Easy Carrot Cake

Best Ever Carrot Cake

Chelsea Sugar’s Best Ever Carrot Cake

Carrot cake is a delicious winter cake. It’s a great way to use up those extra carrots (while they’re cheap and plentiful) and get some warmly sweet spiced cake into lunchboxes or afternoon tea. My inspiration for the recipe is this Best Ever Carrot Cake which I’ve amended to add in some different micro-nutrients; also, swapping from nuts to seeds makes it suitable for childcare and schools with no-nut policies.

Carrot cake with seeds and ancient grains

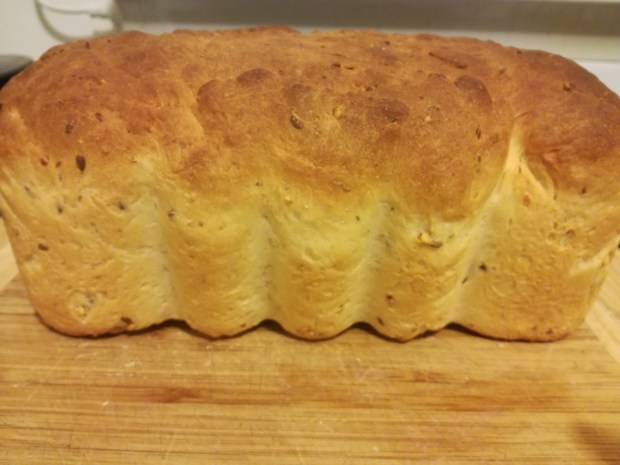
Delicious carrot cake with seeds and ancient grains.

Ingredients

  • 1 1/2 cup plain flour
  • 1 tsp baking powder
  • 1 tsp baking soda
  • 1 1/2 tsp ground cinnamon
  • 1/2 tsp ground ginger
  • pinch Allspice
  • 3/4 cup brown sugar or raw coconut sugar
  • 200g grated carrot
  • ½ cup sultanas or raisins
  • 2 tsp ground chia seeds
  • 3 – 4 Tbsp Hubbards Seeds and Ancient Grains Toppers
    • or, a mix (as desired) of coconut thread, linseed, pumpkin seeds, sunflower seeds, buckwheat, puffed quinoa.
  • 3 large eggs
  • 1 cup rice bran oil or canola oil
  • 1 tsp vanilla essence

Allergies: dairy free, soy free, nut free.

Directions

  1. Pre-heat oven to 180°C bake (160°C fan-forced). Grease a 23cm cake tin (6cm deep) and line with baking paper.
  2. Sift all of the dry ingredients into a mixing bowl.
  3. Add carrot, sultanas, ground chia seeds, and coconut + seed mix and stir until combined.
  4. In a separate bowl, whisk eggs, oil and vanilla.
  5. Make a well in the dry ingredients and pour liquid ingredients into the dry ingredients. Mix until just combined.
  6. Pour the cake mixture into the prepared tin and smooth the surface. Bake for 40-50 minutes or until cooked (when a skewer inserted into the centre of the cake comes out clean). Remove from oven, cool for 10 minutes then remove from the cake tin and peel away the paper.
  7. Optional: make cream cheese icing to decorate.


Cream Cheese Icing

  • 50g butter, softened
  • 125g cream cheese, chopped
  • 1½ cups Icing Sugar

Cream Cheese Icing
Beat butter and cream cheese together until combined. Stir in Chelsea Icing Sugar, then beat mixture on high speed until light and fluffy.

Mushroom melt burgers

Mushroom melt burgers

Mushroom melt burgers

Grilled mushrooms with melted cheese make a quick and easy vegetarian meal.

Ingredients

  • Portobello mushrooms (or similar big fleshy mushrooms)
  • Piquant easy-melt cheese (like goat cheese or blue cheese)
  • Fresh salad ingredients (like sliced tomato, grated carrot, baby spinach, lettuce, sliced beetroot, watercress, mungbeans, sliced cucumber).
  • Hamburger bun, brioche bun, gluten-free wrap or bun.

Cheese

If goat cheese seems too…well, goaty, consider a goat-buffalo cheese blend. Similarly, if blue cheese seems too strong consider a creamy mild blue cheese. Alternatively, use a strong tasty or colby cheese + grated parmesan and mozzarella!

For dairy free / soy free / vegan cheese consider: Daiya or Angel Food

Burger buns

If allergies aren’t an issue, there a range of burger buns to choose from, or go up-scale and use a brioche bun. For gluten-free (or soy free) then you may want to use a gluten free bun or wrap. You can also skip the bun (and substitute rice or beans) and tell your child (or yourself) that you’re simply having a super fancy ‘deconstructed’ burger.

Allergies: gluten free*, dairy free*, soy free, egg free, nut free.

Directions

  1. Prepare your salad ingredients.
  2. Grill the mushrooms and cheese.
  3. Assemble your burger. Add dressings (like sauces and mustard) if desired.

How to make an easy and cheap instrument at playgroup (Musical Maracas)

Making musical maracas

Making musical maracas

Making musical maracas

Making musical maracas

What you need

  • Paper plates (small).
  • Felts, crayons, paint, stickers etc.
  • Wooden beads, sea shells, bells etc.
  • Stapler.

Directions

  1. Help your children to decorate the outside of the plates (don’t forget to write their names on!).
  2. Fold the plate in half (like an empanada) and staple along the edges. Leave a gap at the top.
  3. Hold it upright with the gap at the top. Help your children to drop beads, bells, shells etc. inside their musical instrument; one big toddler sized handful will be about enough.
  4. Staple up the gap, put on some music, and shake!

Note: This is a great activity to do on a rainy day or with a playgroup. For younger toddlers choose larger items to put inside and play with under supervision only; i.e. keep choking hazards in mind.

Baked Chicken & Peaches

Baked Chicken and Peaches.jpg

Baked Chicken and Peaches

This is a great dish to make in summer when fresh peaches are cheap; I made it recently on a dark Autumn day with the skies full of rain – tinned peaches work just as well and bring a bright note to the day!

It takes very little time too mix up and put in the oven; combine it with some vegetables and instant mashed potatoes for a quick meal that is also toddler / child friendly!

(FYI I buy plain potato flakes from a bulk buy store rather than buying boxed instant mashed potato from the supermarket.)

Ingredients

  • 2 chicken breasts (boned & skinned)
  • 1/3c brown sugar
  • 1 peach / 1/3 of a 400g tin of peaches
  • 2 pinches of ground ginger
  • 1 pinch allspice or ground cloves
  • 1/2T lemon juice

Optional

  • Superfine white rice flour or cornflour (corn starch) to make gravy.
  • Potato flakes + boiling water + rice bran oil + salt + almond milk to make mashed potatoes.
  • Broccoli.

Allergies: gluten free, dairy free, soy free, egg free, nut free.

Note: The recipe will also work well for larger amounts just double or triple the ingredients based on the number of chicken breasts you are cooking.

Directions

  1. Take a pyrex baking dish and put in the brown sugar.
  2. Put in the chicken breasts (turning them to coat them in sugar).
  3. Lay slices of peaches over the chicken breasts.
  4. Sprinkle the ground ginger, allspice, and lemon juice over the chicken and peaches.
  5. Bake in a preheated oven at 180’C for approx. 30 minutes. Baste regularly with the chicken juices. Cover in tinfoil if needed.
  6. Optional: After removing the chicken and peaches, whisk in some superfine white rice flour (or cornflour) to make a sweet gravy.
  7. Optional: Serve with steamed broccoli, mashed potatoes, and gravy.

Making a drawstring bag


Making a drawstring bag

Making a drawstring bag for marbles

Making a drawstring bag is a fun and easy project to do with kids! I still remember the soft nubby green cloth of the drawstring bag of marbles my brother and I shared as kids. I wanted to make something similar for Miss 3 and gaining access to a sewing machine at kindy seemed like a great opportunity.

There is an easy project to follow in this book by Jane Bull, My Sewing Machine. I didn’t think to look so I actually designed my own project for this bag. My daughter’s sensory sensitivities mean she doesn’t like being in the same room as the sewing machine when it’s operating but she likes looking at the sewing book and she liked helping me with the pattern, cutting, and pinning.

Making a drawstring bag (for marbles)

Materials

  • Paper, sellotape, pencil
  • Fabric
  • Cord or ribbon
  • Ruler
  • Pins
  • Chalk / fabric pencil
  • Scissors (paper, fabric, pinking)
  • Safety pin

Tip: Shop around to find good prices for fabric. Sometimes you’ll find fabric in unexpected places – I bought a giant polyester fleece blanket for NZD$3 / USD$2. It was perfect for making a drawstring bag for marbles (though I wouldn’t use it to make a dress).

Design

I made up a design template using paper, scissors sellotape, and pencil. I could see there were two different ways of approaching the bag and decided to have the fold at the bottom and seams up the sides; this results in the cord being on on two sides (instead of one) which I thought would be easier for Little Miss.

Making a paper template

Making a paper template for the drawstring bag

Once I’d worked out the design, and order of sewing seams, I transferred the template into the fabric. My fabric pencil didn’t work on the fleece but chalk did 🙂

Fabric cut and pinned for the drawstring bag

Fabric cut and pinned

I kept my seams about 1.5cm from the edges, allowed plenty of space for the cord, and made sure the fabric was ‘wrong side’ facing out (not as important with this fleece but good practice).

Sewing the bag

I made sure the threads were all set up and then my sewing order was:

  1. Sew short end (for cord).
  2. Sew other short end (for cord).
  3. Loop silky cord through safety pin. Miss 3 loved helping wriggle the silver fish (safety pin) through the ‘tunnel’. We did that on both sides and then I tied the loose ends.
  4. Sew each of the long sides. I started with a curve at the bottom and then went up to the drawstring (enough to just go over that seam but not go over the cord). Then I turned the fabric around and did a small zig-zag back to reinforce.
  5. The nice thing with this fabric is that I didn’t need to hem or worry about fraying like I werewolf with cotton. I did use the pinking shears to cut the bottom corners off (being careful of the curved corners I’d stitched).

    Drawstring bag sewn (wrong side facing out)

    Inside the bag

  6. Turn bag right side out!

    How to make a drawstring bag!

    Drawstring bag for marbles

Bag of marbles

Next week we can go on a treasure hunt expedition to buy marbles for the bag we made!

Learning to sew

A step by step beginner's guide to sewing

A step by step beginner’s guide to sewing

I recently gained access to a sewing machine. My previous experiences were the 10 lessons we did as a class, decades ago, when I was in Intermediate School. My Nana was a dressmaker and money is tight so I’d love to learn a new skill.

I decided my best approach, since I don’t have a mentor, was to look through the local library. I found a brilliant book by Jane Bull, My Sewing Machine. It’s a step-by-step guide for beginners, ostensibly for 8-12 year olds since it was in the children’s section, with lots of photos and easy projects. It explains the different parts of the sewing machine and how to thread it.

Setting up the sewing machine probably seems really simple if you’re familiar with one but it’s not intuitive for me. There are a lot of steps, compared to hand sewing, and forgetting one of them leads to catastrophe! (Not really, but it can cause a lot of frustration as the needle just tattoos holes in the fabric or the threads turn into a tangled cat’s ball).

The sewing machine is located at our lovely new kindy. I had a pair of fascinated 4 year olds avidly watching my every step (no pressure!). It’s actually a nice learning experience for the kids being able to talk to them about how I don’t know how to use it and that we can work it out together. It’s not just about teaching them how to sew, it’s teaching them the process of learning. I’m talking with them about going to the library, following the instructions in the book, and asking for help when I can’t work out something myself.

Thankfully, one of the student teachers is a sewer; I’ve been able to run to her for help a few times when everything’s turned to custard!

How to make a vegan chocolate spread that is allergy free and tastes amazing!

Chocolate Buttercream Frosting

Chocolate Buttercream Frosting. I use Nuttelex + coconut milk to make a vegan, allergy free frosting that tastes amazing!

If you have a child with food allergies then you may find it difficult to source safe versions of products like Nutella. Alternatively, you may have a child attending a nut free kindergarten or school in which case Nutella isn’t permitted (as it contains hazelnuts). If you want to use a treat spread, for school lunches or parties, then this recipe will help you make your own!

Ingredients

  • 115g allergy friendly spread like Nuttelex (buttery taste)
  • 2 cups icing sugar
  • 1/2 cup Dutch Cocoa Powder
  • 1/2 tsp vanilla essence
  • 1 – 5 Tbsp  coconut milk

Allergies: gluten free, dairy free*, soy free, egg free, nut free. Vegan*.

Directions

  1. Whip the Nuttelex.
    • I like to use the food processsor (with a plastic beating tool rather than the metal cutting one).
  2. Sift in the cup icing sugar, and cocoa powder. Add the vanilla and 2 Tbsp milk.
  3. Beat until smooth.
    • I like to pulse it slowly in the food processor.
  4. Mix in more coconut milk, 1 Tbsp at a time, until you have a good thick smooth consistency.
  5. Store in an airtight container in the fridge.

Everything you wanted to know about baking bread & rolls!

I stumbled upon a fabulous repository of information at the Robin Hood Baking Centre; apart from a wee bit of product placement all of their information is well presented with helpful photos. I’ve altered the order of information so that there’s a more logical grouping and flow to it 🙂

ADDING FLOUR

Adding Flour

People often add too much flour to dough, and this makes the finished product heavy and dense. Hold back about 1 cup (250 mL) of flour, then add it gradually until you get the desired texture. Add as little flour as possible to the kneading surface. Use a pastry scraper as you knead the dough to pick up any bits that stick to the surface. The dough should still be slightly sticky when fully kneaded— it may be a little harder to work but will give you the desired results.

CHOOSING FLOUR

Choosing Flour

It’s best to use flour specially formulated for baking bread, like Robin Hood® Best for Bread flours. It will help you make delicious breads that are high in volume with a light, even texture.
At the minimum, you want High Grade Flour (not plain flour). You may also find flours that are called ‘Strong Flour’ or which say that they have extra gluten added for breadmaking.

ADDING SALT

Adding Salt

Salt enhances taste, and helps bring out the flavours and aromas of the ingredients in your baked goods. Salt will help with tightening the gluten structure, which strengthens the bread dough, and helps with the volume of the bread in the end.

ADDING SUGAR

Adding Sugar

Yeast feeds on sugar, which causes it to activate and produce carbon dioxide gas. Be sure to follow the recipe, as adding too much sugar can slow down your yeast or keep it from activating.

BAKING WITH YEAST

Baking with Yeast

When using active dry yeast, it’s important to make sure it’s still viable. Always follow the recipe directions, which will include dissolving a specified amount of sugar into lukewarm water (110ºF-115ºF/45ºC-56ºC). Then add the yeast and allow it to stand for 10 minutes. If the yeast bubbles up, it’s still active. If not, your bread or rolls will not rise.

Be sure the water is lukewarm. If the water exceeds 138°F (59°C), the yeast will become inactive.

KNEADING BREAD DOUGH

Kneading Bread Dough

Kneading helps to develop gluten in the bread. Knead dough on a lightly floured work surface, adding more flour if dough is too sticky.

You’ll know kneading is complete when the bread is smooth and elastic. To test it, lightly slap the dough. If your hand comes away clean, it’s ready to rise.

RISING

First Rising
When you let the dough rise, the ingredients activate and carbon dioxide develops causing the gluten to stretch. It will rise best in a warm place (75°F-85°F / 24°C-29°C) that is free from drafts. Make sure you place it in a greased bowl that’s large enough to allow the dough to double in size. Cover the bowl with a tea towel.Once it’s doubled in size and no longer springs back when pressed, lightly punch down the dough and let it rest for 10 minutes to relax the gluten.

Second Rising
Once your dough is placed in or on its pan, it’s ready to rise again in a warm place (75°F-85°F / 24°C-29°C). Let your dough rise until it is again double in size.

If dough overrises, it may collapse in the oven during baking.

If you don’t have a place in your home that’s warm enough, try leaving it in the oven with the oven light turned on. If you like, you can also add a pot of hot water on another rack.

Letting the dough rise twice helps improve the flavour and texture even more.

RISING BREAD DOUGH IN THE REFRIGERATOR

Rising Bread Dough in the Refrigerator

Just finished making your bread dough but need to step away? Place your dough in the refrigerator for the first rising. This slows down the rising as yeast doesn’t like the cold. You can let the dough sit in the refrigerator overnight.

When you’re ready to make the bread, take the dough out of the refrigerator, punch it down, shape the dough and let it rise a second time. Since the dough is cold, it will take longer than normal to rise.

SHAPING A LOAF

Shaping a Loaf

To eliminate large air bubbles, roll out your dough into a large rectangle (approx. 9” x 12” / 23cm x 30cm). From the shorter end, roll it up jelly-roll style, sealing the dough in the middle with the heel of your hand after each turn.

For a different look, bake your loaves free-form on a baking sheet that’s greased or sprinkled with cornmeal. Cornmeal will prevent bread from sticking and provide an interesting texture to the bread.

DIVIDING DOUGH

Dividing dough

Use a sharp knife or kitchen shears when a recipe calls for dividing the dough in half or making into rolls. If you tear the dough it may compromise the gluten, which will affect the rising and shape of the end product.

FREEZING BREAD DOUGH

Freezing Bread Dough

Love homemade bread but don’t want to have to make the dough all the time? Plan ahead and freeze some dough. Use your favourite bread dough recipe but double the amount of yeast called for. Follow the recipe for the mixing, kneading and the first rising. Punch down the dough, shape into loaves that are 2” (5 cm) thick (this allows for quicker thawing). Place in air tight freezer bag and freeze for up to four weeks.

When you’re ready to bake, remove the dough from freezer bag, place it in a greased loaf pan, and cover with greased plastic wrap. The dough will rise as it defrosts. Once thawed, follow your recipe’s baking directions.

GLAZING BREADS

Glazing Breads

Glazes may be used to provide different results in the bread crust. For a crisp crust, brush the dough with a mixture of one egg white and ½ tsp (2 mL) water. For a shiny, golden crust, use a whole egg beaten with 1 tsp (5 mL) water. If you’d like a deep brown crust, use egg yolks instead of egg whites. If you brush the dough with melted butter or oil, it will produce a soft velvety crust.

If you want to top your bread with nuts, seeds or grains, make sure to brush the dough with the glaze first, so it acts like a glue.

CRUSTS – FROM SOFT TO CRISP

Crusts – From Soft to Crisp

Dough that is made with water will typically have a crispier crust, while dough made with milk will be softer.

To soften a crisp crust, brush it with melted butter as soon as it comes out of the oven.

For a darker, richer colour, brush the finished loaves lightly with butter and return them to the oven for 5 to 10 minutes.

HOW DO I GET A CRISP BAGUETTE TYPE CRUST

How Do I Get a Crisp Baguette Type Crust

To get a crisp baguette type crust, you have to create a steam environment in your oven. Using a spray bottle, spray water on the sides of the oven every 10 minutes while the bread is baking. You can also put a pan of boiling water on the bottom rack of the oven under the bread.

VERSATILITY OF BREAD DOUGH

Versatility of Bread Dough

Take your favourite bread dough and change it up by adding nuts, cheese, dried fruit or chopped chocolate. To make a savory dinner bread, you can also add chopped garlic and herbs.

PREPARING YOUR PAN

Preparing Your Pan

Use shortening or oil, like Crisco®, butter, or non-stick spray to grease the pan.

BAKING WITH PROPER HEAT DISTRIBUTION

Baking with Proper Heat Distribution

Unless the recipe says otherwise, always bake your bread on a lower rack.

If you’re baking more than one pan, be sure they are not touching one another or any sides of the oven. You want the air to circulate between them so they cook evenly.

If your crust is becoming too brown too quickly, cover it loosely with aluminum foil.

HOW DO I KNOW WHEN MY BREAD IS BAKED?

How Do I Know When My Bread Is Baked?

Similar to checking the doneness of other baked goods, you can insert a skewer or cake tester into middle of bread. If it comes out clean, it is ready. An instant read thermometer is a very reliable way to check as well. Insert the thermometer in the center of the loaf – if the temperature has reached 190°F/88°C, it is ready.

COOLING BAKED BREAD

Cooling Baked Bread

Remove the baked bread from the pan immediately and place on a wire cooling rack to cool. This allows the air to circulate and prevents the crust from becoming soggy.

WHY IS MY BREAD TOO SMALL?

Why is My Bread Too Small?

Make sure your oven is at the right temperature. If it’s too hot, the bread may bake too quickly, causing a crust to form before the bread is finished rising in the oven.

Also make sure that your bread dough isn’t too cold. Make sure your bread dough has risen in a warm place (between 75°to 85°F/24° to 29°C).

When baking, leave a space between your pans so they are not touching in the oven, allowing for proper air circulation.

WHY IS MY BREAD COARSE AND CRUMBLY?

Why is My Bread Coarse and Crumbly?

If your bread is coarse and crumbly, you may have let your dough over rise or you may have over kneaded the dough. Make sure you follow the recipe directions and allow the dough to rise just until it is double in size – this should take about 1 hour. Knead your dough for the specified time only.

STORING BREAD

Storing Bread

To keep your crust crisp, store your bread in a paper bag at room temperature. It should be good for up to two days. If storing bread at room temperature, avoid storing it in plastic wrap unless you want an especially soft crust.

Bread is best stored at room temperature or frozen. Refrigeration tends to dry out bread.

FREEZING BREAD

Freezing Bread

Bread freezes really well. To freeze, allow your loaf to cool completely, wrap well with plastic wrap, then place in a freezer bag. Be sure to remove all the air or ice crystals will form while freezing.

Thaw at room temperature in the freezer bag to allow the bread to re-absorb the moisture lost during the freezing process.

To freshen your loaf, place it in a 350°F (180°C) oven for 10-15 minutes.

What foods contain soy?

Soy beans (edamame)

Soy beans (edamame) are an obvious form of soy; you will be surprised how many of the foods you eat are hiding soy!

Is soy really hiding in everything I eat?

You may be surprised how many of the foods you eat each day contain hidden soy. I’ve written previously about  soybean oil (normally called vegetable oil) and soy lecithin. These are incredibly widely used in the international food industry because they are cheap, grown year round, and are not FDA regulated (i.e. these do not have to be declared as an allergen on packaging). These are often hidden in compound ingredients, as are other products that may be soy derived. I have to check ingredients every single time I buy something (even if I’ve bought it before). I don’t buy anything containing oil or emulsifiers unless those are 100% declared and identifiable (i.e. canola oil and sunflower lecithin). 

I also have to be careful about bathroom products because glyercin can be soy derived. I’ve changed our bathroom to natural products like shampoo bars and chemical free soap products.

What foods contain soy?

I’ve tried to keep the table below to ingredients. The reality is that these ingredients can be in anything other than raw fruit, most raw vegetables, and most unprocessed raw meats. Soy can be present in anything else including bread, biscuits, crackers, dried fruit (i.e. sultanas have oil added), deli meats, bacon, sausages, peanut butter, spreadable butter, margarine, spice mixes; I’ve even looked at tins of ‘beans in springwater’ which have had soy!

I’ve inserted the table it as a photo so that it’s possible to save the image to your phone or print it for your wallet.

Ingredients that may contain SOY

Ingredients that may contain SOY

Note: Also miso (as a soup or paste)!

How to save money and freshen clothes naturally! Pre-soaking laundry using baking soda.

Replace chemical cleaners with a natural and cheap laundry soaking solution!

Replace chemical cleaners with a natural and cheap laundry soaking solution!

Miss 2 has really sensitive skin (and eczema) which means that I’ve needed to look around for non-chemical options for the laundry pre-soak bucket. Funnily enough, sometimes it’s the mid-range brands of ‘Oxygenated Whiteners’ or ‘Nappy Soakers’, which claim to be environmentally friendly and ‘natural’, which cause her to react more. Of course they’re still packed with chemicals and I know it’s just a marketing ploy but it’s easy to want to believe them!

Turns out all I needed was a 1/2 cup baking soda (bicarbonate of soda) dissolved in warm water (a couple of litres half fills my soak bucket). It helps to freshen and soak laundry (and keep it smell free) before it goes in the washing machine.

Tip: Rinse laundry first and handscrub any stubborn stains. Create a paste using four tablespoons of baking soda and ¼ cup of water. After working the paste thoroughly into the stains, apply a little undiluted vinegar.

Tip: Don’t add white vinegar to the soak bucket. Baking soda (base) + white vinegar (acid) will largely cancel each other out and reduce effectiveness. Instead, add white vinegar during the rinse cycle (instead of fabric softener or an anti-bacterial agent) and line dry in the sun if you can.  Vinegar will help to soften hard water, reduce odours, and reduce bugs. Sunlight will also help (especially if you’re washing cloth nappies!)