KiwiCo Review: Kiwi Crate for 5-8 year olds – Learn About Time

WHAT IS IN THE MARBLE TIMER BOX?

This box encourages children to think about time. It explores the history of timekeeping leading up to our current international system of time zones and modern timekeeping devices.

Kiwi Crate’s Marble Timer box comes with materials for two crafts:

DESIGN A MARBLE RUN (and TIMER!)

Marble Runs are just generally fun! This one has a push-bar built in so that when the first marble reaches the bottom it triggers the second marble dropping. To extend the fun, the pre-cut backboard allows the wooden ‘shelves’ to be placed in different configurations. Children can experiment with engineering different drops and angles to see how this impacts the time taken for all the marbles to reach the bottom.

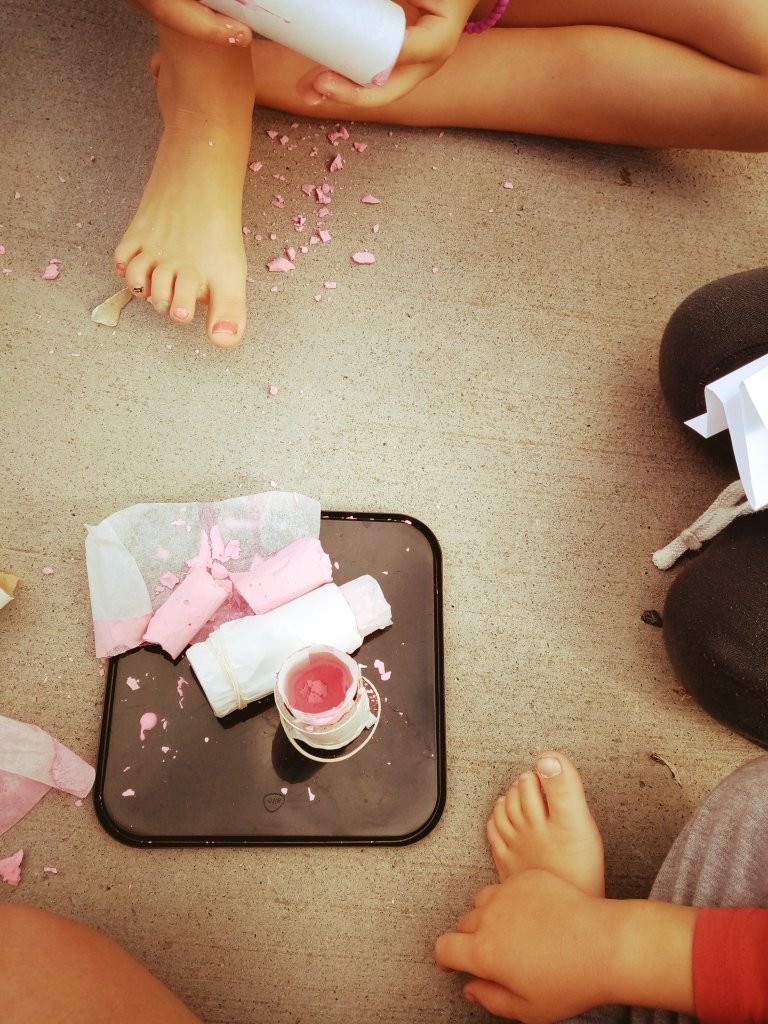
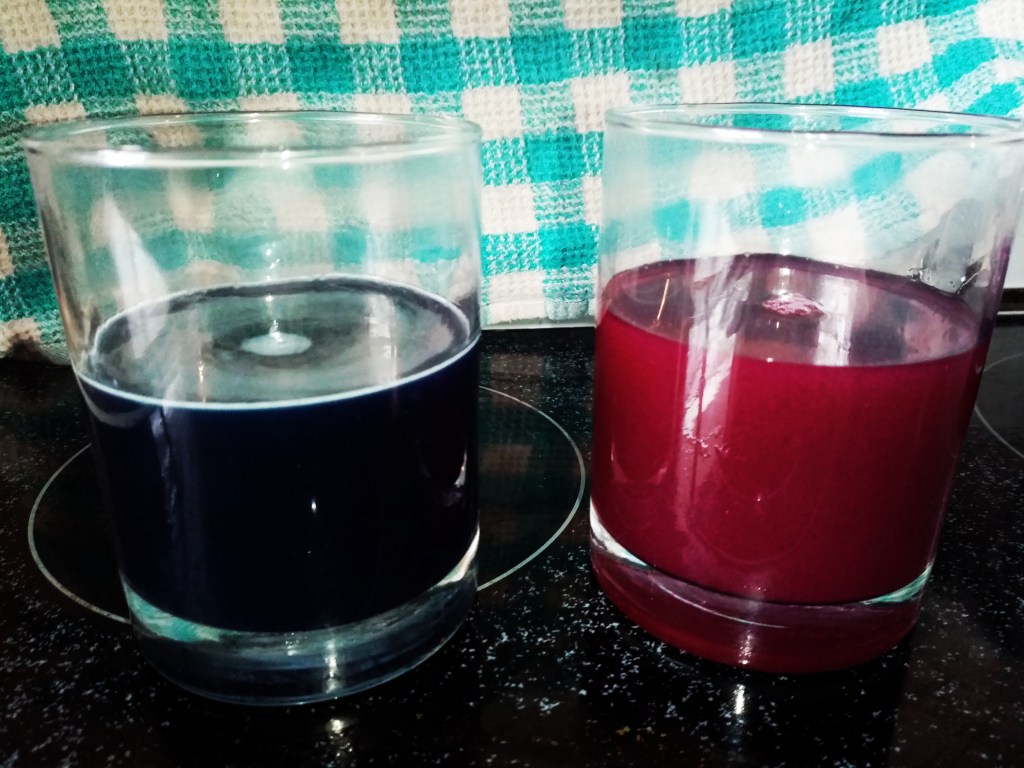
CREATE DIP-DYE WOOD ART

These make beautiful ornaments that can be used for anything from bookmarks to Christmas Tree decorations. There are three pieces of carved wood for you to create unique art with. You’re provided with everything you need, including plastic cups, clips, and liquid colours. We also used our dipper from the KiwiCo Surface Tension box.

Children can experiment with the dipping process to see how time impacts the intensity of the colour and how double dipping can create new blended colours (such as: blue + yellow = green).

We loved this so much that we plan to repeat this at other times of the year, by buying plain seasonal wooden ornaments (i.e. at Christmas or Easter), to craft something that is truly unique.

HOW DO I ORDER KIWI CRATE?

This is not a paid review. I spent a lot of time searching the internet to find out more information about the Kiwi Crate and Atlas Crate boxes before deciding to try them and found the blog posts / photos that people shared were really useful!

If you would like to try Kiwi Crate (or one of their other lines), you can receive 50% off your first box by clicking here.

What I like about the Kiwi Crate kits is that they use a combination of Science, Technology, Engineering, Arts, and Mathematics to explore a concept or idea. There’s no obligation to sign-up in an on-going capacity so it’s easy to tie them in with birthdays / Christmas; the boxes are quite compact so they also store easily in a cupboard for bringing them out on a rainy day. Mind you, this only works if you spot the package on the door-step first – children become quite adept at recognising the green Kiwi Crate box and screaming with delight at it’s arrival!

The boxes are sent randomly so there’s no way to know what will come in the future; however, you can log-in to your account at the start of each month to see what box has been selected. Your box history is kept which means that even if you cancel and then pick-up again the following year they can make sure that you aren’t sent repeats of boxes.

WHAT IS IN A KIWI CRATE?

The Kiwi Crate is aimed at ages 5-8 years. It comes with a copy of the Explore magazine which opens with a fun comic about Steve the Kiwi and his friends. [As a side note, these are made by an American company despite the use of our New Zealand native bird]. These comics are really approachable for younger kids and a great way of exploring the concepts being introduced in a relateable manner.

The Explore magazine provides a range of information on the topic, it might include some simple games or tricks to try at home, and provide ideas for additional crafts / activities using simple materials. It also has a sticker [unique to each box theme] to put on your Kiwi Crate chart.

The box also includes an instruction manual and the materials that you need to build the main craft. Generally, there are two activities to do – one that is more art related, and one that is more mechanical engineering. What makes the kits special, is how well crafted the engineering components are. They really are designed for the intended age group so that they can either build themselves or help assist an adult. There are handy visual images and checkpoints to make sure that things are aligned correctly. There is no super-bonding-fingers-together wood glue to use with these projects (which makes them great for highly sensory children); instead parts come with double sided tape finely engineered on so that you just need to remove the backing strip of paper.

Interested in more homeschool box reviews?

Discover the World with ATLAS Crate

#1 Introducing the World

#2 Discover Japan

#3 Discover France

#4 Discover Madagascar

#5 Discover Colombia

#6 Discover England

#7 Discover Nepal

#8 Discover Guatemala

#9 Discover Greece

Explore STEM with Kiwi Crate

#1 Arcade Box (and the Claw!)

#2 The Amazing Animation Box (make your own 19th century movie with a Zoetrope!)

#3 The Mechanical Sweeper Box (make your own baleen whale!)

#4 The Disc Launchers Box (play games with physics!)

#5 Kaleidoscope Puzzles (explore symmetry and mirrors!)

#6 The Human Body

#7 The Science of Tension

#8 All about Surface Tension

#9 Learn about Stars and Constellations

Advertisement

How to make butter at home!

This is fun activity to do with the kids that requires no electricity or fancy gadgets – just a little patience!

Ingredients

  • Cream
  • Glass jar with lid

In New Zealand, you just need standard supermarket cream; in countries where cream is differentiated by milkfat, you want heavy cream.

Optional: You can add extras to your butter once it is made. Consider: salt; honey; a garlic herb mix; brown sugar and cinnamon; finely chopped lavender petals and honey.

Directions

  1. Half full your glass jar with cream and put on the lid (tightly).
  2. Start shaking!
  3. Phase 1 – you’ll hear a sloshing sound as the cream moves around. Phase 2 – silence…you have whipped cream thickly coating the glass. Phase 3 – the glass begins to clear and the sloshing sound begins to return. Phase 4 – you clearly have a ball of butter in the middle sitting in thin white liquid (buttermilk).
    • Note: the timing for this is impacted by the weather! This activity is made more difficult by very hot and by very cold weather.
  4. Pop the jar in the fridge for an hour or so to set.
  5. Drain the buttermilk (you can drink or use it for cooking).
  6. Pour cool water in the jar and give it a shake. You will need to wash the butter several times until the water remains clear. This helps to remove the buttermilk and casein traces that will otherwise go rancid.
  7. Tip the butter onto a dish (or bowl) and press with the back of a wooden spoon (or even a metal fork). This will help to bring out the water which needs to be drained off.
  8. Now your butter is ready to have any desired salt or flavours added.
  9. Butter will keep best in the fridge (wrapped or sealed).

KiwiCo Review: Kiwi Crate for 5-8 year olds – Learn about the Night Sky (Stars + Constellations!)

WHAT IS IN THE NIGHT SKY BOX?

This box encourages children to explore the night sky using both science and their imaginations. They learn about the science of stars (and build a solar spinner) and how to imagine a night sky full of stories (drawing dot-to-dot constellations and making a constellation lantern). There are also instructions on how to turn your Kiwi Crate into a solar oven – which we have successfully done 🙂

Kiwi Crate’s Night Sky box comes with materials for two crafts:

BUILD A SOLAR SPINNER

The Solar Spinner lets you build a mechanical model to demonstrate the way the Earth moves around the sun, and the Moon moves around the Earth. It’s also a useful model to use for discussing the changing phases of the moon.

MAKE YOUR OWN CONSTELLATION LANTERN

This easy to build lantern lets you copy (or design your own) star constellations using star stickers over lantern paper. The candle provided is battery powered and has a flickering effect for added cosiness!

Want more ideas for learning about stars and constellations?

We love the book Space Atlas by Tom Jackson and it forms part of our homeschool library.

You could download a free Exploring the Night Sky activity pack from Twinkl which includes learning about moon phases, making a solar system mobile, and finding out more about constellations. They also have star spotting constellation checklists for both the Northern Hemisphere and Southern Hemisphere.

Learn more about why the moon appears to change with a child friendly video (@ SciShow Kids) or diagram (@NatGeo Kids) about moon phases. You can also experiment with moon phases at home with just a few simple materials.

Try making a solar oven and cooking s’mores or melting cheese on corn chips.

HOW DO I ORDER KIWI CRATE?

This is not a paid review. I spent a lot of time searching the internet to find out more information about the Kiwi Crate and Atlas Crate boxes before deciding to try them and found the blog posts / photos that people shared were really useful!

If you would like to try Kiwi Crate (or one of their other lines), you can receive 50% off your first box by clicking here.

What I like about the Kiwi Crate kits is that they use a combination of Science, Technology, Engineering, Arts, and Mathematics to explore a concept or idea. There’s no obligation to sign-up in an on-going capacity so it’s easy to tie them in with birthdays / Christmas; the boxes are quite compact so they also store easily in a cupboard for bringing them out on a rainy day. Mind you, this only works if you spot the package on the door-step first – children become quite adept at recognising the green Kiwi Crate box and screaming with delight at it’s arrival!

The boxes are sent randomly so there’s no way to know what will come in the future; however, you can log-in to your account at the start of each month to see what box has been selected. Your box history is kept which means that even if you cancel and then pick-up again the following year they can make sure that you aren’t sent repeats of boxes.

WHAT IS IN A KIWI CRATE?

The Kiwi Crate is aimed at ages 5-8 years. It comes with a copy of the Explore magazine which opens with a fun comic about Steve the Kiwi and his friends. [As a side note, these are made by an American company despite the use of our New Zealand native bird]. These comics are really approachable for younger kids and a great way of exploring the concepts being introduced in a relateable manner.

The Explore magazine provides a range of information on the topic, it might include some simple games or tricks to try at home, and provide ideas for additional crafts / activities using simple materials. It also has a sticker [unique to each box theme] to put on your Kiwi Crate chart.

The box also includes an instruction manual and the materials that you need to build the main craft. Generally, there are two activities to do – one that is more art related, and one that is more mechanical engineering. What makes the kits special, is how well crafted the engineering components are. They really are designed for the intended age group so that they can either build themselves or help assist an adult. There are handy visual images and checkpoints to make sure that things are aligned correctly. There is no super-bonding-fingers-together wood glue to use with these projects (which makes them great for highly sensory children); instead parts come with double sided tape finely engineered on so that you just need to remove the backing strip of paper.

INTERESTED IN MORE HOMESCHOOL BOX REVIEWS?

Discover the World with ATLAS Crate

#1 Introducing the World

#2 Discover Japan

#3 Discover France

#4 Discover Madagascar

#5 Discover Colombia

#6 Discover England

Explore STEM with Kiwi Crate

#1 Arcade Box (and the Claw!)

#2 The Amazing Animation Box (make your own 19th century movie with a Zoetrope!)

#3 The Mechanical Sweeper Box (make your own baleen whale!)

#4 The Disc Launchers Box (play games with physics!)

#5 Kaleidoscope Puzzles (explore symmetry and mirrors!)

#6 The Human Body (learn about biology)

#7 The Science of Tension (make push and pull toys)

#8 Learn about Surface Tension (experiment with water)

KiwiCo Review: Kiwi Crate for 5-8 year olds – Learn about Surface Tension

WHAT IS IN THE SURFACE TENSION BOX?

We recently learned about force and tension in the Kiwi Crate Push and Pull box. This time we learn about a different type of tension – surface tension! Ever wonder why water soaks into some materials but pools on top of others? Well, water droplets are pretty sticky and they most like to stick to each other – especially on a surface like wax paper that is water resistant. That ‘stickiness’ is also at it’s strongest on the surface – which is why insects like water striders can delicately move across it.

Kiwi Crate’s Surface Tension box comes with materials for four experiments:

BUILD A BLOB

Liquid watercolours in primary colours are provided along with water resistant wax paper and a stirring stick. When you squeeze the watercolours onto the wax paper, instead of dissolving into the paper – they sit on top and make blobs! You can make small blobs, big blobs, and baby blobs. You can move blobs by herding them with your stick. You can merge blobs and watch the colours change to orange, green, purple, or ‘muddy mix’. The fun science magazine comes with kid friendly infographics to explain why when you drag one water droplet, its friends want to stick together and come along.

MAKE A WATER MAZE

This activity reminded me a little of wooden mazes and steel ball bearings that we played with as kids – twisting, turning, and tilting, to try and guide the ball to the centre of the maze. This brings a whole new level to the game while teaching us about science. The maze that you build combines water absorbent walls with a water resistant floor. It is a fun challenge and the secret is definitely patience (and slow movements!).

MAKE A WATER ELEVATOR

So, when we were learning about (cable) tension, we built a toy elevator. This time, we’re kind of making an elevator for water and it works because of that principle of water being ‘sticky’. Cool Science Experiments have a great visual demonstration; KiwiCo simplify things by providing a kid friendly kit. We have tested this with friends and it’s a ‘magic trick’ that does not fail to entertain and amaze! It is important that you remember to soak the yarn (water follows water) and that you keep a careful eye on tension + pour speed. Have some towels handy just in case you need to mop up spills.

MAKE YOUR OWN WATER STRIDER

I shared a video at the start of the post about water striders – excitingly, you get to make your own! You get a bunch of wires that you can crimp and then use to make a water strider. You can also experiment with making shapes to float on the top of the water. What gets a bit tricky, is that your insect’s legs and feet need to be balanced on the surface; if the angles are not quite right then they will pierce the surface tension and potentially drag part of your insect under the water. If you’re struggling a big with the water strider, try using the dipper to gently place a needle or paper clip on the surface.

Want more ideas for learning about surface tension?

Did you know that soap impacts surface tension? You could explore this with Nanogirl as to why soap makes a super shield, or you could try the rainbow swirl magic milk experiment.

HOW DO I ORDER KIWI CRATE?

This is not a paid review. I spent a lot of time searching the internet to find out more information about the Kiwi Crate and Atlas Crate boxes before deciding to try them and found the blog posts / photos that people shared were really useful!

If you would like to try Kiwi Crate (or one of their other lines), you can receive 50% off your first box by clicking here.

What I like about the Kiwi Crate kits is that they use a combination of Science, Technology, Engineering, Arts, and Mathematics to explore a concept or idea. There’s no obligation to sign-up in an on-going capacity so it’s easy to tie them in with birthdays / Christmas; the boxes are quite compact so they also store easily in a cupboard for bringing them out on a rainy day. Mind you, this only works if you spot the package on the door-step first – children become quite adept at recognising the green Kiwi Crate box and screaming with delight at it’s arrival!

The boxes are sent randomly so there’s no way to know what will come in the future; however, you can log-in to your account at the start of each month to see what box has been selected. Your box history is kept which means that even if you cancel and then pick-up again the following year they can make sure that you aren’t sent repeats of boxes.

WHAT IS IN A KIWI CRATE?

The Kiwi Crate is aimed at ages 5-8 years. It comes with a copy of the Explore magazine which opens with a fun comic about Steve the Kiwi and his friends. [As a side note, these are made by an American company despite the use of our New Zealand native bird]. These comics are really approachable for younger kids and a great way of exploring the concepts being introduced in a relateable manner.

The Explore magazine provides a range of information on the topic, it might include some simple games or tricks to try at home, and provide ideas for additional crafts / activities using simple materials. It also has a sticker [unique to each box theme] to put on your Kiwi Crate chart.

The box also includes an instruction manual and the materials that you need to build the main craft. Generally, there are two activities to do – one that is more art related, and one that is more mechanical engineering. What makes the kits special, is how well crafted the engineering components are. They really are designed for the intended age group so that they can either build themselves or help assist an adult. There are handy visual images and checkpoints to make sure that things are aligned correctly. There is no super-bonding-fingers-together wood glue to use with these projects (which makes them great for highly sensory children); instead parts come with double sided tape finely engineered on so that you just need to remove the backing strip of paper.

INTERESTED IN MORE HOMESCHOOL BOX REVIEWS?

Discover the World with ATLAS Crate

#1 Introducing the World

#2 Discover Japan

#3 Discover France

#4 Discover Madagascar

#5 Discover Colombia

#6 Discover England

Explore STEM with Kiwi Crate

#1 Arcade Box (and the Claw!)

#2 The Amazing Animation Box (make your own 19th century movie with a Zoetrope!)

#3 The Mechanical Sweeper Box (make your own baleen whale!)

#4 The Disc Launchers Box (play games with physics!)

#5 Kaleidoscope Puzzles (explore symmetry and mirrors!)

#6 The Human Body (learn about biology)

Science: Learning about tension – How to make a toy elevator

How does an elevator lift work?

In our KiwiCo Kiwi Crate Push and Pull Toys box we learned about force and tension. When we hold a rope loosely so that it rests between us, it is slack. When we pull, that force travels along it and it becomes taut. That is tension at work. That pull force and tension can also be used to make something (or someone) move especially when we add a simple machine – like a pulley. SciShow Kids gives a great visual example of how this works: click here to watch.

An elevator lift relies upon the science of tension so that those vertical cables, a pulley, and counterweights, can create a lift force in order to move people or objects. An elevator lift’s science and internal mechanisms can make for fascinating reading and is more complex then this simple build. This craft is a great place to start for younger kids, and older kids may want to engineer their own more complex designs!

How to make a kids toy elevator lift

Our Kiwi Crate came with this great idea in the Explore magazine!

Materials

  • Sturdy cardboard box
  • Wooden dowel (cut to size)
  • String
  • Pencil, scissors, glue, sellotape, ruler.
  • Decorations

Tip: Where can I get a wooden dowel? Turns out, lots of places! Craft stores and hardware stores are a good place to start. Keep in mind that you’ll want the wooden dowel to be at least the width of your box (with some extra length each side as turning handles).

Instructions

  1. Cut the lid / flaps off the top face of the box. (Save them)
  2. You want to make a small hole for your wooden dowel. Stand your box and choose a short end to be the top of the ‘building’. Choose a ‘side’ of the building and use a ruler to measure about an inch down from the ‘roof’ and make a pencil mark. Use a sharp pencil (or scissors) to carefully push a hole through the cardboard.
  3. Slide the wooden dowel through the hole and use it (as well as your ruler) to help you position a matching hole on the far side of the ‘building’.
  4. To make your ‘elevator’, cut the cardboard that you saved into two strips. Experiment with scoring and folding these, then slide them together to make a rectangle (you’ll need to tape or glue the sides). You will need to trim them to size as if they press too closely against the building walls, friction will slow the elevator’s rise.
  5. Make two holes in the ‘roof’ of the elevator.
  6. Measure and cut your string; you want it about twice as long as your building is high.
  7. Thread string through one hole and tie a knot inside the elevator lift. Take the other end of the string and wrap it around the wooden dowel (acting as a pulley) and then place the end through the roof of the elevator and knot it off.
  8. Make sure your string has equal lengths on each side and then tape the centre of the loop to the dowel.
  9. Have fun decorating your building and elevator 🙂
  10. You are now ready to lift! Simply twist the handles and watch the elevator rise as the string wraps itself around the dowel. Observe how the lift force requires the cable (string) to retain tension in order to operate. Discuss what would happen if the string was too long and stayed like limp spaghetti. What can you lift? Are some things too big or too heavy? Do some shapes wobble and fall off? Is it the right height to transport cars or dinosaurs or dolls where they want to go? What size might you need to reach a floor in a dollhouse, or the top of a coffee table, or the seat of the couch?

KiwiCo Review – Kiwi Crate for 5-8 year olds: Learn about the Science of Tension

WHAT IS IN THE PUSH AND PULL TOYS BOX?

This is a great way of introducing kids to early scientific concepts found in physics – namely, force and tension. We love playing tug of war every evening with our wearable chewable cotton terrycloth band. When we hold it loosely so that it rests between us, it is slack. When we pull, that force travels along it and it becomes taut. That is tension at work. That pull force and tension can also be used to make something (or someone) move.

The first thing that you build with the crate is a simple puppet show. The handy diagrams and kid friendly physics explanations will help you understand that while building and playing with this you are demonstrating the use of levers, force, and tension. There are multiple backgrounds included and you can design your own.

The second activity sees you constructing two racing turtles and weaving their shells. You then experiment with string tension to race your turtles!

The nice thing about the solid wood shell is that if your turtles deteriorate in the future, you can use brightly coloured yarn to turn these into wall art or christmas tree decorations.

Want more ideas for learning about tension?

Get busy in the great outdoors! Go fishing. Play tug of war. Lie in a hammock. Carefully set up a tightrope between trees (low to the ground!). Play tennis. Visit a suspension bridge in your area. Go on a high wire obstacle course. Ride a zipline!

Get busy indoors! Ride an elevator. Play a guitar. Create a toy elevator (coming soon!). Create your own ‘floating structure’.

HOW DO I ORDER KIWI CRATE?

This is not a paid review. I spent a lot of time searching the internet to find out more information about the Kiwi Crate and Atlas Crate boxes before deciding to try them and found the blog posts / photos that people shared were really useful!

If you would like to try Kiwi Crate (or one of their other lines), you can receive 50% off your first box by clicking here.

What I like about the Kiwi Crate kits is that they use a combination of Science, Technology, Engineering, Arts, and Mathematics to explore a concept or idea. There’s no obligation to sign-up in an on-going capacity so it’s easy to tie them in with birthdays / Christmas; the boxes are quite compact so they also store easily in a cupboard for bringing them out on a rainy day. Mind you, this only works if you spot the package on the door-step first – children become quite adept at recognising the green Kiwi Crate box and screaming with delight at it’s arrival!

The boxes are sent randomly so there’s no way to know what will come in the future; however, you can log-in to your account at the start of each month to see what box has been selected. Your box history is kept which means that even if you cancel and then pick-up again the following year they can make sure that you aren’t sent repeats of boxes.

WHAT IS IN A KIWI CRATE?

The Kiwi Crate is aimed at ages 5-8 years. It comes with a copy of the Explore magazine which opens with a fun comic about Steve the Kiwi and his friends. [As a side note, these are made by an American company despite the use of our New Zealand native bird]. These comics are really approachable for younger kids and a great way of exploring the concepts being introduced in a relateable manner.

The Explore magazine provides a range of information on the topic, it might include some simple games or tricks to try at home, and provide ideas for additional crafts / activities using simple materials. It also has a sticker [unique to each box theme] to put on your Kiwi Crate chart.

The box also includes an instruction manual and the materials that you need to build the main craft. Generally, there are two activities to do – one that is more art related, and one that is more mechanical engineering. What makes the kits special, is how well crafted the engineering components are. They really are designed for the intended age group so that they can either build themselves or help assist an adult. There are handy visual images and checkpoints to make sure that things are aligned correctly. There is no super-bonding-fingers-together wood glue to use with these projects (which makes them great for highly sensory children); instead parts come with double sided tape finely engineered on so that you just need to remove the backing strip of paper.

INTERESTED IN MORE HOMESCHOOL BOX REVIEWS?

Discover the World with ATLAS Crate

#1 Introducing the World

#2 Discover Japan

#3 Discover France

#4 Discover Madagascar

#5 Discover Colombia

#6 Discover England

Explore STEM with Kiwi Crate

#1 Arcade Box (and the Claw!)

#2 The Amazing Animation Box (make your own 19th century movie with a Zoetrope!)

#3 The Mechanical Sweeper Box (make your own baleen whale!)

#4 The Disc Launchers Box (play games with physics!)

#5 Kaleidoscope Puzzles (explore symmetry and mirrors!)

#6 The Human Body (learn about biology)

KiwiCo Review: Kiwi Crate for 5-8 year olds – THE HUMAN BODY

WHAT IS IN THE AMAZING ANATOMY BOX?

This is a fabulous hands on box for learning about the human body! There is a giant wall poster that shows multiple systems including: skeletal, nervous, digestive, and muscular.

Make your own x-ray of a broken bone

We loved the ‘magic paper’ that allowed us to explore the skeletal system and make our own x-ray of a broken bone. We started with a clear sheet of plastic that we blu-tak’d to the poster and then carefully applied bones to create the hand and forearm (ulna and radius). We put the sheet of plastic on top of the ‘magic paper’ and placed it in bright sunlight; later (in a dark room), we removed the plastic and admired our x-ray of a break in the radius. Note: There are a range of bones that you can choose from and they can be removed easily so that you can try more projects.

Tip: You can also use the magic paper to create your own experiments! We used black paper to create a Stegosaurus silhouette and thus created our very own dinosaur magic trick!

Make your own stethoscope

Provided in the kit were the materials to make our own stethoscope – it really works for listening to a heartbeat! It also comes with a fun double-sided wipe-clean examination sheet so that kids can play doctor.

Make your own plush organs

The art project for the box means you can make your own super cute plush organs (brain, heart, and stomach). The felt comes with pre-pierced holes which makes threading easier for children.

Want more ideas for learning about the human body?

The Explore magazine in the kit gives some craft ideas that you can do at home. We’ve used various resources such as an ExperiSenseNZ Human Body learning kit, Factivity: Amazing Body Sticker Activity BookWrite & Wipe Wellbeing Book, and a poseable art mannequin for exploring movements and joints.

HOW DO I ORDER KIWI CRATE?

This is not a paid review. I spent a lot of time searching the internet to find out more information about the Kiwi Crate and Atlas Crate boxes before deciding to try them and found the blog posts / photos that people shared were really useful!

If you would like to try Kiwi Crate (or one of their other lines), you can receive 50% off your first box by clicking here.

What I like about the Kiwi Crate kits is that they use a combination of Science, Technology, Engineering, Arts, and Mathematics to explore a concept or idea. There’s no obligation to sign-up in an on-going capacity so it’s easy to tie them in with birthdays / Christmas; the boxes are quite compact so they also store easily in a cupboard for bringing them out on a rainy day. Mind you, this only works if you spot the package on the door-step first – children become quite adept at recognising the green Kiwi Crate box and screaming with delight at it’s arrival!

The boxes are sent randomly so there’s no way to know what will come in the future; however, you can log-in to your account at the start of each month to see what box has been selected. Your box history is kept which means that even if you cancel and then pick-up again the following year they can make sure that you aren’t sent repeats of boxes.

WHAT IS IN A KIWI CRATE?

The Kiwi Crate is aimed at ages 5-8 years. It comes with a copy of the Explore magazine which opens with a fun comic about Steve the Kiwi and his friends. [As a side note, these are made by an American company despite the use of our New Zealand native bird]. These comics are really approachable for younger kids and a great way of exploring the concepts being introduced in a relateable manner.

The Explore magazine provides a range of information on the topic, it might include some simple games or tricks to try at home, and provide ideas for additional crafts / activities using simple materials. It also has a sticker [unique to each box theme] to put on your Kiwi Crate chart.

The box also includes an instruction manual and the materials that you need to build the main craft. Generally, there are two activities to do – one that is more art related, and one that is more mechanical engineering. What makes the kits special, is how well crafted the engineering components are. They really are designed for the intended age group so that they can either build themselves or help assist an adult. There are handy visual images and checkpoints to make sure that things are aligned correctly. There is no super-bonding-fingers-together wood glue to use with these projects (which makes them great for highly sensory children); instead parts come with double sided tape finely engineered on so that you just need to remove the backing strip of paper.

INTERESTED IN MORE HOMESCHOOL BOX REVIEWS?

Discover the World with ATLAS Crate

#1 Introducing the World

#2 Discover Japan

#3 Discover France

Explore STEM with Kiwi Crate

#1 Arcade Box (and the Claw!)

#2 The Amazing Animation Box (make your own 19th century movie with a Zoetrope!)

#3 The Mechanical Sweeper Box (make your own baleen whale!)

#4 The Disc Launchers Box (play games with physics!)

#5 Kaleidoscope Puzzles (explore symmetry and mirrors!)

ExperisenseNZ

Exploring Maths through Art

Exploring Space through Art

Exploring the Human Body through Art

Exploring Spring: Flower Press and Life Cycles

Exploring Science through Experiments

EXPERISENSE NZ REVIEW: Exploring Science Homeschool Box

Lava lamp experiment

WHAT IS IN THE EXPERISENSE NZ SCIENCE EXPERIMENT HOMESCHOOL BOX?

This kit is all about having some scientific fun with experiments and adding in artistic flair. I love adding a kinaesthetic dimension to our learning! The box provides seven learning activities to do that are fully aligned with the NZ Curriculum and are highly adaptable to age, interest, and special needs.

The kit comes with a guide that outlines how to conduct each experiment and also provides information on the scientific principles being demonstrated. It’s a great way for kids to build on prior knowledge, as well as asking new questions!

The ExperiSense NZ Science Box sells for NZD$27 online; I’ve bought and reviewed a number of their boxes with this one being received free in exchange for an honest review.

How to make your own lava lamp

Have you ever looked at a lava lamp and wondered how they work? Well, this experiment will let you make your own temporary lava lamp! We loved it to so much that we did it twice.

Fundamentally, it comes down to the fact that oil and water do not mix. This is because they are different densities (and oil will actually rise up to float on top of water – which you can see happen in the experiment). As you slowly drop food dye into the oil, watch how the droplets retain their own separate form (“immiscible” was our cool new word of the day). Once water is added, the food dye will slowly dissolve into the water but differences in density mean the oil will rise to the surface.

The magic happens when carbon dioxide gas is created by introducing a fizzing tablet! The chemistry being demonstrated means that as the solid tablet dissolves, bubbles of water-and-gas raise to the surface. As the carbon dioxide gas dissipates, density changes causing the bubbles to sink. FYI – in a real lava lamp what you are watching is caused by thermodynamic changes (i.e. the application of heat).

In our first experiment, we used 1/4 tablet, red + yellow food dye, the oil provided, and the cup provided. In our second experiment, we used 3/4 tablet, a recycled glass jar, our own kitchen oil, the blue dye provided + some red dye.

Extra Activities

The lava lamp experiment looks at both density and states of matter. You may want to explore these further with simple experiments such as:

Why do things float or sink? A great way to start is in natural environments, such as a river or beach, by gathering up materials such as driftwood, shells, rocks, and mangrove pods to experiment with. At home, consider experiments with buoyancy such as why an orange will float (unless you peel it!).

How does water demonstrate states of matter? I love using water to demonstrate how something can so easily change forms between solid > liquid > gas. A fun experiment relating to buoyancy is to freeze water in a bag (food delivery boxes can be great sources of pre-formed ice) and create an iceberg diorama in a sink or bucket; have fun seeing what toys can balance on the iceberg before it melts!

Oil and Water Painting

We really enjoy making marbled paper using shaving foam; this was our first time using oil. We used a large plastic tray and simply recycled our lava lamps (with some extra colours dropped onto the surface of the oil). We chose to use our own paper and dye, in addition to the card stock provided, and made lots of beautiful art work.

Tip: Have layers of cardboard and paper towels beneath your art so that it can absorb the excess oil. We waited until the next day (once the dye was dry) before layering the artwork between layers of paper towels and popping in hot water cupboard to finish drying.

Magic Trick: Once the paintings are completely dry, the oil will have changed the appearance of the paper but any ‘virgin’ paper will still appear white. If you hold the art up to a bright light then not only can you see your beautiful colours clearly but any ‘white’ corners will disappear and smokey ‘shadows’ will appear in their place instead!

How to make a rainbow

The kit comes with a very small prism that you can use to split light. As light enters the prism, it bends, and the different wavelengths will create a spectrum of colours as they exit. For us, the light exited onto the opposite wall and we found creating some shadow helped us see it more clearly. We lined up the prism with the sun after catching a wonderful rainbow that was refracting through our fish tank!

The kit also comes with a second rainbow experiment where a bendable ‘mirror’ is placed in a glass of water to reflect and refract light. We found this one a bit tricky but we did achieve a little colour splitting. Miss 6 actually most enjoyed casting shapes of reflected light onto the shadowed ceiling!

Extra Activity

Want to combine rainbows AND learning about the density of different liquids? Check out this fun experiment to make a sugar rainbow!

How to experiment with static electricity

The kit comes with a balloon, templates, and craft paper to make your own ‘jumping bunnies’ or frogs; we also had fun designing our own creatures in a variety of sizes. Rubbing the balloon energetically on clothes creates a temporary static charge which allows your creations to ‘jump’ or ‘dance’.

Extra Activity

Want to see and feel another invisible force? Pop one end of a straw partially into a balloon and secure the neck with a tight rubber band. Blow down the straw and watch the balloon inflate (just like a lung!) and then feel the air exit again out the straw! Talk about how some natural forces we can’t see (like gravity, or air in motion) but we can observe their effects on the world around us.

How to make magic tea

Beautiful colour changing butterfly tea!

The kit comes with two experiments for exploring acids and bases. One is experimenting with litmus paper and the other is making butterfly pea flower tea. I find the tea has a light floral flavour and like to drink it with a little liquid honey. When you brew it, the tea comes out a stunning vibrant blue; the addition of a little freshly squeezed lemon juice (changing the pH level) magically makes it a purple-pink colour!

Tip: Wet litmus paper can leave a yellow mark on benchtops (easily removed with Chemco) so it’s a good idea to place the strips on a piece of white card.

Tip: Hot water will have a more dramatic effect (than cold) when added to a teaspoon of baking soda (alkaline) or a teaspoon of baking powder (acidic).

Extra activities

Explore natural colour changing properties further by using a red cabbage to make a magic colour changing potion! Collect your magic molecules, make a potion, and use the rest to make your own litmus paper!

After watching how baking powder dramatically foams up when a little hot water is added, try making these light and fluffy scones and imagine how the baking powder helps the dough to rise when combined with the heat of the oven.

Interested in more homeschool box reviews?

Discover the World with ATLAS Crate

#1 Introducing the World

#2 Discover Japan

Explore STEM with Kiwi Crate

#1 Arcade Box (and the Claw!)

#2 The Amazing Animation Box (make your own 19th century movie with a Zoetrope!)

#3 The Mechanical Sweeper Box (make your own baleen whale!)

#4 The Disc Launchers Box (play games with physics!)

#5 Kaleidoscope Puzzles (explore symmetry and mirrors!)

ExperisenseNZ

Exploring Maths through Art

Exploring Space through Art

Exploring the Human Body through Art

Life in Lockdown – Decorate our streets!

Making homemade chalk is easy a great way to connect as a family!

Life in New Zealand has changed rapidly. Our borders are closed, domestic travel restricted, our schools and shops closed, and we are asked to remain at home in order to restrict the spread of Covid-19. Cars are now to be used only for essential travel (the doctor, pharmacy, or supermarket) and people may only leave their house to walk nearby. Social distancing is everything.

Our big field trip for today was walking to the top of the driveway and drawing pictures that the kids in the houses nearby can see from their windows. Creating chalk, with a few simple ingredients from the supermarket, has been both art and science. It’s also a way to share a little love and kindness with the community around us.

Why not bring a little colour to yours?

Life in lockdown: Share some love and decorate our streets!

How to make home made chalk

Ingredients

  • Cornflour
  • Water
  • Food colouring
  • Cardboard tubes
  • Waxed paper / baking paper
  • Scissors
  • Sellotape or rubber bands

Note: Alternative ingredients include plaster of paris + tempera paint, or a 1:2 ratio of very finely crushed eggshell + flour.

Directions

  1. Prepare your moulds. Toilet paper rolls are a good size; I find a bread knife does a good job of sawing longer cardboard inner tubes into parts.
  2. Cover the bottom of your cardboard tubes with waxed paper and tape / elastic band into place. You then want to roll more waxed paper and slot it inside (you may need to trim to size).
  3. Pour cornstarch into a bowl and then add food colouring of your choice. Slowly add water and mix well. You want to add just enough water to create a very thick [viscous] mixture.
  4. Pour or spoon the mix into your moulds.
  5. Pop into a hot water cupboard (or somewhere warm to dry). You want as much of the water to evaporate as possible to dry before use (about 24-48 hrs).
  6. You can then removed from the moulds and let the kids have fun!

Tip

If you add too much water then it will have difficulty drying (and remaining contained within the moulds). Never fear! Treat it as a chemistry and physics lesson all-in-one for the kids. You have just created a non-Newtonian fluid 🙂 You can take your ooblek outside for messy play fun with the kids. Pour it into your hands and watch how it becomes a solid if you clench your fist but magically liquefies if you release the pressure!

Home Science: Make a colour changing magic potion!

These colour changing molecules can be changed from indigo to brilliant blue or bright pink with a few simple experiments!

Pigments are molecules that contain colour and the ones in red cabbage juice ( anthocyanin ) are pretty special. By adding a base or acid, we can both change their shape and their colour! The pigments are easy to collect and the basis for two easy home experiments: Colour Changing Magic Potions and Making Litmus Paper.

First, you will need to collect some magic molecules from a red cabbage: click here to find out how.

Materials

Change your purple cabbage juice to blue by adding a base and to red/pink by adding an acid.

Directions

  1. Pour your prepared red cabbage juice into two clear glasses or small bowls.
  2. Into one glass, stir 1 tsp of baking soda. Watch the solution turn blue – indicating that the pH has turned basic.
  3. Into the second glass, stir 3 Tbsp of white vinegar. Watch the solution turn red/pink – indicating that the pH has turned acidic.
  4. For fun, pour the glass containing vinegar into the glass containing baking soda and watch them foam! Tip: for less mess, pour both solutions into a big bowl!
Foaming magic potion fun!