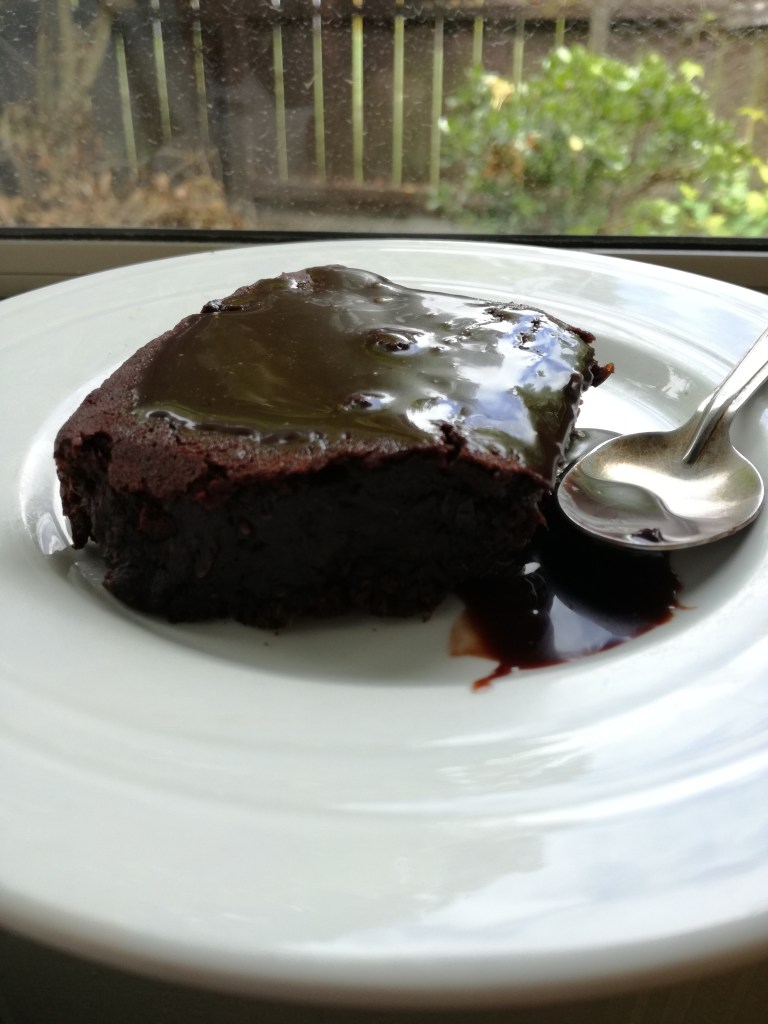
Healthy Hearts Chocolate Fudge Brownie
Free from dairy, gluten, and soy.
I wanted to make something that tasted decadently chocolatey but without a lot of added sugar and minimizing ingredients that are common allergies. It can easily be adjusted to make it suitable for any food restrictions in the family, daycare, or school. Lentils contain a wide range of nutrients and are made up of over 25% protein!
Healthy heart Chocolate Fudge Brownies
Ingredients
2 x 400g tin lentils (approx. 2 cups of drained lentils)
1 cup chopped dates
1/2 cup brown sugar
1 Tbsp maple syrup
1 egg
1/2 cup rice bran oil
1/2 cup almond meal + 1/2 cup fine rice flour
(or substitute 1 cup plain flour)
1 cup dutch cocoa
1/2 tsp salt
1 tsp Baking Powder
2 Tbsp chia seeds
Optional: 90g pureed green vegetables (spinach, peas, courgette)
There are many types of lentils and many online recipes suggest using red lentils. This is probably because they are split, skinless, and can have a sweet nutty flavour. To be honest, I went with what what was affordable and convenient – tins of brown lentils!
How can I replace egg?
I used egg as I wanted the protein but for an egg free alternative, you could pre-soak the chia seeds in 6 Tbsp boiling water for 15-20 minutes or use something like Orgran’s Egg Replacer.
Directions
Put oven on to pre-heat to 180’C / 375’F. Grease your brownie tray (I use rice bran oil).
Rinse lentils thoroughly. The lentils will need to be cooked and their cooking time is going to depend on what form you’re using (i.e. dried lentils will need to be simmered for 15-20 minutes).
Put the kettle on to boil while you chop up the dates (the measurement of 1 cup is after they’ve been cut up).
The dates need to be soaked in boiling water until soft. Personally, I took a big pyrex dish, put in my (rinsed) soft brown tinned lentils + my roughly chopped dates + a small amount of water. I then put it in the microwave on High for 2 minutes, stirred, and then put back in the microwave for another 2 minutes.
Pour the hot date / lentil mix into a food processor and blend till smooth.
A metal blade is ideal for smoothness but then you’ll need to change to a plastic blade (or wooden spoon) for combining the rest; if you’re not worried about a perfect puree then you can just use a plastic blade throughout.
Mix in sugar and maple syrup. Taste test for sweetness.
Note: instead of sugar, you could just use 1/3 cup maple syrup. The dates will also add natural sweetness.
Mix in egg and oil.
Mix in almond meal, rice flour, dutch cocoa, salt, baking powder, chia seeds, and any optional ingredients. (I went for green veggies, someone else might go for chopped walnuts).
Bake for 30-35 mins.
The gluten free version comes out as a soft, fudgey, chocolate slice; with normal flour it will probably be higher and a bit firmer. Blind taste testing by neighbour was successful both for approval rating and not guessing the lentils.
What to call these? They have no sweetening, no flaky butter, and no cheesy flavour (as the mozzarella acts as a binder) so they’re a small quick bread which slices beautifully to top with salted butter, colby cheese, and Culley’s South Carolina Mustard. You can also quite happily top them with a few thinly sliced berries, or chia seed jam (depending on your dietary preferences). So it’s a bit like a UK scone, a bit like an English muffin, and a bit like a USA biscuit; and of course you don’t have to cook them in a muffin pan! For those on Keto – they are also only 4.1g carbs per serve 🙂
Ingredients
100g almond flour
50g coconut flour
2 medium eggs
1 tsp baking powder
125g sour cream
50g grated mozzarella
1 tsp baking soda
1 Tbsp apple cider vinegar
dash salt
Optional: 2 Tbsp – 1/4c water
Directions
Pre-heat oven to 200’C / 390’F and grease muffin trays.
Combine the almond flour, coconut flour, and baking powder in a bowl.
Mix in the eggs, sour cream, and mozzarella.
Add a little water to moisten (this will also impact how moist / dry these are once cooked and cooled).
Allow to sit for 10 – 20 minutes so that the gluten free flours can absorb the moisture.
Add baking soda and vinegar – enjoy the fizz!
Quickly combine and spoon into muffin trays.
Pop into pre-warmed oven. I like to do mine a bit like scones – intense heat at first for the initial rise and then drop the heat for the rest of the cooking; 200’C / 390’F for about 10 mins and then 170’C / 340’F for about 10-15 mins. Use a toothpick to test (it will come out clean once cooked).
Lovely warm. I’ve been pleased with how mine store in both fridge and freezer.
NUTRITIONAL INFORMATION
Based on 6 servings per recipe; nutritional breakdown is approx:
We recently learned about force and tension in the Kiwi Crate Push and Pull box. This time we learn about a different type of tension – surface tension! Ever wonder why water soaks into some materials but pools on top of others? Well, water droplets are pretty sticky and they most like to stick to each other – especially on a surface like wax paper that is water resistant. That ‘stickiness’ is also at it’s strongest on the surface – which is why insects like water striders can delicately move across it.
Kiwi Crate’s Surface Tension box comes with materials for four experiments:
BUILD A BLOB
Liquid watercolours in primary colours are provided along with water resistant wax paper and a stirring stick. When you squeeze the watercolours onto the wax paper, instead of dissolving into the paper – they sit on top and make blobs! You can make small blobs, big blobs, and baby blobs. You can move blobs by herding them with your stick. You can merge blobs and watch the colours change to orange, green, purple, or ‘muddy mix’. The fun science magazine comes with kid friendly infographics to explain why when you drag one water droplet, its friends want to stick together and come along.
MAKE A WATER MAZE
This activity reminded me a little of wooden mazes and steel ball bearings that we played with as kids – twisting, turning, and tilting, to try and guide the ball to the centre of the maze. This brings a whole new level to the game while teaching us about science. The maze that you build combines water absorbent walls with a water resistant floor. It is a fun challenge and the secret is definitely patience (and slow movements!).
MAKE A WATER ELEVATOR
So, when we were learning about (cable) tension, we built a toy elevator. This time, we’re kind of making an elevator for water and it works because of that principle of water being ‘sticky’. Cool Science Experiments have a great visual demonstration; KiwiCo simplify things by providing a kid friendly kit. We have tested this with friends and it’s a ‘magic trick’ that does not fail to entertain and amaze! It is important that you remember to soak the yarn (water follows water) and that you keep a careful eye on tension + pour speed. Have some towels handy just in case you need to mop up spills.
MAKE YOUR OWN WATER STRIDER
I shared a video at the start of the post about water striders – excitingly, you get to make your own! You get a bunch of wires that you can crimp and then use to make a water strider. You can also experiment with making shapes to float on the top of the water. What gets a bit tricky, is that your insect’s legs and feet need to be balanced on the surface; if the angles are not quite right then they will pierce the surface tension and potentially drag part of your insect under the water. If you’re struggling a big with the water strider, try using the dipper to gently place a needle or paper clip on the surface.
Want more ideas for learning about surface tension?
This is not a paid review. I spent a lot of time searching the internet to find out more information about the Kiwi Crate and Atlas Crate boxes before deciding to try them and found the blog posts / photos that people shared were really useful!
If you would like to try Kiwi Crate (or one of their other lines), you can receive 50% off your first box by clicking here.
What I like about the Kiwi Crate kits is that they use a combination of Science, Technology, Engineering, Arts, and Mathematics to explore a concept or idea. There’s no obligation to sign-up in an on-going capacity so it’s easy to tie them in with birthdays / Christmas; the boxes are quite compact so they also store easily in a cupboard for bringing them out on a rainy day. Mind you, this only works if you spot the package on the door-step first – children become quite adept at recognising the green Kiwi Crate box and screaming with delight at it’s arrival!
The boxes are sent randomly so there’s no way to know what will come in the future; however, you can log-in to your account at the start of each month to see what box has been selected. Your box history is kept which means that even if you cancel and then pick-up again the following year they can make sure that you aren’t sent repeats of boxes.
WHAT IS IN A KIWI CRATE?
The Kiwi Crate is aimed at ages 5-8 years. It comes with a copy of the Explore magazine which opens with a fun comic about Steve the Kiwi and his friends. [As a side note, these are made by an American company despite the use of our New Zealand native bird]. These comics are really approachable for younger kids and a great way of exploring the concepts being introduced in a relateable manner.
The Explore magazine provides a range of information on the topic, it might include some simple games or tricks to try at home, and provide ideas for additional crafts / activities using simple materials. It also has a sticker [unique to each box theme] to put on your Kiwi Crate chart.
The box also includes an instruction manual and the materials that you need to build the main craft. Generally, there are two activities to do – one that is more art related, and one that is more mechanical engineering. What makes the kits special, is how well crafted the engineering components are. They really are designed for the intended age group so that they can either build themselves or help assist an adult. There are handy visual images and checkpoints to make sure that things are aligned correctly. There is no super-bonding-fingers-together wood glue to use with these projects (which makes them great for highly sensory children); instead parts come with double sided tape finely engineered on so that you just need to remove the backing strip of paper.
In our KiwiCo Kiwi Crate Push and Pull Toys box we learned about force and tension. When we hold a rope loosely so that it rests between us, it is slack. When we pull, that force travels along it and it becomes taut. That is tension at work. That pull force and tension can also be used to make something (or someone) move especially when we add a simple machine – like a pulley. SciShow Kids gives a great visual example of how this works: click here to watch.
An elevator lift relies upon the science of tension so that those vertical cables, a pulley, and counterweights, can create a lift force in order to move people or objects. An elevator lift’s science and internal mechanisms can make for fascinating reading and is more complex then this simple build. This craft is a great place to start for younger kids, and older kids may want to engineer their own more complex designs!
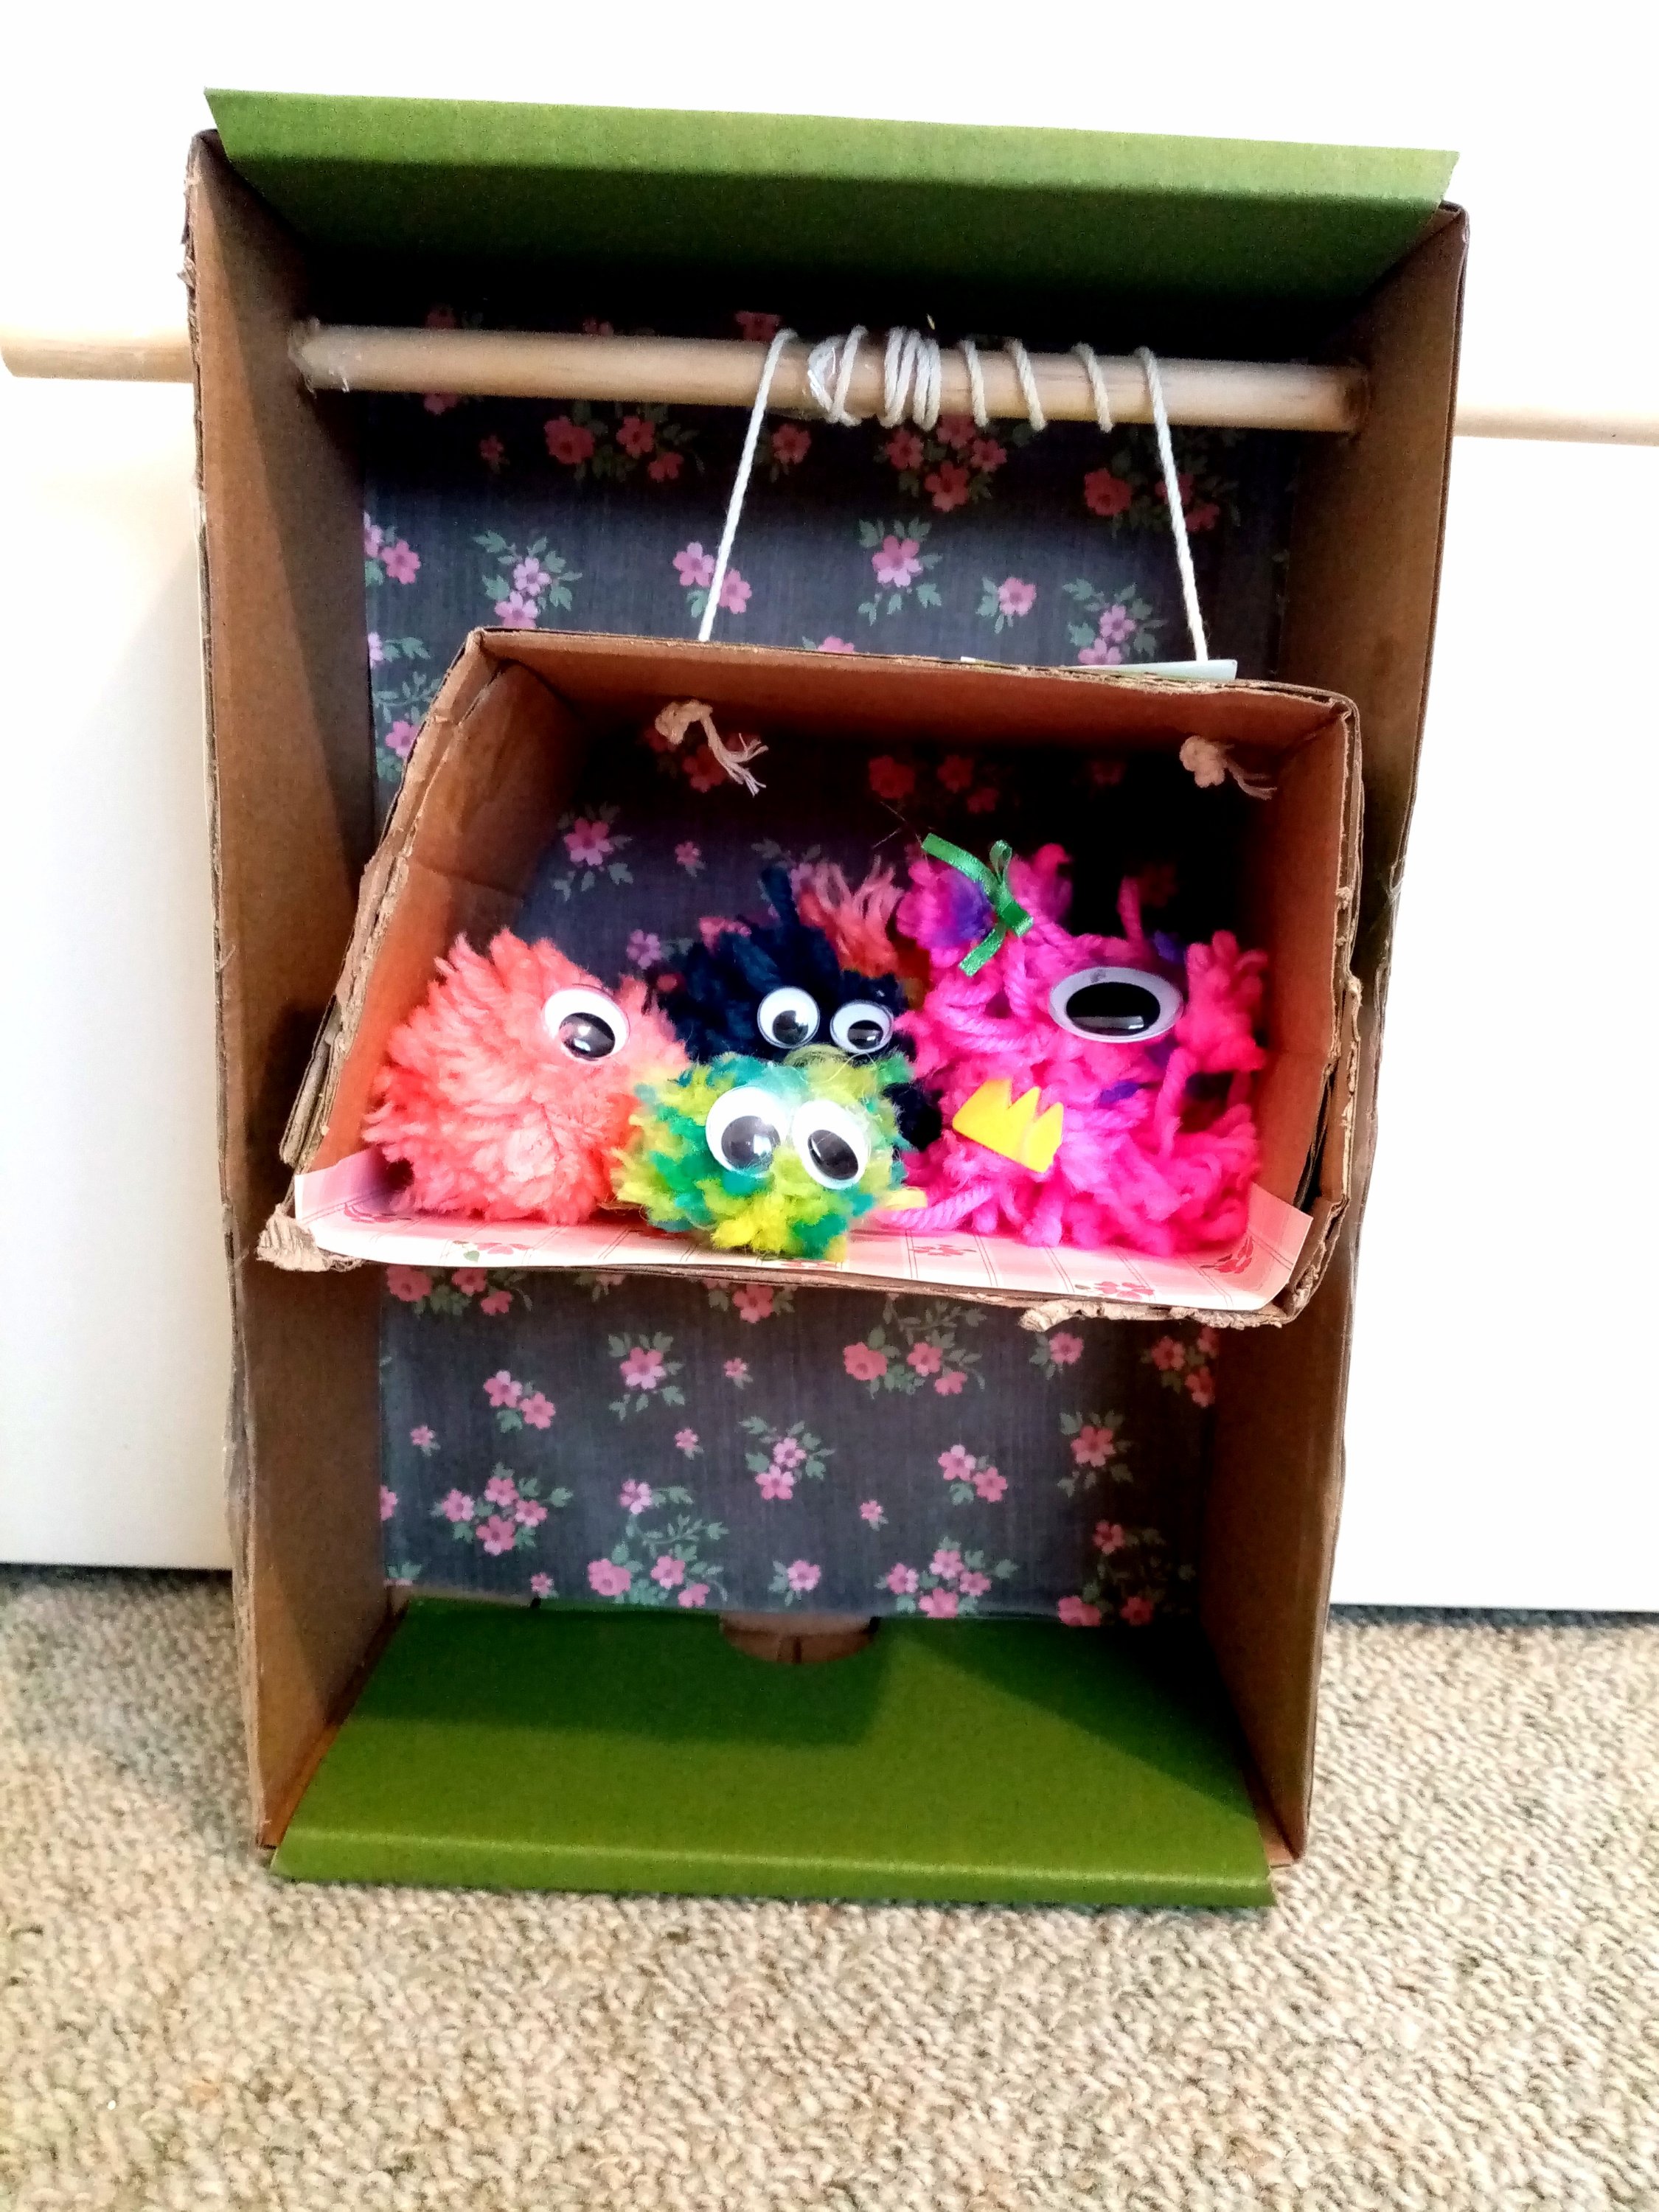
How to make a kids toy elevator lift
Our Kiwi Crate came with this great idea in the Explore magazine!
Materials
Sturdy cardboard box
Wooden dowel (cut to size)
String
Pencil, scissors, glue, sellotape, ruler.
Decorations
Tip: Where can I get a wooden dowel? Turns out, lots of places! Craft stores and hardware stores are a good place to start. Keep in mind that you’ll want the wooden dowel to be at least the width of your box (with some extra length each side as turning handles).
Instructions
Cut the lid / flaps off the top face of the box. (Save them)
You want to make a small hole for your wooden dowel. Stand your box and choose a short end to be the top of the ‘building’. Choose a ‘side’ of the building and use a ruler to measure about an inch down from the ‘roof’ and make a pencil mark. Use a sharp pencil (or scissors) to carefully push a hole through the cardboard.
Slide the wooden dowel through the hole and use it (as well as your ruler) to help you position a matching hole on the far side of the ‘building’.
To make your ‘elevator’, cut the cardboard that you saved into two strips. Experiment with scoring and folding these, then slide them together to make a rectangle (you’ll need to tape or glue the sides). You will need to trim them to size as if they press too closely against the building walls, friction will slow the elevator’s rise.
Make two holes in the ‘roof’ of the elevator.
Measure and cut your string; you want it about twice as long as your building is high.
Thread string through one hole and tie a knot inside the elevator lift. Take the other end of the string and wrap it around the wooden dowel (acting as a pulley) and then place the end through the roof of the elevator and knot it off.
Make sure your string has equal lengths on each side and then tape the centre of the loop to the dowel.
Have fun decorating your building and elevator 🙂
You are now ready to lift! Simply twist the handles and watch the elevator rise as the string wraps itself around the dowel. Observe how the lift force requires the cable (string) to retain tension in order to operate. Discuss what would happen if the string was too long and stayed like limp spaghetti. What can you lift? Are some things too big or too heavy? Do some shapes wobble and fall off? Is it the right height to transport cars or dinosaurs or dolls where they want to go? What size might you need to reach a floor in a dollhouse, or the top of a coffee table, or the seat of the couch?