Through the Desert – Boardgame Review

Through the Desert – caravan leaders

From the award-winning game designer Reiner Knizia comes a game of strategy, patience, and cool plastic camels! The desert is still treacherous, mysterious, and without mercy. But for those willing to risk the dangers of the shifting, sun-baked sands, the desert holds riches beyond compare.
In Through the Desert, two to five players each control a tribe of nomads vying for control of the desert. By establishing caravans and taking over oases, the players gain points as their tribes increase in power.

Strategy is essential in deciding how and where to build your tribe’s caravans. There are multiple ways to gain points and several ways to win. Should you try to build the longest caravan? Or should you dominate the desert’s oases? Don’t forget to keep an eye on your opponents’ caravans, or you may find your own tribe cut off from valuable water holes.

Through the Desert (a strategy / placement game)

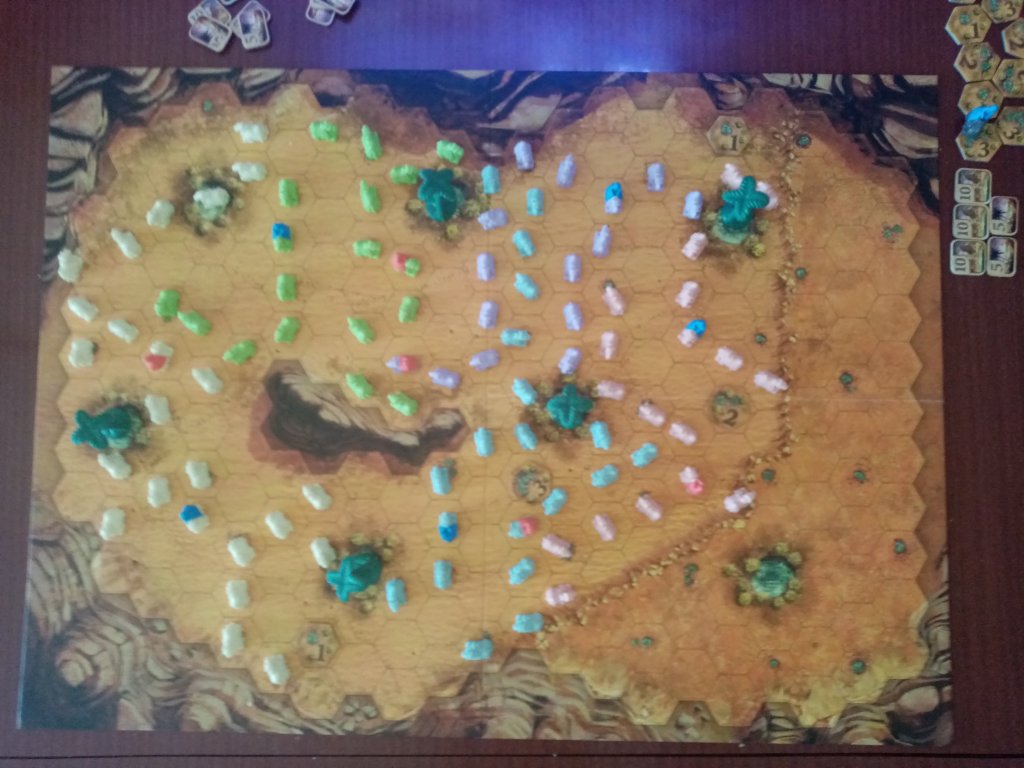
Many reviewers have found the game reminiscent of the ancient and elegant game of Go. Through the Desert can be played in a number of strategic ways (including encapsulating territory and aiming to prevent your opponents from reaching key resources) but at it’s heart it’s about camels. 180 beautifully coloured miniature camels in five pastel colours (along with caravan leaders) that are sure to delight younger players (and are still pretty cool as an adult).

Players take turns to place their leaders on the board and then game play proceeds by choosing two camels (of any colour) and placing them on the board (connecting them to your caravan(s) of the same colour. Play continues until there are no camels left of a particular colour.

Strategy comes into play with the various placement rules and scoring system. You can place camels of a different coloured caravan next to your opponents camels but not next to the same colour (an important rule as otherwise camel ownership would become very confusing!). This simple rule opens up all kinds of strategic moves as you work to block opponents from reaching their goals.

Scoring involves reaching the five palm-tree oasis, taking watering holes, capturing territory (by surrounding it), and having the longest caravans of each colour.

Bonus features

There are rules provided for how to scaffold the game from 2 players to 5 players; the beautiful game board also provides natural geographic features to restrict the play area if there are only 2 players. It’s also double sided so that once you have mastered ‘the mountain’, you flip it to see how ‘the river’ changes play.

It also provides optional rules for variant game plays.

What age is the game suitable for?

To an extent, this will depend on the children involved and their interests / attention span. It helps that the rules are simple enough that even younger children can simply choose camels (at random or based on their favourite colour) and join in – while also adding an element of natural chaos to the plans of older players.

Slightly older children will begin to understand there are different possible goals and begin to engage with these. They may choose to focus on a single goal at a time or juggle a multiple focus. Goals can include:

  • Having the most camels of a particular colour on the board.
  • Linking their caravans to as many oasis as possible (each caravan scores 5 points for each oasis they reach).
  • Acquiring as many watering holes as possible (these score points and are removed from the board by the player that reaches them first).
  • Creating lines to stop other players from moving forward / reaching their goal.

Adults will appreciate that last goal often isn’t the most high-scoring but it’s a tactic that kids will delight in when they thwart their parents!

What can boardgames teach us? a.k.a. learning through play

There’s a whole community of homeschoolers who focus on gameschooling as a key way of learning. Why? Because it makes learning fun and there are so many wonderful games out there that can teach kids skills and knowledge without them even being aware that they’re learning.

In Through the Desert, they are learning:

  • Maths: strategy; logical reasoning.
  • Maths: counting to 20, addition, skip counting, and equivalency trading.
    • Even if they don’t instinctively recognise that 5+5 = 10, they can quickly learn that they can trade 2 x 5 point tokens, for a 10 point token with a different picture.
    • Children can help to score at end of game by: counting how many camels they have of each colour; ‘skip counting’ by 5’s or 10’s to add their oasis points; add their 1 / 2 / 3 point watering hole tokens together to find a total.
  • Visual-spatial recognition and reasoning.
    • By end of game there is a beautiful and unique pattern of coloured camels on the board (with complexity increased by number of players) so there is a fair amount of visual processing involved in working out final scoring – especially for minor captured territories (encapsulation).
  • World Studies:
    • It’s a great opportunity to review any desert habitats or countries that you’ve studied. We pulled out our range of desert dwelling animals that we’ve collected in our studies so far to watch the action; unsurprisingly, our Dromedary Camel was lead judge.
  • Life Skills:
    • It’s a great game to discuss short-term gains (such as thwarting parents) vs long-term gains (strategic scoring).
  • Social Skills: turn taking, patience, and good sportsmanship.
Through the Desert end of game
Advertisement

Life in Lockdown – Decorate our streets!

Making homemade chalk is easy a great way to connect as a family!

Life in New Zealand has changed rapidly. Our borders are closed, domestic travel restricted, our schools and shops closed, and we are asked to remain at home in order to restrict the spread of Covid-19. Cars are now to be used only for essential travel (the doctor, pharmacy, or supermarket) and people may only leave their house to walk nearby. Social distancing is everything.

Our big field trip for today was walking to the top of the driveway and drawing pictures that the kids in the houses nearby can see from their windows. Creating chalk, with a few simple ingredients from the supermarket, has been both art and science. It’s also a way to share a little love and kindness with the community around us.

Why not bring a little colour to yours?

Life in lockdown: Share some love and decorate our streets!

How to make home made chalk

Ingredients

  • Cornflour
  • Water
  • Food colouring
  • Cardboard tubes
  • Waxed paper / baking paper
  • Scissors
  • Sellotape or rubber bands

Note: Alternative ingredients include plaster of paris + tempera paint, or a 1:2 ratio of very finely crushed eggshell + flour.

Directions

  1. Prepare your moulds. Toilet paper rolls are a good size; I find a bread knife does a good job of sawing longer cardboard inner tubes into parts.
  2. Cover the bottom of your cardboard tubes with waxed paper and tape / elastic band into place. You then want to roll more waxed paper and slot it inside (you may need to trim to size).
  3. Pour cornstarch into a bowl and then add food colouring of your choice. Slowly add water and mix well. You want to add just enough water to create a very thick [viscous] mixture.
  4. Pour or spoon the mix into your moulds.
  5. Pop into a hot water cupboard (or somewhere warm to dry). You want as much of the water to evaporate as possible to dry before use (about 24-48 hrs).
  6. You can then removed from the moulds and let the kids have fun!

Tip

If you add too much water then it will have difficulty drying (and remaining contained within the moulds). Never fear! Treat it as a chemistry and physics lesson all-in-one for the kids. You have just created a non-Newtonian fluid 🙂 You can take your ooblek outside for messy play fun with the kids. Pour it into your hands and watch how it becomes a solid if you clench your fist but magically liquefies if you release the pressure!

How to make an easy and cheap instrument at playgroup (Musical Maracas)

Making musical maracas

Making musical maracas

Making musical maracas

Making musical maracas

What you need

  • Paper plates (small).
  • Felts, crayons, paint, stickers etc.
  • Wooden beads, sea shells, bells etc.
  • Stapler.

Directions

  1. Help your children to decorate the outside of the plates (don’t forget to write their names on!).
  2. Fold the plate in half (like an empanada) and staple along the edges. Leave a gap at the top.
  3. Hold it upright with the gap at the top. Help your children to drop beads, bells, shells etc. inside their musical instrument; one big toddler sized handful will be about enough.
  4. Staple up the gap, put on some music, and shake!

Note: This is a great activity to do on a rainy day or with a playgroup. For younger toddlers choose larger items to put inside and play with under supervision only; i.e. keep choking hazards in mind.

Chicken with 40 cloves of garlic

Chicken with 40 cloves of garlic

Chicken with 40 cloves of garlic served with bacon, brussel sprouts, and rice noodles.

I really love the simplicity of this dish and that it’s a one pot meal when cooked in the wok. Miss 2 even ate a brussel sprout after licking all the gravy off it!

Ingredients

  • 40 cloves of garlic (peeled; hard end cut off; cut in half any large cloves)
  • 3 large skinless, boneless chicken breasts (cut in half)
    • You can use chicken tenderloins or thighs instead.
  • Neutral oil (i.e. Rice Bran Oil)
  • Salt & Pepper
  • 3 cups chicken stock + 1/2 cup in reserve
  • 1/4 cup lemon juice
  • 1T dried basil
  • 2 tsp dried oregano
  • 2T fine white rice flour
  • Optional: 2 chopped rashers of bacon (middle or shoulder)
  • Optional: approx. 8 brussel sprouts (chopped in half)
  • Optional: Wild Mushroom Powder

Allergies: soy free, gluten free, dairy free, egg free, nut free.

Directions

  1. In a large skillet / frying pan / electric wok, heat the oil.
  2. Put in the chicken and garlic. Once the chicken is partially cooked, put in the bacon and brussel sprouts to cook as well.
  3. Cook until the chicken is browned on both sides.
  4. Add 3 cups of the chicken stock, lemon juice, basil, and oregano. You may want to keep back some of the lemon juice and add after tasting (it can be quite a strong flavour).
  5. Bring mixture to the boil, then reduce heat and simmer for 10 minutes.
    • Note: If you want to serve with rice noodles, you can rinse the noodles under hot water until you are able to separate them and then cook them in the simmering broth. Not only will this help to reduce the broth but the noodles taste amazing!
    • Taste the broth and add salt + pepper to liking. If you’d like slightly more umami flavour, consider adding  a dash of one of the following: coconut amino acids, wild mushroom powder, soy sauce, or hoisin sauce.* Food allergies will impact choice.
  6. In a small bowl or cup, whisk the rice flour and 1/c of reserved chicken stock. Add this slurry to the cooking mixture and cook until the sauce thickens (you may need to increase the heat).
  7. Serve with rice noodles, rice, or mashed potatoes.

Note: The secret to this recipe is to lightly sear the outside of the garlic cloves – you want them to go soft, sweet, and squishy inside (like when roasted (otherwise the garlic can be a bit overwhelming). In the traditional French recipe the cloves are left intact (skin on) and the dish is cooked in the oven (then you suck out the gooey inner and discard the skin).


This slideshow requires JavaScript.

What foods contain soy?

Soy beans (edamame)

Soy beans (edamame) are an obvious form of soy; you will be surprised how many of the foods you eat are hiding soy!

Is soy really hiding in everything I eat?

You may be surprised how many of the foods you eat each day contain hidden soy. I’ve written previously about  soybean oil (normally called vegetable oil) and soy lecithin. These are incredibly widely used in the international food industry because they are cheap, grown year round, and are not FDA regulated (i.e. these do not have to be declared as an allergen on packaging). These are often hidden in compound ingredients, as are other products that may be soy derived. I have to check ingredients every single time I buy something (even if I’ve bought it before). I don’t buy anything containing oil or emulsifiers unless those are 100% declared and identifiable (i.e. canola oil and sunflower lecithin). 

I also have to be careful about bathroom products because glyercin can be soy derived. I’ve changed our bathroom to natural products like shampoo bars and chemical free soap products.

What foods contain soy?

I’ve tried to keep the table below to ingredients. The reality is that these ingredients can be in anything other than raw fruit, most raw vegetables, and most unprocessed raw meats. Soy can be present in anything else including bread, biscuits, crackers, dried fruit (i.e. sultanas have oil added), deli meats, bacon, sausages, peanut butter, spreadable butter, margarine, spice mixes; I’ve even looked at tins of ‘beans in springwater’ which have had soy!

I’ve inserted the table it as a photo so that it’s possible to save the image to your phone or print it for your wallet.

Ingredients that may contain SOY

Ingredients that may contain SOY

Note: Also miso (as a soup or paste)!

Winter Crafts: Painting Leaves

A wonderful winter activity can be going for a walk through the woods or local park and talking about how the trees change with the seasons (and how some don’t!).

Collect some leaves and pine cones on your walk and take them home to dry.

Tip: Putting then on newspaper or a towel in the hot water cupboard works well.

Once the leaves are dry they make a wonderful canvas for painting. Again, they dry well in the hot water cupboard and can be hung up for a few days as decorations.

Tip: You could try spraying them with varnish to help them last longer.

Making playdough insects (portable playgroup fun!)

Playdough and straw caterpillar

Making playdough insects

Why not spend a rainy afternoon making homemade playdough and designing your own insects (or animals, or monsters!). It’s a cheap activity that’s also easily transportable to playgroup. Younger toddlers will have fun pushing the legs in and pulling them out again; preschoolers will have fun making their designs happen. Think about putting out some library picture books to help give them ideas!

What you 

  • Playdough (try making your own!)
  • Straws
  • Scissors
  • Knife (bamboo or wooden ones are great!)
  • Optional: Googly eyes (from craft stores)

How to make easy bracelets and crowns for kids

How to make easy bracelets and crowns for kids

How to make easy bracelets and crowns for kids

Kids are so wonderfully creative! There are lots of kit-sets for crafts at toy stores but it’s often much cheaper to visit a craft store or emporium.

All you need to make a crown, necklace, or bracelet is some pretty pipe cleaners, beads, and imagination! They’re a great activity for birthday parties, playgroups, and rainy days.

Fun things to do with beads!

Fun things to do with beads!

Make sure that you choose beads (or bells) with large enough holes for the pipe cleaners to feed through. Younger kids will need active supervision and assistance but by 4 years they’ll be shaking you off 🙂 You’ll also find they start coming up with their own ideas like making swords or funny glasses or monster crowns!

Warning: This isn’t suitable for babies and young toddlers due to small parts and choking hazards. Make sure young children are old enough to follow instructions and will not put beads in their mouths.

Bedazzling bags (rainy day crafts)

Bedazzling bags (rainy day crafts)

Bedazzling bags (rainy day crafts)

This is a great way to pass a rainy day – especially since a trip to the craft store will take up time as well! It’s also a fun activity for playgroups!

What do I need?

This is really up to your imagination!

  • Coloured paper bags
  • Glue (You may need a mix of paste, PVA, and a glue gun depending on what you’re using)
  • Wooden clips
  • Scissors
  • Buttons, sequins, stickers, fabric, wooden beads etc!

Directions

Play around with your materials to find a look that you like and start gluing!

These have wooden ladybugs hot-glued to the wooden clips. The flower is layered; there are plastic petals glued to the bag and then a fabric flower glued on top of that.

Ancient Grains Bread (soft & fluffy!)

Ancient Grains Bread

Ancient Grains Bread

To make a 750g loaf. This was delicious with home made peanut butter.

Ingredients

  • 290ml water
  • 2T oil (I use rice bran oil)
  • 1 1/2 tsp salt
  • 2T sugar
  • 3c bread flour
  • 2 T mix of:
    • Linseed
    • Pumpkin Seeds
    • Sunflower Seeds
    • Buckwheat
    • Puffed Quinoa
    • Coconut Thread
    • *You can mix this yourself or Hubbards conveniently sell a Seeds & Ancient Grains Mix
  • 2T milk powder
    • Baby formula also works and has the benefit of fortifying it with added vitamins & minerals!
    • Can replace with Almond Milk powder or Coconut Milk powder.
  • 3 tsp bread improver yeast

Allergies: soy free, egg free, dairy free* nut free.

Directions

  1. Put everything into the breadmaker in order listed. Select Dough only.
  2. When it finishes, select Dough only again so that it goes through another knockdown/rising cycle.
  3. Take out dough, knead for a couple of minutes, and place in bread tin. Let it rise while oven heats.
  4. Heat oven to 220’C.
  5. Bake at 220’C for 10 minutes, then at 180’C for 30 minutes; you may want to lower the oven tray when you turn the temperature down. I also recommend removing the loaf from the bread tin for the last 5-10 mins of cooking to allow even browning along the base.
  6. Bread should sound ‘hollow’ if you take it out of the tin and knock on the bottom.

Note: This will not turn out the same if you simply cook it in the breadmaker (it will be okay but not amazing) because the bread is contained by the size of the breadmaker and you can’t vary temperature and distance from heat.

Tip: A longer rising time will result in fluffier bread. I have sometimes done 4 knockdowns (two lengthy and two short) and 4 rising times meaning that the bread with 4-8 hours of ‘proofing’ before baking. Gluten based bread loves getting knocked around; all that kneading and rising helps to elasticate the dough and allows the gluten + yeast to work together to create tiny air bubbles.

If you’re interested in the chemistry of breadmaking check out this great post from Serious Eats.

Did you know? A commercial bakery will go from start to bag in 3 hours or less when making bread; traditional methods (and sourdoughs) take 18-25 hours. One theory behind rising numbers of gluten sensitivity and celiac disease is our move away to industrialized baking; a longer rising time results in decreased gluten proteins as they break down and change. It’s something to think about if you’re considering decreasing gluten in your diet.

Ancient Grains Bread

Ancient Grains Bread