One of the wonderful things about homeschooling is that making cookies can definitely be part of the curriculum! We’re studying Mexico at the moment and were sitting in the garden working with clay after watching videos about pottery. Miss decided to make and paint cookies – which then started us researching different types of Mexican cookies.
We settled on hojarascas (oh-ha-rascas) a kind of cinnamon sugar shortbread cookie. The name comes from a Spanish word referring to Autumnal leaves falling from the trees (and the crackling, crunching sound as they crumble beneath feet).
We started with a traditional recipe, and then adapted it to a Kiwi kitchen and making a small batch of about 18 cookies.
Ingredients
100g butter
1/4 cup sugar
1 egg
1/2 Tablespoon baking powder
1 tsp ground cinnamon
1.5 cups high grade flour
Topping: 1/2 cup sugar + 2tsp ground cinammon
Directions
Preheat the oven to 180’C / 350’F and line a cookie tray with baking paper.
In a large Pyrex bowl, soften or melt the butter.
Add the sugar and mix well.
Add the egg, cinnamon, and baking powder. Stir to combine.
Slowly mix in the flour until you have a soft dough.
You can can roll it out and use cookie cutters if you want to, but I like to just roll small balls with my fingers and softly flatten them.
Mix the sugar and cinnamon topping on a plate and gently press the cookies into the mix on both sides.
Place the cookies on the tray and bake for 10-15 mins (my oven took exactly 13 minutes!).
Place on a cooling rack and sprinkle with leftover cinnamon-sugar mix. (You could also wait until they are cooled, place the cinnamon-sugar in a ziploc bag, and shake the cookies gently.)
Notes
There are many versions of hojarascas cookies online and although some use butter, traditionally they use lard or shortening. Most recipes have the sugar and cinnamon mix added after baking, whereas I added mine beforehand to help it adhere more firmly. Some recipes add vanilla, or star anise, orange zest, or nuts (like pecans) but the cinnamon and sugar are consistent throughout – it does mean that you can experiment with many variations if these become a firm favourite in your household.
You can also experiment with the ratios of cinnamon:sugar and whether you’d like the cinnamon weighted more to the cookie or topping. I made the cinnamon flavour in the cookie quite mild but others may like it stronger.
The Inca civilisation had a complex administration system keeping detailed records of supplies, people, tributes, and stored goods. They also maintained over 40,000km (25,000 miles) of paved roadways with an State chaski messenger relay system.
As well as a rich oral culture, detailed records and messages were kept using quipus (kee-pooz). Instead of a system of written symbols (such as hieroglyphics or an alphabet), the Inca had a woven system of multi-coloured knots suspended from a central string. Different kinds of knots, their colour, and their position had different meanings that translated into a numerical system.
Creating a simple number cipher
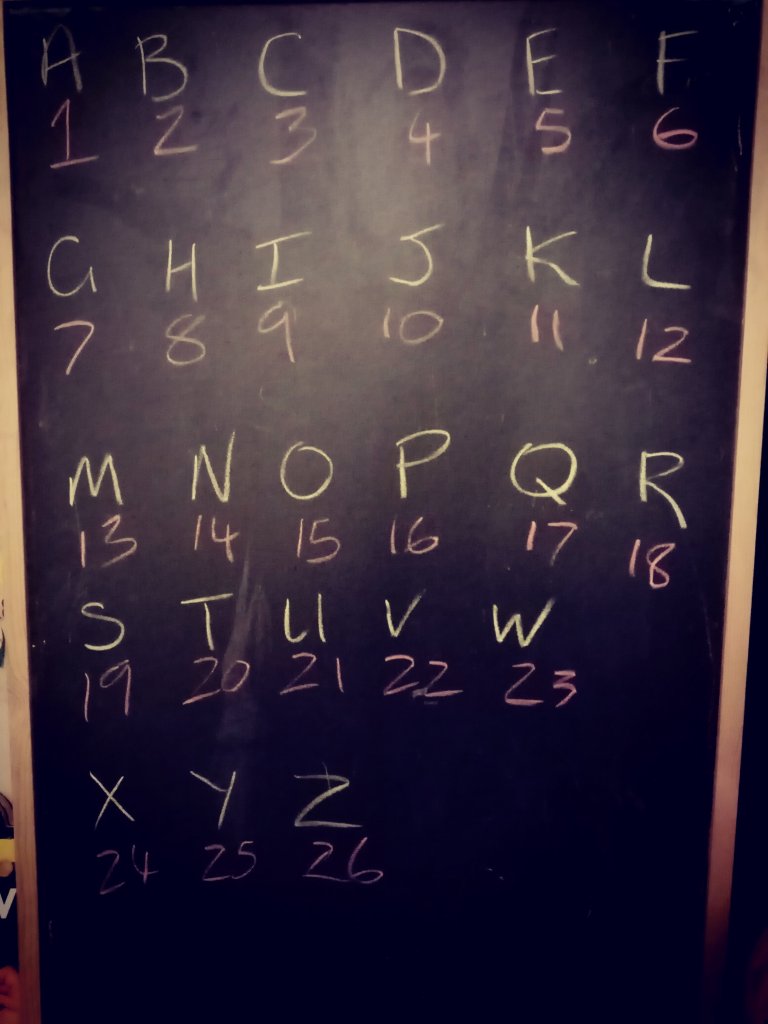
To explore the concept of recording information without using a written language, we will begin by creating a simple number substitution cipher where A=1, B=2, C=3, etc. This will then get translated into a series of knotted beads.
Simple number substitution cipher
Weaving words
Materials
Coloured yarn
Beads
Scissors
Directions
Start by choosing a word that you want to record (such as a name); as in English, you will read this from left to right (with each letter being read from top to bottom).
Weave a simple plait to act as your top anchor; it’s a good idea to have a loop at the left end so that it’s clear where to start reading from.
Knot a piece of yarn to the top anchor (you can slip it through the plait before tying it to help make sure it doesn’t move). Attach the relevant number of beads to correspond with the letter you are recording and knot beneath them so that they don’t slide off.
Letters A – I (numbers 1-9) will be represented by a corresponding number of beads close to the top anchor (i.e. A =1 bead).
Letter J (10) will be be represented as a single bead further down the strand.
Letters K-S (11-19) will be represented by a single bead further down the strand (representing one 10) with a knot to hold it in place, an approx. 5 cm gap, and then a group of beads to represent the ‘ones’ (i.e. S/19 will be one bead = 10, and then a group of nine beads = 9), and a knot to hold in place.
Letters T – Z will be represented by two beads further down the strand (representing two 10) with a knot to hold in place, an approx. 5 cm gap, and then a group of beads to represent the ‘ones’ (i.e. Z/26 will be two beads = 20, and then a group of six beads = 6), and a knot to hold in place.
Keep following Step 3, with a separate piece of yarn for each letter.
Example:
Lily (12/9/12/25) = One top anchor with four strands hanging from it. Reading from left to right, these will hold the following beads: low 1 (10) + 2 (2); high 9 (9); low 1 (10) + 2 (2); low 2 (20) + 5 (5).
Sam (19/1/13) = One top anchor with three strands hanging from it. Reading from left to right, these will hold: low 1 (10) + 9 (9); high 1 (1); low 1 (10) + 3 (3).
Tip: Older kids may want to create their own variation of this code by creating meaning based on the colour, size, or type of beads being used.
Want to find out more about the Inca?
One of my favourite books is proving to be Inca Discover the culture and geography of a lost civilisation. It’s well laid out, has plenty of pictures and infographics, and (very importantly) it has lots of ideas for easy to complete projects to help develop learning. This craft is inspired by one of their projects.
Want another project? Why not try making your own Inca Rope Suspension Bridge. This particular project references the Inca using rope bridges made of woven grass to cross narrow river canyons (such as the Keshwa Chaca – Quecha Bridge).
Well, lots of things really. It also differs so much from family to family. One unifying factor tends to be the freedom and flexibility to embrace a learning style that works for your particular child (or children). We tend to do lots of hands-on project based learning that weaves together different disciplines. This project for instance encompasses literature, world studies, art, engineering, and problem solving.
We flowed down the Amazon River, away from Brazil’s Pantanal and portion of the Amazon rainforest, to Peru with its vibrant surf culture, Cabillitos de Totora, and the towering Andes mountains – historically home to the Inca civilisation. We have a number of resources from documentaries, to Twinkl, to books; one of my favourites is proving to be Inca Discover the culture and geography of a lost civilisation. It’s well laid out, has plenty of pictures and infographics, and (very importantly) it has lots of ideas for easy to complete projects to help develop learning. [My only wish for improvement would be the addition of colour to make it more visually appealing for children].
This particular project references the Inca using rope bridges made of woven grass to cross narrow river canyons (such as the Keshwa Chaca – Quecha Bridge).
Materials
A shoebox or similar (We made excellent use of a KiwiCo box!)
Yarn or string
Pencils
Scissors
Ruler
Craft materials for decorating the landscape (such as construction paper, markers, or paint).
Directions
Imagine your box is a deep canyon with a river at the bottom. You can decorate it pretty much however you like (from marker pens, to paint, to showers of glitter). We opted for blue construction paper glued in as the river, and crumbled green construction paper as a mountainous landscape in the distance.
Use a sharpened pencil to create a hole near the top edge of one side of the box (and a matching hole on the other side). I was delighted to find that my Kiwico box width was exactly the length of my pencil which made the whole hole making process delightfully easy! I was happy doing things by eye, but a ruler will come in handy if you’d like to be more exact.
Measure a piece of yarn or string so that it will travel from one hole to the other with length left over at each end. This will form one of your handrails.
Thread the yarn through the hole and secure it with a large double knot. Then thread it through the opposite hole and knot it again (check the tension to ensure it is tight).
For your second handrail, move along the box about the length of your little finger. Make another hole (plus one opposite) so that you can repeat Steps 3 and 4.
Now you’re going to make the bottom of the bridge. Imagine a triangle (base facing the sky). Find the mid-point between two holes, measure down about 5cm, and create a new hole (see photo). Create a matching hole on the opposite side of the box. Thread the string through and knot if off (making sure to keep it taught. I used a pencil on each side to help weight the bridge (twisting to add tension).
The final step is making the sides. Cut lengths of yarn (around 15cm). Tie each length to a handrail, loop it twice around the bottom, continue up to the other handrail, loop it around, and then knot. Techniques will vary; I opted to loop mine back and do two sliding knots on the upward slant of the ‘V’. Repeat this process until have traversed the canyon!
Involving kids…
You can tailor this project to the age and interest of the children involved. A simple way to get them involved is by asking them, ‘What would you make a bridge out of?’ and then talking about their answer (and relating it to the real world if applicable – easy to do if they say wood, stone, or steel, trickier if they say marshmallow clouds!).
Ask them at each stage of the process what else they think the bridge needs. After explaining that the first piece of yarn is a handrail, they will hopefully start thinking about the other hand and the feet!
Give them a couple of toys to test the bridge as it is built. Explain that testing designs is an important part of engineering. They may well delight in seeing the figures plummet to the depths below and swim to shore to try again. We found the best ‘to scale’ figure was a Playmobil child crossing the river to meet a grazing Peruvian llama at home in its Andean highlands.
Creative homeschool STEM fun with the Kiwi Crate Disc Launchers box and learning about physics through play!
WHAT IS IN THE DISC LAUNCHER BOX?
The science for this box is learning about physics and inertia. What I love about KiwiCo is how engaging they make learning about physics and how easy they make it for kids to understand. The comic strip for this box features the regular characters having wagon races with their soft toys – when one of the wagons is stopped by a rock, the stuffed bunny goes flying! They learn that not only is inertia a resistance to a change in force – movement – but also that seat-belts are really important protective features.
The Explore magazine gives lots of fun ideas of ways to explore inertia at home – from attempting the ‘pull tablecloth from beneath a plate’ magic trick, to watching what happens when you stop your own wagon suddenly. We found that we could easily repeat the concepts in the comic strip by using Lego vehicles and mini-figures, or by putting little balls into one of our HotWheels that looks like a supermarket trolley.
The main engineering build for this crate is building a Disc Launcher (reminiscent of a clay bird launcher) and there are enough materials to build two of these. There are a heap of wooden discs to launch, and these can also be used for homeschool activities as counting, coins, and whale food.
The disc launcher comes with ideas for games – such as knocking down skittles (rainbow ones included) or playing a version of curling using the scoring mat (included).
The secondary project (art) is using your imagination to make things out of air dry clay (pack included). We used the three colours provided (red, yellow, blue) to make archways, a goalie, and lots of multi-coloured balls. We found that we could get cool multi-coloured swirling colours when lightly combining and a sort-of purple when they were really thoroughly mixed. Our creations then created a kind of obstacle course for the disc launcher. It’s worth noting that air dry clay starts as a very soft malleable material; after 24 hours drying it could readily be played with but was also still able to be changed into new forms. You may want to give it a full week to dry and harden (if the kids are willing to wait that long).
HOW DO I ORDER KIWI CRATE?
This is not a paid review. I spent a lot of time searching the internet to find out more information about the Kiwi Crate and Atlas Crate boxes before deciding to try them and found the blog posts / photos that people shared were really useful!
If you would like to try Kiwi Crate (or one of their other lines), you can receive 50% off your first box by clicking here.
What I like about the Kiwi Crate kits is that they use a combination of Science, Technology, Engineering, Arts, and Mathematics to explore a concept or idea. There’s no obligation to sign-up in an on-going capacity so it’s easy to tie them in with birthdays / Christmas; the boxes are quite compact so they also store easily in a cupboard for bringing them out on a rainy day. Mind you, this only works if you spot the package on the door-step first – children become quite adept at recognising the green Kiwi Crate box and screaming with delight at it’s arrival!
The boxes are sent randomly so there’s no way to know what will come in the future; however, you can log-in to your account at the start of each month to see what box has been selected. Your box history is kept which means that even if you cancel and then pick-up again the following year they can make sure that you aren’t sent repeats of boxes.
WHAT IS IN A KIWI CRATE?
The Kiwi Crate is aimed at ages 5-8 years. It comes with a copy of the Explore magazine which opens with a fun comic about Steve the Kiwi and his friends. [As a side note, these are made by an American company despite the use of our New Zealand native bird]. These comics are really approachable for younger kids and a great way of exploring the concepts being introduced in a relateable manner.
The Explore magazine provides a range of information on the topic, it might include some simple games or tricks to try at home, and provide ideas for additional crafts / activities using simple materials. It also has a sticker [unique to each box theme] to put on your Kiwi Crate chart.
The box also includes an instruction manual and the materials that you need to build the main craft. Generally, there are two activities to do – one that is more art related, and one that is more mechanical engineering. What makes the kits special, is how well crafted the engineering components are. They really are designed for the intended age group so that they can either build themselves or help assist an adult. There are handy visual images and checkpoints to make sure that things are aligned correctly. There is no super-bonding-fingers-together wood glue to use with these projects (which makes them great for highly sensory children); instead parts come with double sided tape finely engineered on so that you just need to remove the backing strip of paper.
Creative homeschool STEM fun with the Kiwi Crate Mechanical Sweeper box and learning about baleen whales.
WHAT IS IN THE MECHANICAL SWEEPER CRATE?
This box is all about baleen whales! The main project (engineering) involves building a mechanical floor sweeper with it’s rotating foam ‘teeth’ representing the baleen ‘moustache’ found in the whale’s mouth for filtering krill out of water. What makes it really engaging for kids is the art aspect for the crate.
The whales are then attached to the sides of the floor sweeper and Voila! Your baleen whale can now eat the little furry balls (representing phytoplankton and zooplankton) provided with the crate.
There are also ideas included for additional projects using materials at home – like making a baby whale using a paper cup and craft materials.
HOW DO I ORDER KIWI CRATE?
This is not a paid review. I spent a lot of time searching the internet to find out more information about the Kiwi Crate and Atlas Crate boxes before deciding to try them and found the blog posts / photos that people shared were really useful!
If you would like to try Kiwi Crate (or one of their other lines), you can receive 50% off your first box by clicking here.
What I like about the Kiwi Crate kits is that they use a combination of Science, Technology, Engineering, Arts, and Mathematics to explore a concept or idea. There’s no obligation to sign-up in an on-going capacity so it’s easy to tie them in with birthdays / Christmas; the boxes are quite compact so they also store easily in a cupboard for bringing them out on a rainy day. Mind you, this only works if you spot the package on the door-step first – children become quite adept at recognising the green Kiwi Crate box and screaming with delight at it’s arrival!
The boxes are sent randomly so there’s no way to know what will come in the future; however, you can log-in to your account at the start of each month to see what box has been selected. Your box history is kept which means that even if you cancel and then pick-up again the following year they can make sure that you aren’t sent repeats of boxes.
WHAT IS IN A KIWI CRATE?
The Kiwi Crate is aimed at ages 5-8 years. It comes with a copy of the Explore magazine which opens with a fun comic about Steve the Kiwi and his friends. [As a side note, these are made by an American company despite the use of our New Zealand native bird]. These comics are really approachable for younger kids and a great way of exploring the concepts being introduced in a relateable manner.
The Explore magazine provides a range of information on the topic, it might include some simple games or tricks to try at home, and provide ideas for additional crafts / activities using simple materials. It also has a sticker [unique to each box theme] to put on your Kiwi Crate chart.
The box also includes an instruction manual and the materials that you need to build the main craft. Generally, there are two activities to do – one that is more art related, and one that is more mechanical engineering. What makes the kits special, is how well crafted the engineering components are. They really are designed for the intended age group so that they can either build themselves or help assist an adult. There are handy visual images and checkpoints to make sure that things are aligned correctly. There is no super-bonding-fingers-together wood glue to use with these projects (which makes them great for highly sensory children); instead parts come with double sided tape finely engineered on so that you just need to remove the backing strip of paper.
Homeschool STEM creative fun with the Kiwi Crate Amazing Animation box
WHAT IS IN THE AMAZING ANIMATION CRATE?
This box is all about animation! The main project (engineering) involves building a zoetrope. This is a wonderful project that has finely manufactured marble-style bearings to allow it to spin. It’s fascinating for kids to watch how important these are to allow the zoetrope to work and is a great opportunity to extend learning by discussing bearings and friction. There are multiple animation strips that you can use to create your own ‘movie’ in 19th Century style! There are also some blank strips so that kids can experiment with creating their own animation. We’ve even taken our zoetrope down to the local library so that she could proudly show it to the team and chat away – they were genuinely impressed and thought it was very cool.
The second project (art) is creating a flipbook. Their suggestion is to start with a simple stick figure and then turn the book over (to the reverse pages) to explore their own creative ideas.
We also did a third project – creating a Victorian-era thaumotrope. This spinning optical illusion is easy to make and a lot of fun!
HOW DO I ORDER KIWI CRATE?
This is not a paid review. I spent a lot of time searching the internet to find out more information about the Kiwi Crate and Atlas Crate boxes before deciding to try them and found the blog posts / photos that people shared were really useful!
If you would like to try Kiwi Crate (or one of their other lines), you can receive 50% off your first box by clicking here.
What I like about the Kiwi Crate kits is that they use a combination of Science, Technology, Engineering, Arts, and Mathematics to explore a concept or idea. There’s no obligation to sign-up in an on-going capacity so it’s easy to tie them in with birthdays / Christmas; the boxes are quite compact so they also store easily in a cupboard for bringing them out on a rainy day. Mind you, this only works if you spot the package on the door-step first – children become quite adept at recognising the green Kiwi Crate box and screaming with delight at it’s arrival!
The boxes are sent randomly so there’s no way to know what will come in the future; however, you can log-in to your account at the start of each month to see what box has been selected. Your box history is kept which means that even if you cancel and then pick-up again the following year they can make sure that you aren’t sent repeats of boxes.
WHAT IS IN A KIWI CRATE?
The Kiwi Crate is aimed at ages 5-8 years. It comes with a copy of the Explore magazine which opens with a fun comic about Steve the Kiwi and his friends. [As a side note, these are made by an American company despite the use of our New Zealand native bird]. These comics are really approachable for younger kids and a great way of exploring the concepts being introduced in a relateable manner.
The Explore magazine provides a range of information on the topic, it might include some simple games or tricks to try at home, and provide ideas for additional crafts / activities using simple materials. It also has a sticker [unique to each box theme] to put on your Kiwi Crate chart.
The box also includes an instruction manual and the materials that you need to build the main craft. Generally, there are two activities to do – one that is more art related, and one that is more mechanical engineering. What makes the kits special, is how well crafted the engineering components are. They really are designed for the intended age group so that they can either build themselves or help assist an adult. There are handy visual images and checkpoints to make sure that things are aligned correctly. There is no super-bonding-fingers-together wood glue to use with these projects (which makes them great for highly sensory children); instead parts come with double sided tape finely engineered on so that you just need to remove the backing strip of paper.
Homeschool STEM creative fun with the Kiwi Crate Arcade box
WHAT IS IN THE ARCADE CRATE?
We were thrilled to get this as our first crate as Miss saw THE CLAW at a friend’s house and post-demonstration was begging to be able to make one of her own. It is so well beloved that it has been carefully cared for and is still going almost a year later. In fact, it was used yesterday to ‘help’ unpack the rice crackers out of the grocery bags with a request that I open the proferred snack 🙂
This box is all about Arcade Games (like the vintage penny arcades found in amusement parks in the early 20th Century)! There are simple coin toss games that you can play with the magazine; there is the awesome wooden Claw to build that opens and closes and can be used to pick up all kinds of toys, there is a pom pom creature to make, and you can turn the box into an arcade machine and try to lift things out of it with the claw. The wooden U for making pom-poms is great and we have used it to make many more since! (I’ve made pom-poms with kids using cardboard templates, and using plastic kits from craft stores; I find this wooden U from KiwiCrate is the quickest and easiest to use, not to mention child friendly and durable!)
HOW DO I ORDER KIWI CRATE?
This is not a paid review. I spent a lot of time searching the internet to find out more information about the Kiwi Crate and Atlas Crate boxes before deciding to try them and found the blog posts / photos that people shared were really useful!
If you would like to try Kiwi Crate (or one of their other lines), you can receive 50% off your first box by clicking here.
What I like about the Kiwi Crate kits is that they use a combination of Science, Technology, Engineering, Arts, and Mathematics to explore a concept or idea. There’s no obligation to sign-up in an on-going capacity so it’s easy to tie them in with birthdays / Christmas; the boxes are quite compact so they also store easily in a cupboard for bringing them out on a rainy day. Mind you, this only works if you spot the package on the door-step first – children become quite adept at recognising the green Kiwi Crate box and screaming with delight at it’s arrival!
The boxes are sent randomly so there’s no way to know what will come in the future; however, you can log-in to your account at the start of each month to see what box has been selected. Your box history is kept which means that even if you cancel and then pick-up again the following year they can make sure that you aren’t sent repeats of boxes.
WHAT IS IN A KIWI CRATE?
The Kiwi Crate is aimed at ages 5-8 years. It comes with a copy of the Explore magazine which opens with a fun comic about Steve the Kiwi and his friends. [As a side note, these are made by an American company despite the use of our New Zealand native bird]. These comics are really approachable for younger kids and a great way of exploring the concepts being introduced in a relateable manner.
The Explore magazine provides a range of information on the topic, it might include some simple games or tricks to try at home, and provide ideas for additional crafts / activities using simple materials. It also has a sticker [unique to each box theme] to put on your Kiwi Crate chart.
The box also includes an instruction manual and the materials that you need to build the main craft. Generally, there are two activities to do – one that is more art related, and one that is more mechanical engineering. What makes the kits special, is how well crafted the engineering components are. They really are designed for the intended age group so that they can either build themselves or help assist an adult. There are handy visual images and checkpoints to make sure that things are aligned correctly. There is no super-bonding-fingers-together wood glue to use with these projects (which makes them great for highly sensory children); instead parts come with double sided tape finely engineered on so that you just need to remove the backing strip of paper.