These are a few fun experiments that you can amaze your friends with that only require a few household items and are based around two things: a balloon and static electricity.
When we rub a balloon on the right kind of surface (like a wool jumper), it goes from being neutral to building up a negative charge. This can then be used to manipulate electrons on other surfaces by repelling negative electrons and drawing positive electrons. More importantly, this can look really, really cool!
Want to see the science behind it? Check out this cool interactive digital experiment.
TIP: The science behind this magic trick is impacted by the weather, so be sure to perform when the air is dry!
Materials
Balloon
Pencil
Salt
Scrap paper
Tip: We found plain balloons worked best. Thicker balloons designed for helium, or heavily patterned ones didn’t seem to build up a charge.
Directions
Blow up a balloon and tie it off.
Rub the balloon repeatedly. You may need to experiment with different surfaces such as hair, woollen clothes, jumpers, carpet; (conductive materials will give up their electrons more readily). You may need to experiment with how long it takes to build up a charge; note that the charge will only build up on the side that is rubbed.
Experiment away!
Dancing Salt: Place a pile of fine table salt on a bench and hold a charged balloon above it. Watch the salt leap up and cling to the balloon!
Magic Pencil: Move a pencil without touching it! Balance a wooden pencil on top of a glass or bottle. Hold the charged balloon nearby and watch the pencil roll.
Shifting paper: Make a pile of paper (ripped into small squares) and hold the charged balloon nearby. Watch the paper shift (and hopefully leap up to the balloon!).
Sticky walls: Charge the balloon and then try sticking it to the wall or curtain.
This box encourages children to reflect on the question: How do mirrors work? The Explore magazine gives lots of fun ideas on how to explore this, such as : using a mirror map, writing a secret message using mirror writing, and creating infinite reflections.
Kiwi Crate’s Mirror Illusions box comes with materials for three crafts:
DESIGN AND PAINT A JIGSAW
We really liked the colour palette provided for this and that the paint stampers/dabbers can be re-used as an ongoing art resource. There is a selection of special stickers to choose from that will provide a magic ‘negative space’ when they are removed after painting. The two jigsaws can be used double sided which means that you can end up with a total of 4 puzzles (the emoji face + 3 of your own design).
MAKE YOUR OWN MIRROR GOGGLES
These really emphasize just how helpful it is when our brain automatically processes and translates reflected light for us. With these mirror goggles, a disconnect is created. Your hands need to move in the opposite direction from what your eyes are telling you. If you move a puzzle piece towards you, it will look like you are pushing it away (and vice versa). If you try writing your name, it will appear upside down without the goggles. A fun challenge is trying to write a name or phrase ‘upside down’ so that it appears correct without the goggles.
MAKE A MAGIC TRICK BOX
These are fun to make! There are a few options to choose from for your inner illustration (or you can design your own). When performing, simply ask for a coin from a member of the audience, drop it in the slot, and Hey Presto! it appears to vanish right in front of their eyes. The secret to the magic trick is the slanted mirror inside that creates an optical illusion and hides a secret compartment.
HOW DO I ORDER KIWI CRATE?
This is not a paid review. I spent a lot of time searching the internet to find out more information about the Kiwi Crate and Atlas Crate boxes before deciding to try them and found the blog posts / photos that people shared were really useful!
If you would like to try Kiwi Crate (or one of their other lines), you can receive 50% off your first box by clicking here.
What I like about the Kiwi Crate kits is that they use a combination of Science, Technology, Engineering, Arts, and Mathematics to explore a concept or idea. There’s no obligation to sign-up in an on-going capacity so it’s easy to tie them in with birthdays / Christmas; the boxes are quite compact so they also store easily in a cupboard for bringing them out on a rainy day. Mind you, this only works if you spot the package on the door-step first – children become quite adept at recognising the green Kiwi Crate box and screaming with delight at it’s arrival!
The boxes are sent randomly so there’s no way to know what will come in the future; however, you can log-in to your account at the start of each month to see what box has been selected. Your box history is kept which means that even if you cancel and then pick-up again the following year they can make sure that you aren’t sent repeats of boxes.
WHAT IS IN A KIWI CRATE?
The Kiwi Crate is aimed at ages 5-8 years. It comes with a copy of the Explore magazine which opens with a fun comic about Steve the Kiwi and his friends. [As a side note, these are made by an American company despite the use of our New Zealand native bird]. These comics are really approachable for younger kids and a great way of exploring the concepts being introduced in a relateable manner.
The Explore magazine provides a range of information on the topic, it might include some simple games or tricks to try at home, and provide ideas for additional crafts / activities using simple materials. It also has a sticker [unique to each box theme] to put on your Kiwi Crate chart.
The box also includes an instruction manual and the materials that you need to build the main craft. Generally, there are two activities to do – one that is more art related, and one that is more mechanical engineering. What makes the kits special, is how well crafted the engineering components are. They really are designed for the intended age group so that they can either build themselves or help assist an adult. There are handy visual images and checkpoints to make sure that things are aligned correctly. There is no super-bonding-fingers-together wood glue to use with these projects (which makes them great for highly sensory children); instead parts come with double sided tape finely engineered on so that you just need to remove the backing strip of paper.
Kiwi Crate’s Marble Timer box comes with materials for two crafts:
DESIGN A MARBLE RUN (and TIMER!)
Marble Runs are just generally fun! This one has a push-bar built in so that when the first marble reaches the bottom it triggers the second marble dropping. To extend the fun, the pre-cut backboard allows the wooden ‘shelves’ to be placed in different configurations. Children can experiment with engineering different drops and angles to see how this impacts the time taken for all the marbles to reach the bottom.
CREATE DIP-DYE WOOD ART
These make beautiful ornaments that can be used for anything from bookmarks to Christmas Tree decorations. There are three pieces of carved wood for you to create unique art with. You’re provided with everything you need, including plastic cups, clips, and liquid colours. We also used our dipper from the KiwiCo Surface Tension box.
Children can experiment with the dipping process to see how time impacts the intensity of the colour and how double dipping can create new blended colours (such as: blue + yellow = green).
We loved this so much that we plan to repeat this at other times of the year, by buying plain seasonal wooden ornaments (i.e. at Christmas or Easter), to craft something that is truly unique.
HOW DO I ORDER KIWI CRATE?
This is not a paid review. I spent a lot of time searching the internet to find out more information about the Kiwi Crate and Atlas Crate boxes before deciding to try them and found the blog posts / photos that people shared were really useful!
If you would like to try Kiwi Crate (or one of their other lines), you can receive 50% off your first box by clicking here.
What I like about the Kiwi Crate kits is that they use a combination of Science, Technology, Engineering, Arts, and Mathematics to explore a concept or idea. There’s no obligation to sign-up in an on-going capacity so it’s easy to tie them in with birthdays / Christmas; the boxes are quite compact so they also store easily in a cupboard for bringing them out on a rainy day. Mind you, this only works if you spot the package on the door-step first – children become quite adept at recognising the green Kiwi Crate box and screaming with delight at it’s arrival!
The boxes are sent randomly so there’s no way to know what will come in the future; however, you can log-in to your account at the start of each month to see what box has been selected. Your box history is kept which means that even if you cancel and then pick-up again the following year they can make sure that you aren’t sent repeats of boxes.
WHAT IS IN A KIWI CRATE?
The Kiwi Crate is aimed at ages 5-8 years. It comes with a copy of the Explore magazine which opens with a fun comic about Steve the Kiwi and his friends. [As a side note, these are made by an American company despite the use of our New Zealand native bird]. These comics are really approachable for younger kids and a great way of exploring the concepts being introduced in a relateable manner.
The Explore magazine provides a range of information on the topic, it might include some simple games or tricks to try at home, and provide ideas for additional crafts / activities using simple materials. It also has a sticker [unique to each box theme] to put on your Kiwi Crate chart.
The box also includes an instruction manual and the materials that you need to build the main craft. Generally, there are two activities to do – one that is more art related, and one that is more mechanical engineering. What makes the kits special, is how well crafted the engineering components are. They really are designed for the intended age group so that they can either build themselves or help assist an adult. There are handy visual images and checkpoints to make sure that things are aligned correctly. There is no super-bonding-fingers-together wood glue to use with these projects (which makes them great for highly sensory children); instead parts come with double sided tape finely engineered on so that you just need to remove the backing strip of paper.
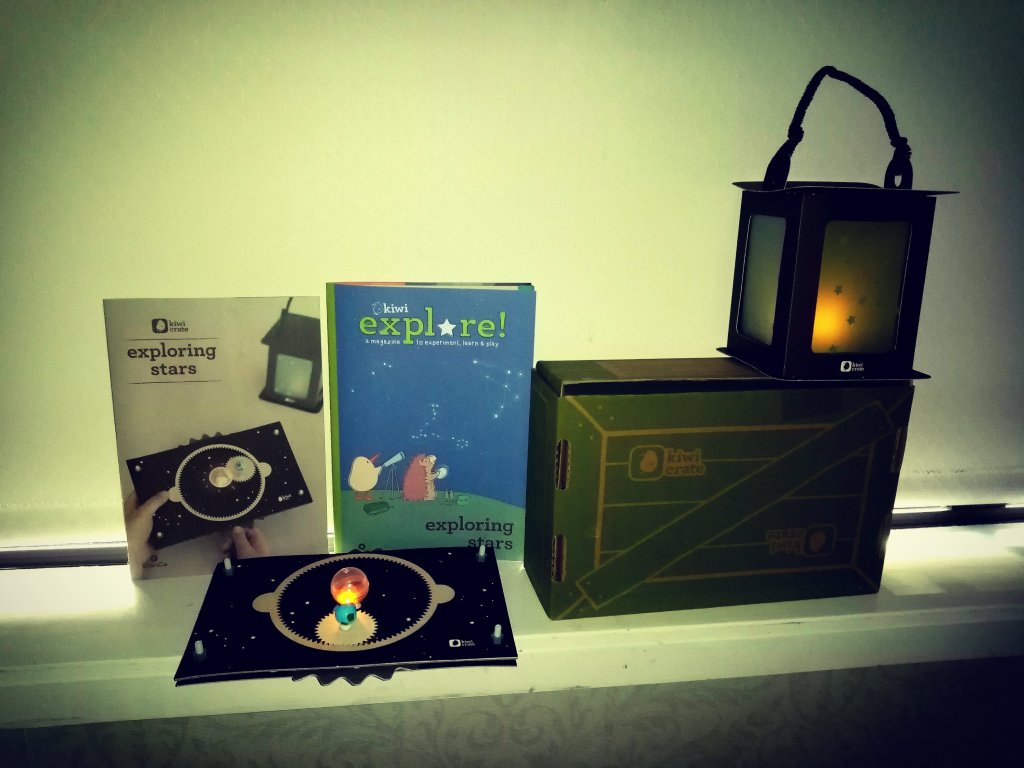
This box encourages children to explore the night sky using both science and their imaginations. They learn about the science of stars (and build a solar spinner) and how to imagine a night sky full of stories (drawing dot-to-dot constellations and making a constellation lantern). There are also instructions on how to turn your Kiwi Crate into a solar oven – which we have successfully done 🙂
Kiwi Crate’s Night Sky box comes with materials for two crafts:
BUILD A SOLAR SPINNER
The Solar Spinner lets you build a mechanical model to demonstrate the way the Earth moves around the sun, and the Moon moves around the Earth. It’s also a useful model to use for discussing the changing phases of the moon.
MAKE YOUR OWN CONSTELLATION LANTERN
This easy to build lantern lets you copy (or design your own) star constellations using star stickers over lantern paper. The candle provided is battery powered and has a flickering effect for added cosiness!
Want more ideas for learning about stars and constellations?
We love the book Space Atlas by Tom Jackson and it forms part of our homeschool library.
Learn more about why the moon appears to change with a child friendly video (@ SciShow Kids) or diagram (@NatGeo Kids) about moon phases. You can also experiment with moon phases at home with just a few simple materials.
Try making a solar oven and cooking s’mores or melting cheese on corn chips.
HOW DO I ORDER KIWI CRATE?
This is not a paid review. I spent a lot of time searching the internet to find out more information about the Kiwi Crate and Atlas Crate boxes before deciding to try them and found the blog posts / photos that people shared were really useful!
If you would like to try Kiwi Crate (or one of their other lines), you can receive 50% off your first box by clicking here.
What I like about the Kiwi Crate kits is that they use a combination of Science, Technology, Engineering, Arts, and Mathematics to explore a concept or idea. There’s no obligation to sign-up in an on-going capacity so it’s easy to tie them in with birthdays / Christmas; the boxes are quite compact so they also store easily in a cupboard for bringing them out on a rainy day. Mind you, this only works if you spot the package on the door-step first – children become quite adept at recognising the green Kiwi Crate box and screaming with delight at it’s arrival!
The boxes are sent randomly so there’s no way to know what will come in the future; however, you can log-in to your account at the start of each month to see what box has been selected. Your box history is kept which means that even if you cancel and then pick-up again the following year they can make sure that you aren’t sent repeats of boxes.
WHAT IS IN A KIWI CRATE?
The Kiwi Crate is aimed at ages 5-8 years. It comes with a copy of the Explore magazine which opens with a fun comic about Steve the Kiwi and his friends. [As a side note, these are made by an American company despite the use of our New Zealand native bird]. These comics are really approachable for younger kids and a great way of exploring the concepts being introduced in a relateable manner.
The Explore magazine provides a range of information on the topic, it might include some simple games or tricks to try at home, and provide ideas for additional crafts / activities using simple materials. It also has a sticker [unique to each box theme] to put on your Kiwi Crate chart.
The box also includes an instruction manual and the materials that you need to build the main craft. Generally, there are two activities to do – one that is more art related, and one that is more mechanical engineering. What makes the kits special, is how well crafted the engineering components are. They really are designed for the intended age group so that they can either build themselves or help assist an adult. There are handy visual images and checkpoints to make sure that things are aligned correctly. There is no super-bonding-fingers-together wood glue to use with these projects (which makes them great for highly sensory children); instead parts come with double sided tape finely engineered on so that you just need to remove the backing strip of paper.
We recently learned about force and tension in the Kiwi Crate Push and Pull box. This time we learn about a different type of tension – surface tension! Ever wonder why water soaks into some materials but pools on top of others? Well, water droplets are pretty sticky and they most like to stick to each other – especially on a surface like wax paper that is water resistant. That ‘stickiness’ is also at it’s strongest on the surface – which is why insects like water striders can delicately move across it.
Kiwi Crate’s Surface Tension box comes with materials for four experiments:
BUILD A BLOB
Liquid watercolours in primary colours are provided along with water resistant wax paper and a stirring stick. When you squeeze the watercolours onto the wax paper, instead of dissolving into the paper – they sit on top and make blobs! You can make small blobs, big blobs, and baby blobs. You can move blobs by herding them with your stick. You can merge blobs and watch the colours change to orange, green, purple, or ‘muddy mix’. The fun science magazine comes with kid friendly infographics to explain why when you drag one water droplet, its friends want to stick together and come along.
MAKE A WATER MAZE
This activity reminded me a little of wooden mazes and steel ball bearings that we played with as kids – twisting, turning, and tilting, to try and guide the ball to the centre of the maze. This brings a whole new level to the game while teaching us about science. The maze that you build combines water absorbent walls with a water resistant floor. It is a fun challenge and the secret is definitely patience (and slow movements!).
MAKE A WATER ELEVATOR
So, when we were learning about (cable) tension, we built a toy elevator. This time, we’re kind of making an elevator for water and it works because of that principle of water being ‘sticky’. Cool Science Experiments have a great visual demonstration; KiwiCo simplify things by providing a kid friendly kit. We have tested this with friends and it’s a ‘magic trick’ that does not fail to entertain and amaze! It is important that you remember to soak the yarn (water follows water) and that you keep a careful eye on tension + pour speed. Have some towels handy just in case you need to mop up spills.
MAKE YOUR OWN WATER STRIDER
I shared a video at the start of the post about water striders – excitingly, you get to make your own! You get a bunch of wires that you can crimp and then use to make a water strider. You can also experiment with making shapes to float on the top of the water. What gets a bit tricky, is that your insect’s legs and feet need to be balanced on the surface; if the angles are not quite right then they will pierce the surface tension and potentially drag part of your insect under the water. If you’re struggling a big with the water strider, try using the dipper to gently place a needle or paper clip on the surface.
Want more ideas for learning about surface tension?
This is not a paid review. I spent a lot of time searching the internet to find out more information about the Kiwi Crate and Atlas Crate boxes before deciding to try them and found the blog posts / photos that people shared were really useful!
If you would like to try Kiwi Crate (or one of their other lines), you can receive 50% off your first box by clicking here.
What I like about the Kiwi Crate kits is that they use a combination of Science, Technology, Engineering, Arts, and Mathematics to explore a concept or idea. There’s no obligation to sign-up in an on-going capacity so it’s easy to tie them in with birthdays / Christmas; the boxes are quite compact so they also store easily in a cupboard for bringing them out on a rainy day. Mind you, this only works if you spot the package on the door-step first – children become quite adept at recognising the green Kiwi Crate box and screaming with delight at it’s arrival!
The boxes are sent randomly so there’s no way to know what will come in the future; however, you can log-in to your account at the start of each month to see what box has been selected. Your box history is kept which means that even if you cancel and then pick-up again the following year they can make sure that you aren’t sent repeats of boxes.
WHAT IS IN A KIWI CRATE?
The Kiwi Crate is aimed at ages 5-8 years. It comes with a copy of the Explore magazine which opens with a fun comic about Steve the Kiwi and his friends. [As a side note, these are made by an American company despite the use of our New Zealand native bird]. These comics are really approachable for younger kids and a great way of exploring the concepts being introduced in a relateable manner.
The Explore magazine provides a range of information on the topic, it might include some simple games or tricks to try at home, and provide ideas for additional crafts / activities using simple materials. It also has a sticker [unique to each box theme] to put on your Kiwi Crate chart.
The box also includes an instruction manual and the materials that you need to build the main craft. Generally, there are two activities to do – one that is more art related, and one that is more mechanical engineering. What makes the kits special, is how well crafted the engineering components are. They really are designed for the intended age group so that they can either build themselves or help assist an adult. There are handy visual images and checkpoints to make sure that things are aligned correctly. There is no super-bonding-fingers-together wood glue to use with these projects (which makes them great for highly sensory children); instead parts come with double sided tape finely engineered on so that you just need to remove the backing strip of paper.
In our KiwiCo Kiwi Crate Push and Pull Toys box we learned about force and tension. When we hold a rope loosely so that it rests between us, it is slack. When we pull, that force travels along it and it becomes taut. That is tension at work. That pull force and tension can also be used to make something (or someone) move especially when we add a simple machine – like a pulley. SciShow Kids gives a great visual example of how this works: click here to watch.
An elevator lift relies upon the science of tension so that those vertical cables, a pulley, and counterweights, can create a lift force in order to move people or objects. An elevator lift’s science and internal mechanisms can make for fascinating reading and is more complex then this simple build. This craft is a great place to start for younger kids, and older kids may want to engineer their own more complex designs!
How to make a kids toy elevator lift
Our Kiwi Crate came with this great idea in the Explore magazine!
Materials
Sturdy cardboard box
Wooden dowel (cut to size)
String
Pencil, scissors, glue, sellotape, ruler.
Decorations
Tip: Where can I get a wooden dowel? Turns out, lots of places! Craft stores and hardware stores are a good place to start. Keep in mind that you’ll want the wooden dowel to be at least the width of your box (with some extra length each side as turning handles).
Instructions
Cut the lid / flaps off the top face of the box. (Save them)
You want to make a small hole for your wooden dowel. Stand your box and choose a short end to be the top of the ‘building’. Choose a ‘side’ of the building and use a ruler to measure about an inch down from the ‘roof’ and make a pencil mark. Use a sharp pencil (or scissors) to carefully push a hole through the cardboard.
Slide the wooden dowel through the hole and use it (as well as your ruler) to help you position a matching hole on the far side of the ‘building’.
To make your ‘elevator’, cut the cardboard that you saved into two strips. Experiment with scoring and folding these, then slide them together to make a rectangle (you’ll need to tape or glue the sides). You will need to trim them to size as if they press too closely against the building walls, friction will slow the elevator’s rise.
Make two holes in the ‘roof’ of the elevator.
Measure and cut your string; you want it about twice as long as your building is high.
Thread string through one hole and tie a knot inside the elevator lift. Take the other end of the string and wrap it around the wooden dowel (acting as a pulley) and then place the end through the roof of the elevator and knot it off.
Make sure your string has equal lengths on each side and then tape the centre of the loop to the dowel.
Have fun decorating your building and elevator 🙂
You are now ready to lift! Simply twist the handles and watch the elevator rise as the string wraps itself around the dowel. Observe how the lift force requires the cable (string) to retain tension in order to operate. Discuss what would happen if the string was too long and stayed like limp spaghetti. What can you lift? Are some things too big or too heavy? Do some shapes wobble and fall off? Is it the right height to transport cars or dinosaurs or dolls where they want to go? What size might you need to reach a floor in a dollhouse, or the top of a coffee table, or the seat of the couch?
This is a great way of introducing kids to early scientific concepts found in physics – namely, force and tension. We love playing tug of war every evening with our wearable chewable cotton terrycloth band. When we hold it loosely so that it rests between us, it is slack. When we pull, that force travels along it and it becomes taut. That is tension at work. That pull force and tension can also be used to make something (or someone) move.
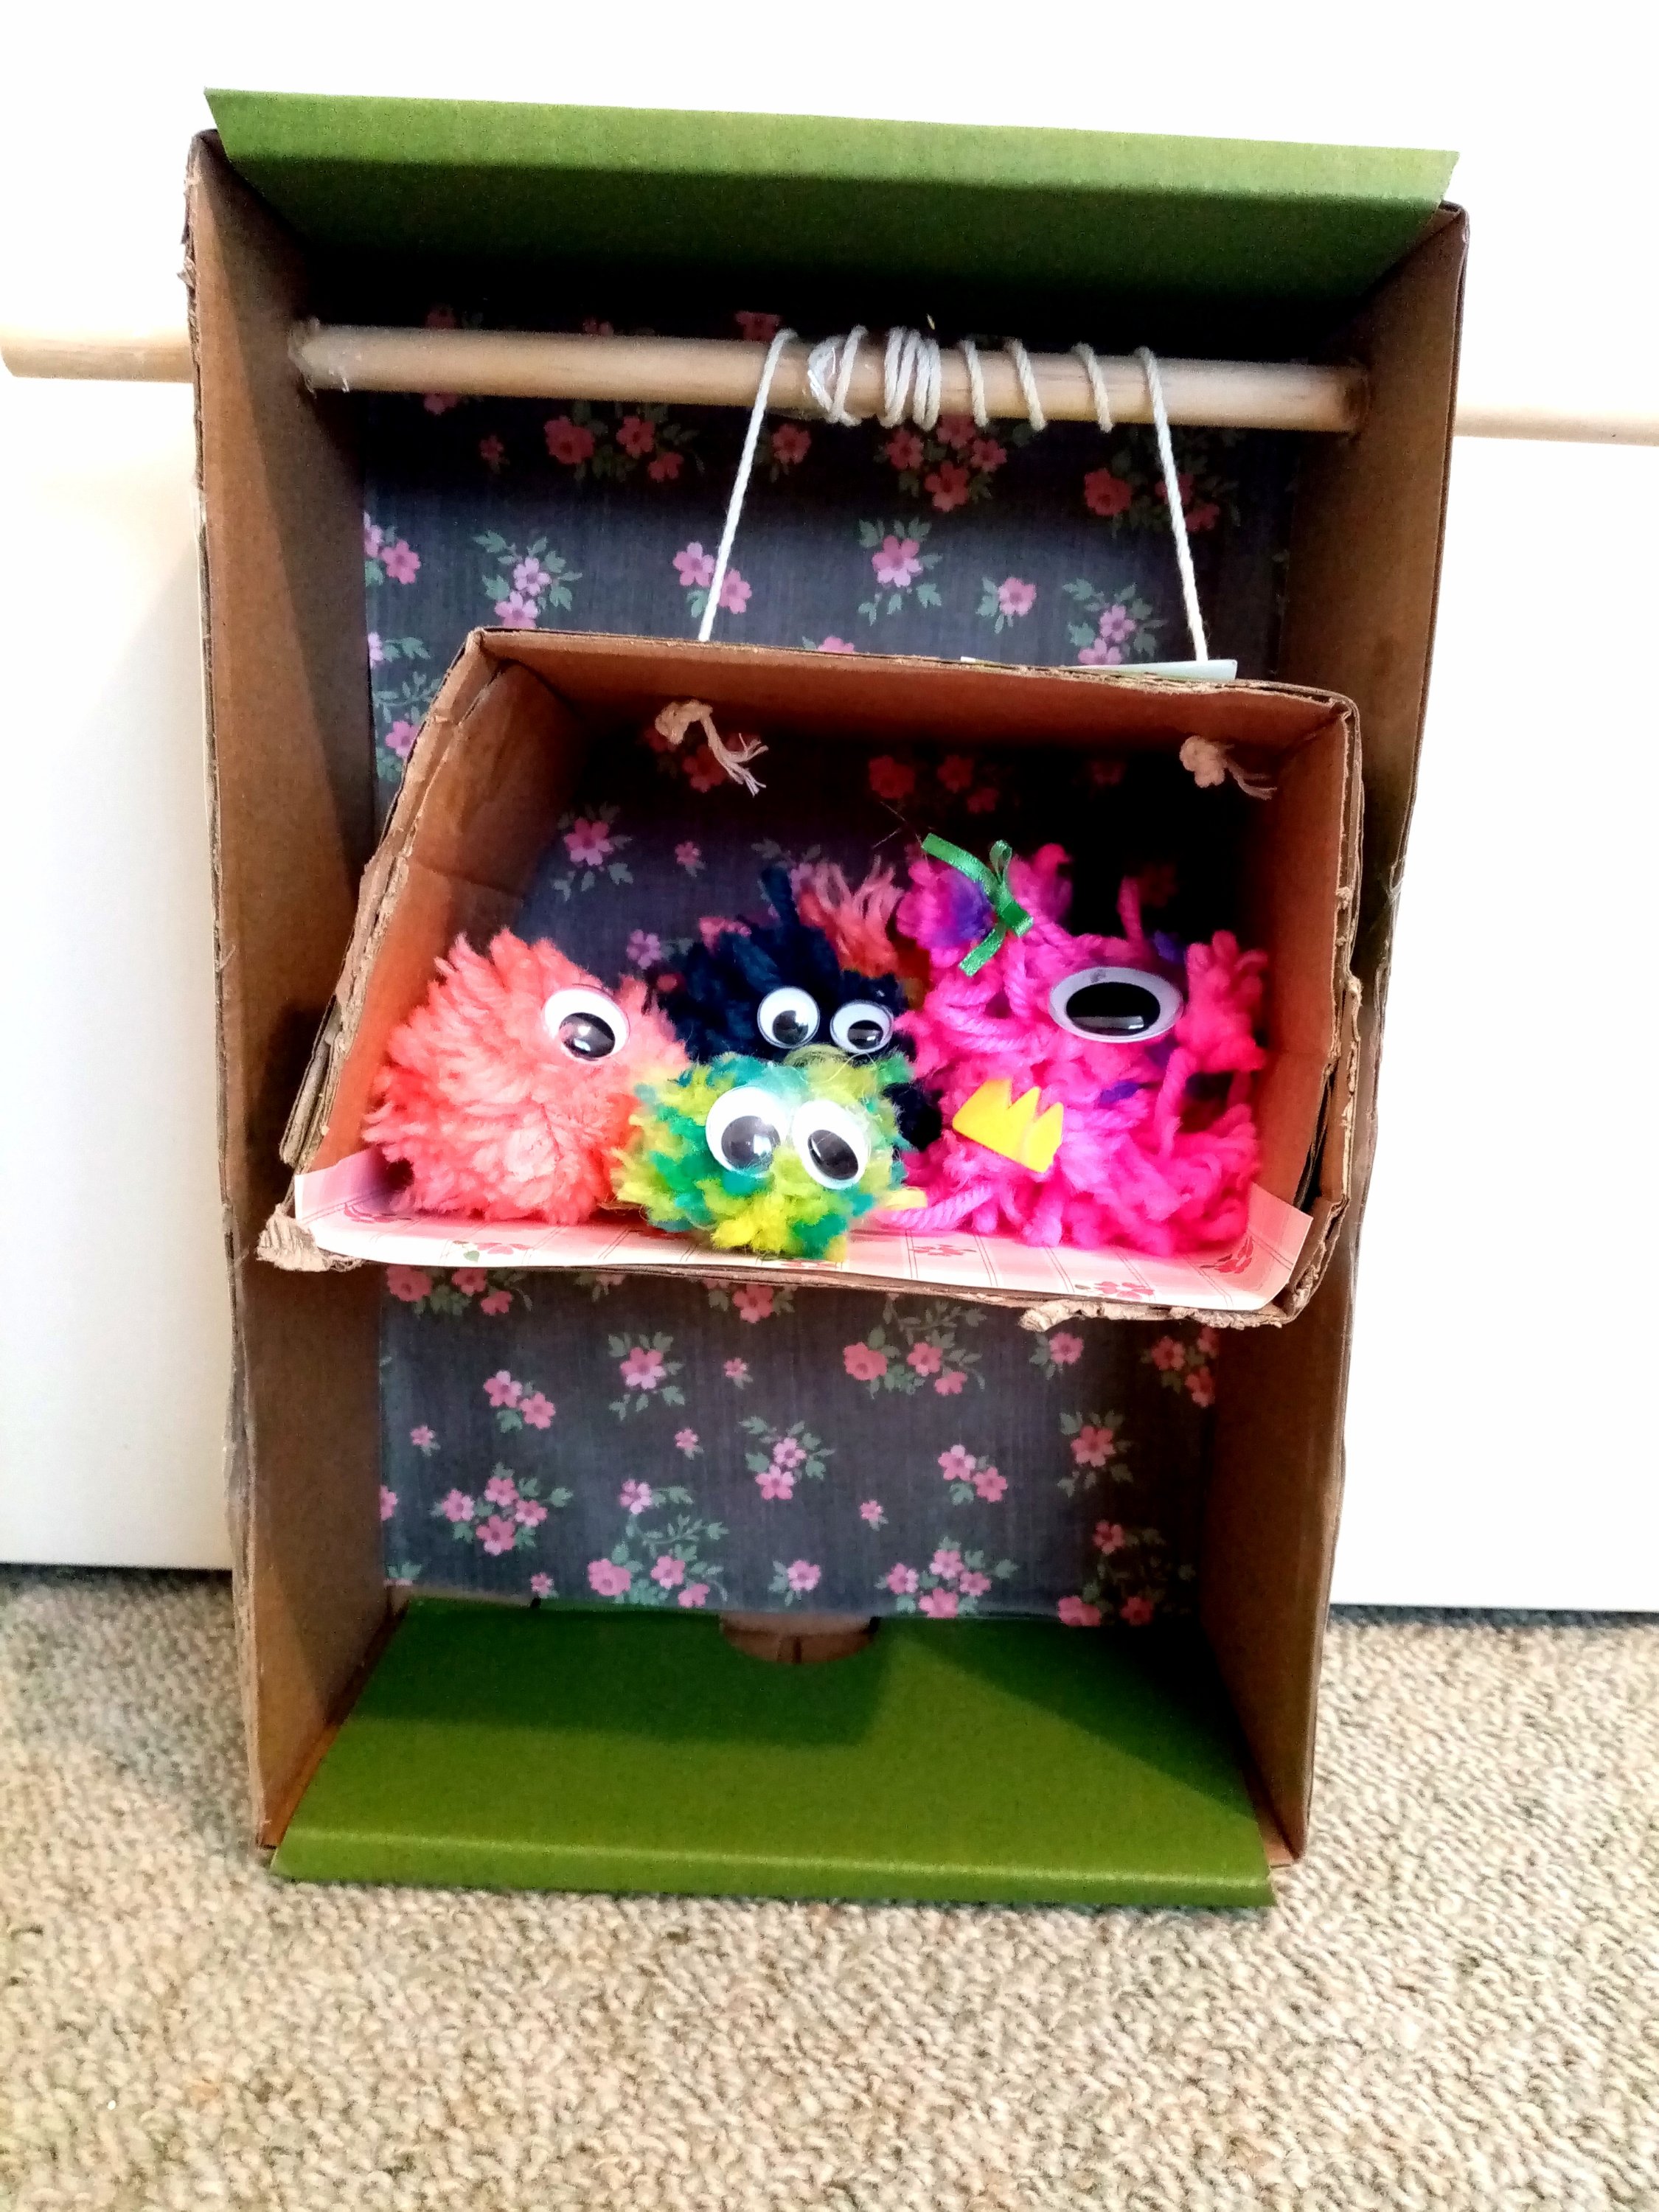
The first thing that you build with the crate is a simple puppet show. The handy diagrams and kid friendly physics explanations will help you understand that while building and playing with this you are demonstrating the use of levers, force, and tension. There are multiple backgrounds included and you can design your own.
The second activity sees you constructing two racing turtles and weaving their shells. You then experiment with string tension to race your turtles!
The nice thing about the solid wood shell is that if your turtles deteriorate in the future, you can use brightly coloured yarn to turn these into wall art or christmas tree decorations.
Want more ideas for learning about tension?
Get busy in the great outdoors! Go fishing. Play tug of war. Lie in a hammock. Carefully set up a tightrope between trees (low to the ground!). Play tennis. Visit a suspension bridge in your area. Go on a high wire obstacle course. Ride a zipline!
This is not a paid review. I spent a lot of time searching the internet to find out more information about the Kiwi Crate and Atlas Crate boxes before deciding to try them and found the blog posts / photos that people shared were really useful!
If you would like to try Kiwi Crate (or one of their other lines), you can receive 50% off your first box by clicking here.
What I like about the Kiwi Crate kits is that they use a combination of Science, Technology, Engineering, Arts, and Mathematics to explore a concept or idea. There’s no obligation to sign-up in an on-going capacity so it’s easy to tie them in with birthdays / Christmas; the boxes are quite compact so they also store easily in a cupboard for bringing them out on a rainy day. Mind you, this only works if you spot the package on the door-step first – children become quite adept at recognising the green Kiwi Crate box and screaming with delight at it’s arrival!
The boxes are sent randomly so there’s no way to know what will come in the future; however, you can log-in to your account at the start of each month to see what box has been selected. Your box history is kept which means that even if you cancel and then pick-up again the following year they can make sure that you aren’t sent repeats of boxes.
WHAT IS IN A KIWI CRATE?
The Kiwi Crate is aimed at ages 5-8 years. It comes with a copy of the Explore magazine which opens with a fun comic about Steve the Kiwi and his friends. [As a side note, these are made by an American company despite the use of our New Zealand native bird]. These comics are really approachable for younger kids and a great way of exploring the concepts being introduced in a relateable manner.
The Explore magazine provides a range of information on the topic, it might include some simple games or tricks to try at home, and provide ideas for additional crafts / activities using simple materials. It also has a sticker [unique to each box theme] to put on your Kiwi Crate chart.
The box also includes an instruction manual and the materials that you need to build the main craft. Generally, there are two activities to do – one that is more art related, and one that is more mechanical engineering. What makes the kits special, is how well crafted the engineering components are. They really are designed for the intended age group so that they can either build themselves or help assist an adult. There are handy visual images and checkpoints to make sure that things are aligned correctly. There is no super-bonding-fingers-together wood glue to use with these projects (which makes them great for highly sensory children); instead parts come with double sided tape finely engineered on so that you just need to remove the backing strip of paper.
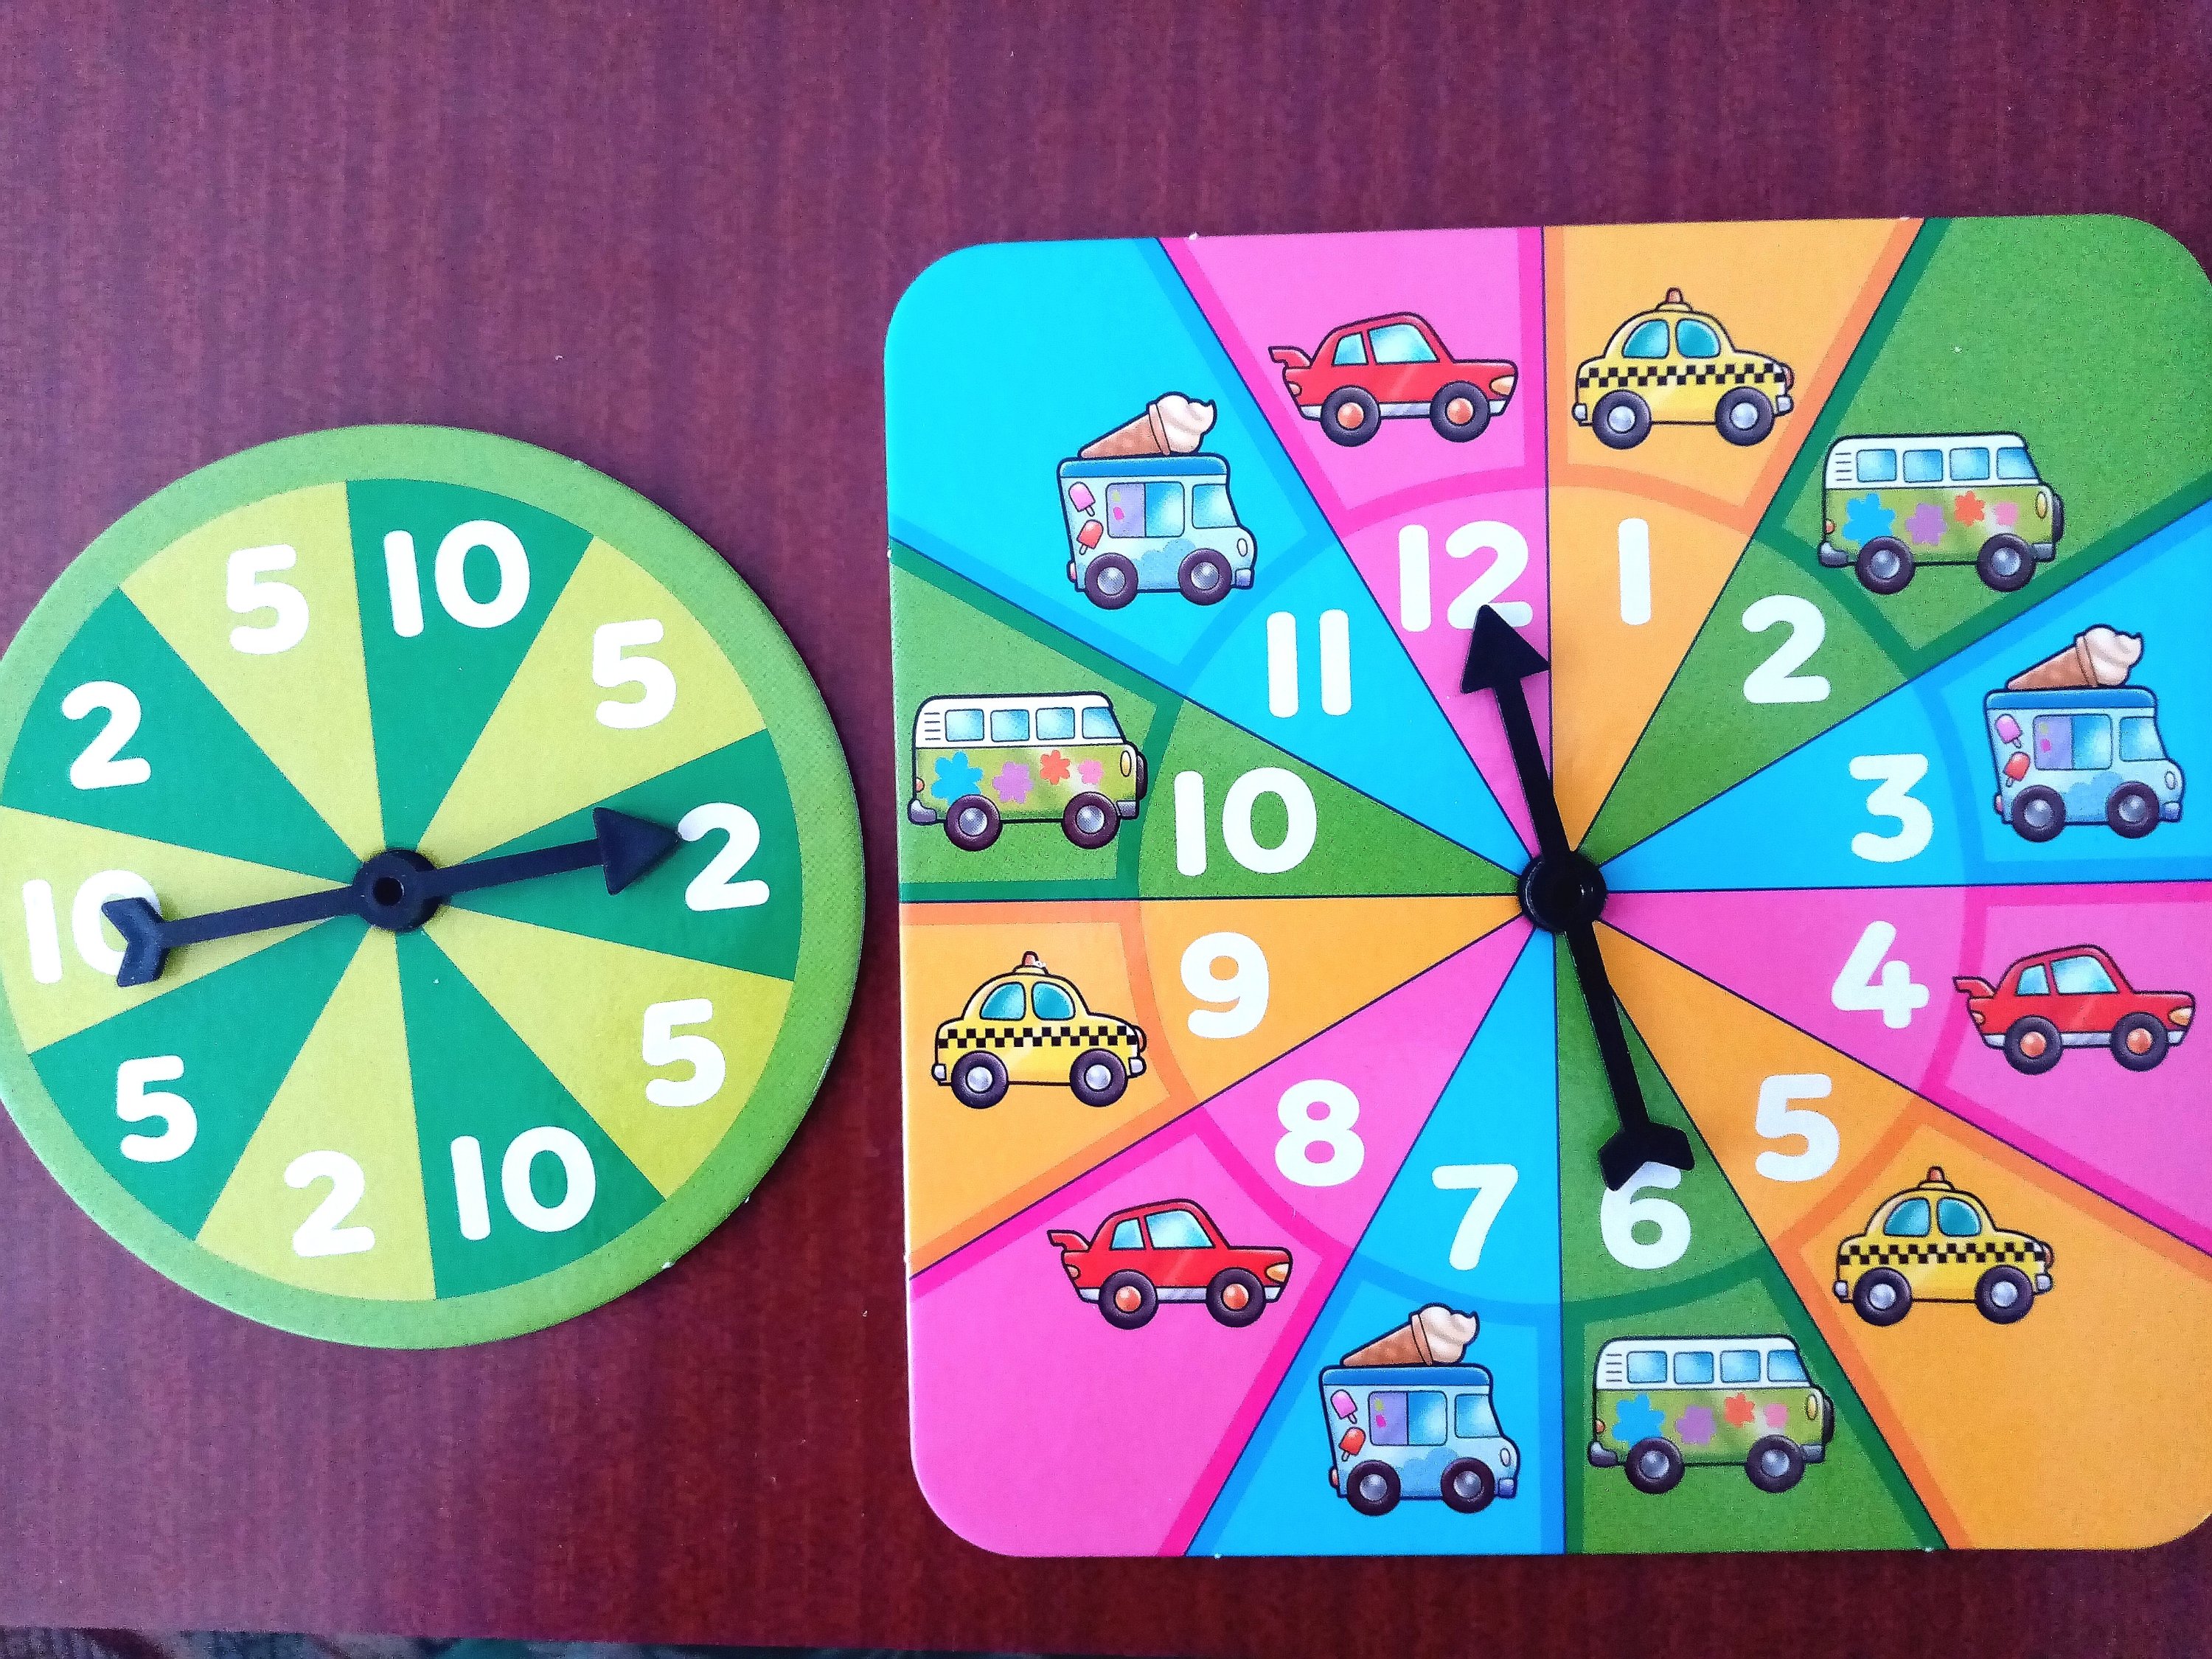
Sum Swamp is a maths boardgame that practices addition and subtraction in a simple and colourful way. What I like about the game is that it is very appealing to visual-kinaesthetic learners. Children select one of the four colourful markers (frog, snail, dragonfly, or crocodile) and roll dice to create equations that determine how they move around the board. The full instructions are conveniently available to view online: here.
The game is aimed at ages 5+ and can be played by 2 – 4 players; younger children may prefer to play two characters in case one languishes far behind the rest. Children are learning to arrange sums so that the largest number goes to the left; to recognise plus (+) and minus (-) symbols; and to recognise odds and evens. The simplest addition sum in the game is 1 + 1 = ?; the most difficult addition sum in the game is 6 + 6 = ?.
Tips for scaffolding the game (decreasing difficulty)
You can make the game easier by using physical objects for children to count and re-group while they do the sums.
The game provides numeral dice; consider switching to dice with dots. This helps children by giving them something visual to count.
Provide a number line. There are various types that can be purchased or you could print one for free from Twinkl.
Tips for scaffolding the game (increasing difficulty)
Buy a write on / wipe off dice (or other blank dice) so that you can also use the game to practice multiplication and division.
Buy a set of beautiful gaming dice containing D4, D6, D8, D10, D10 percentile, D12, and D20 (check out colours like milkshake, undersea whispers, or supernova). This opens the game up to an older audience; for instance, you can do equations up to 20 (using D12 + D8) and up to 30 (using D20 + D10). You may need to come up with a few house rules as you move to bigger numbers; for instance: that you need to do two laps of the board to finish, or, that the maximum amount you can move forward/back in a turn is 10.
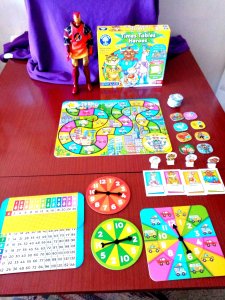
Before we played Times Tables Heroes, we had already spent time looking at the concept of ‘grouping’ (multiplication) and ‘skip counting’. We ‘group’ our captured pieces when we play Fanorona and I show how we can count them by 1’s, or 2’s, etc; we collect pebbles on our nature walks and practice different ways to ‘group’ them to help us count them. Times Tables Heroes is a fun way of practising our times tables that Miss 6 genuinely enjoys (and much better than my memories of sitting in front of a chalk board while the entire class repeated after the teacher!).
The game comes with sturdy cardboard pieces and is easy to set-up. You choose from one of four superheroes (each of whom has unique super powers). Instead of rolling a dice, you spin two spinners. One spinner determines which multiplication table you will practice; beginner level practices 2, 5, 10 and advanced level practices 1 – 12. The next spinner determines how many ‘groups’ you will have; i.e. 12 groups of 2. Once you have announced the answer correctly, you move to the next vehicle on the board that matches the spinner.
I love that the game comes with a colourful multiplication slider. It’s easy to scaffold the game so that children begin by using the slider to find their answer and then, as they gain confidence, to check their answer. We also do a hand-clapping singing game to work our way through the times tables each time to reach the answer.
The twist for the game is that it also incorporates oral storytelling (a literacy bonus!). If you land on a vehicle with a shield then you pick up a dreadful disaster card and need to describe how you will use your superpowers to save the city. The game helpfully comes with a guide that explains the disasters but we prefer to make up our own, after all – would you rather defend the city from an asteroid, or from an attack by giant flaming meatballs from an alien’s intergalactic BBQ party?
Tip: What is wonderful for visual-spatial learners and kids whose learning needs mean they need lots of movement, is that they do not need to sit still for this game. Encourage them to get up and act out their story (or everyone’s story – though they may need to be encouraged to do silent mime on other people’s turn).
Tip: It’s easy for this game to tick off maths, oral storytelling, and drama in a single session. You could use it to further support literacy, by asking kids to later extend on one of their superhero stories by writing it down / typing it up. Alternatively, encourage them to dictate the story and focus on linear story telling, mind mapping what / when / why / who / where, and editing.
Tip: The Shield cards have numbers that provide bonus moves. We find the game quite short so we ignore this and our house rule is to treat these as victory points; this way everyone can have a go at defeating the robot at the end of the board and it doesn’t matter who gets there first.
Maths Bingo
You can also reverse the game board to create maths bingo boards (with extra boards available online).
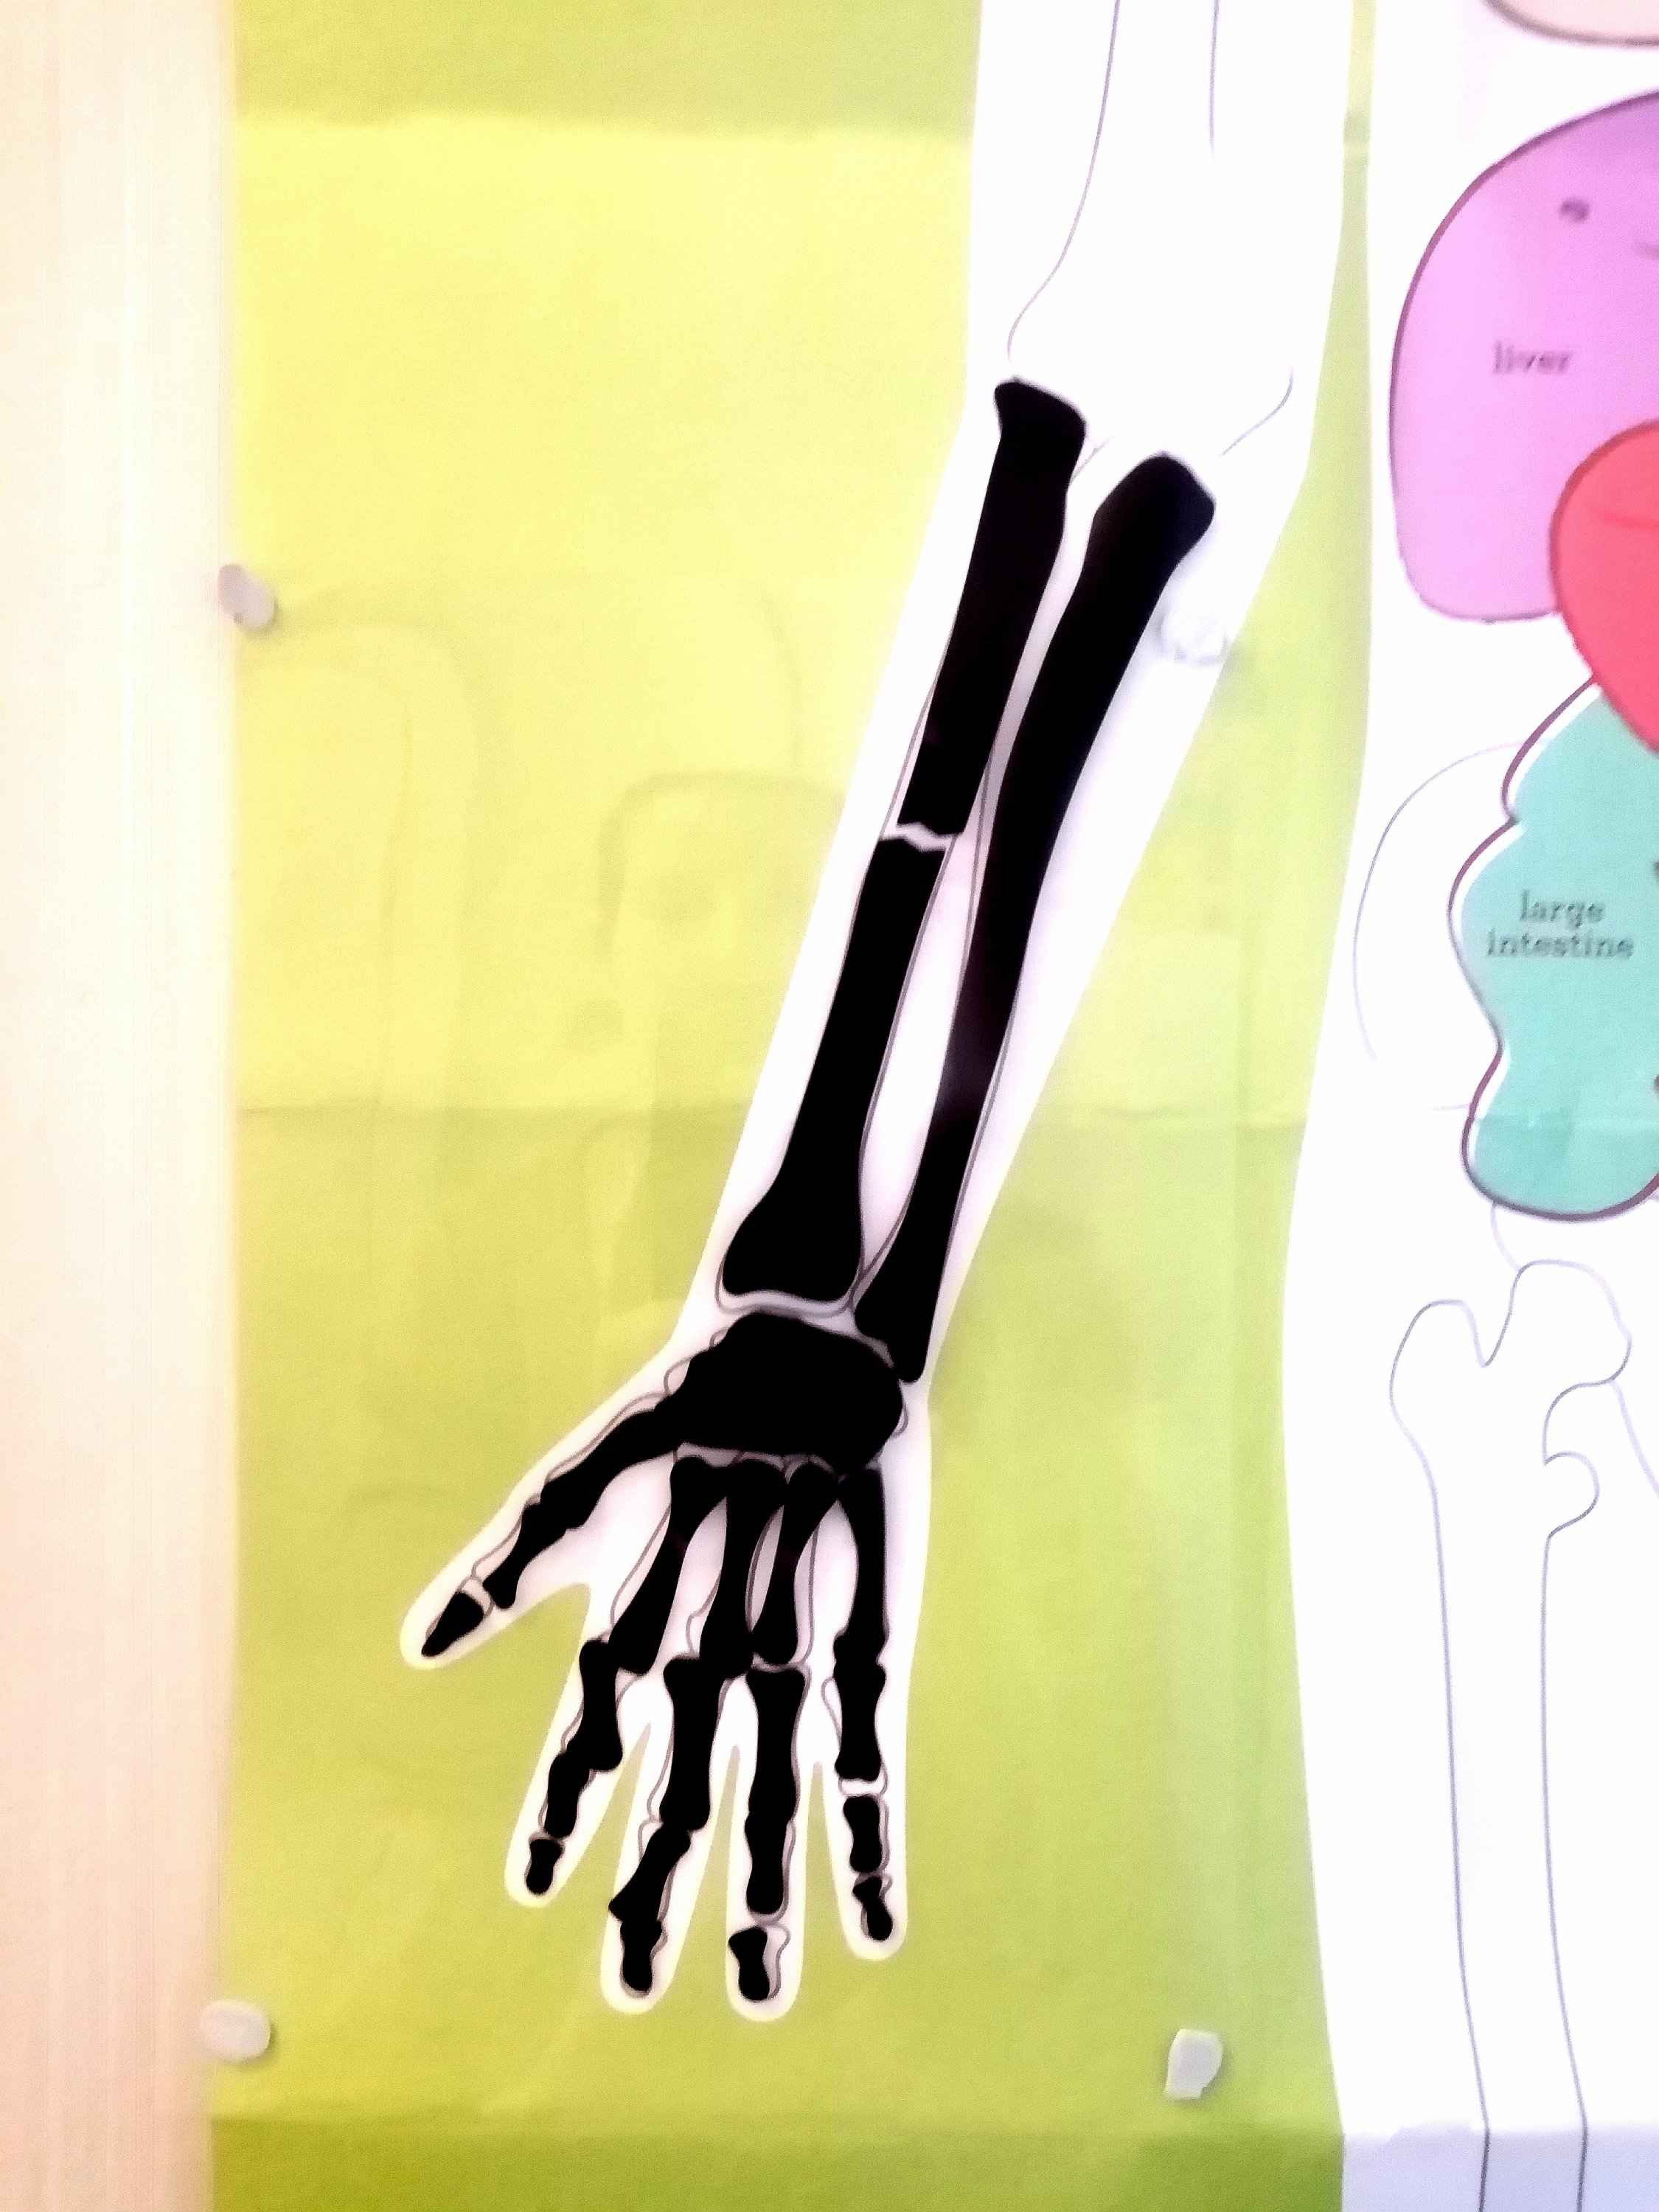
This is a fabulous hands on box for learning about the human body! There is a giant wall poster that shows multiple systems including: skeletal, nervous, digestive, and muscular.
Make your own x-ray of a broken bone
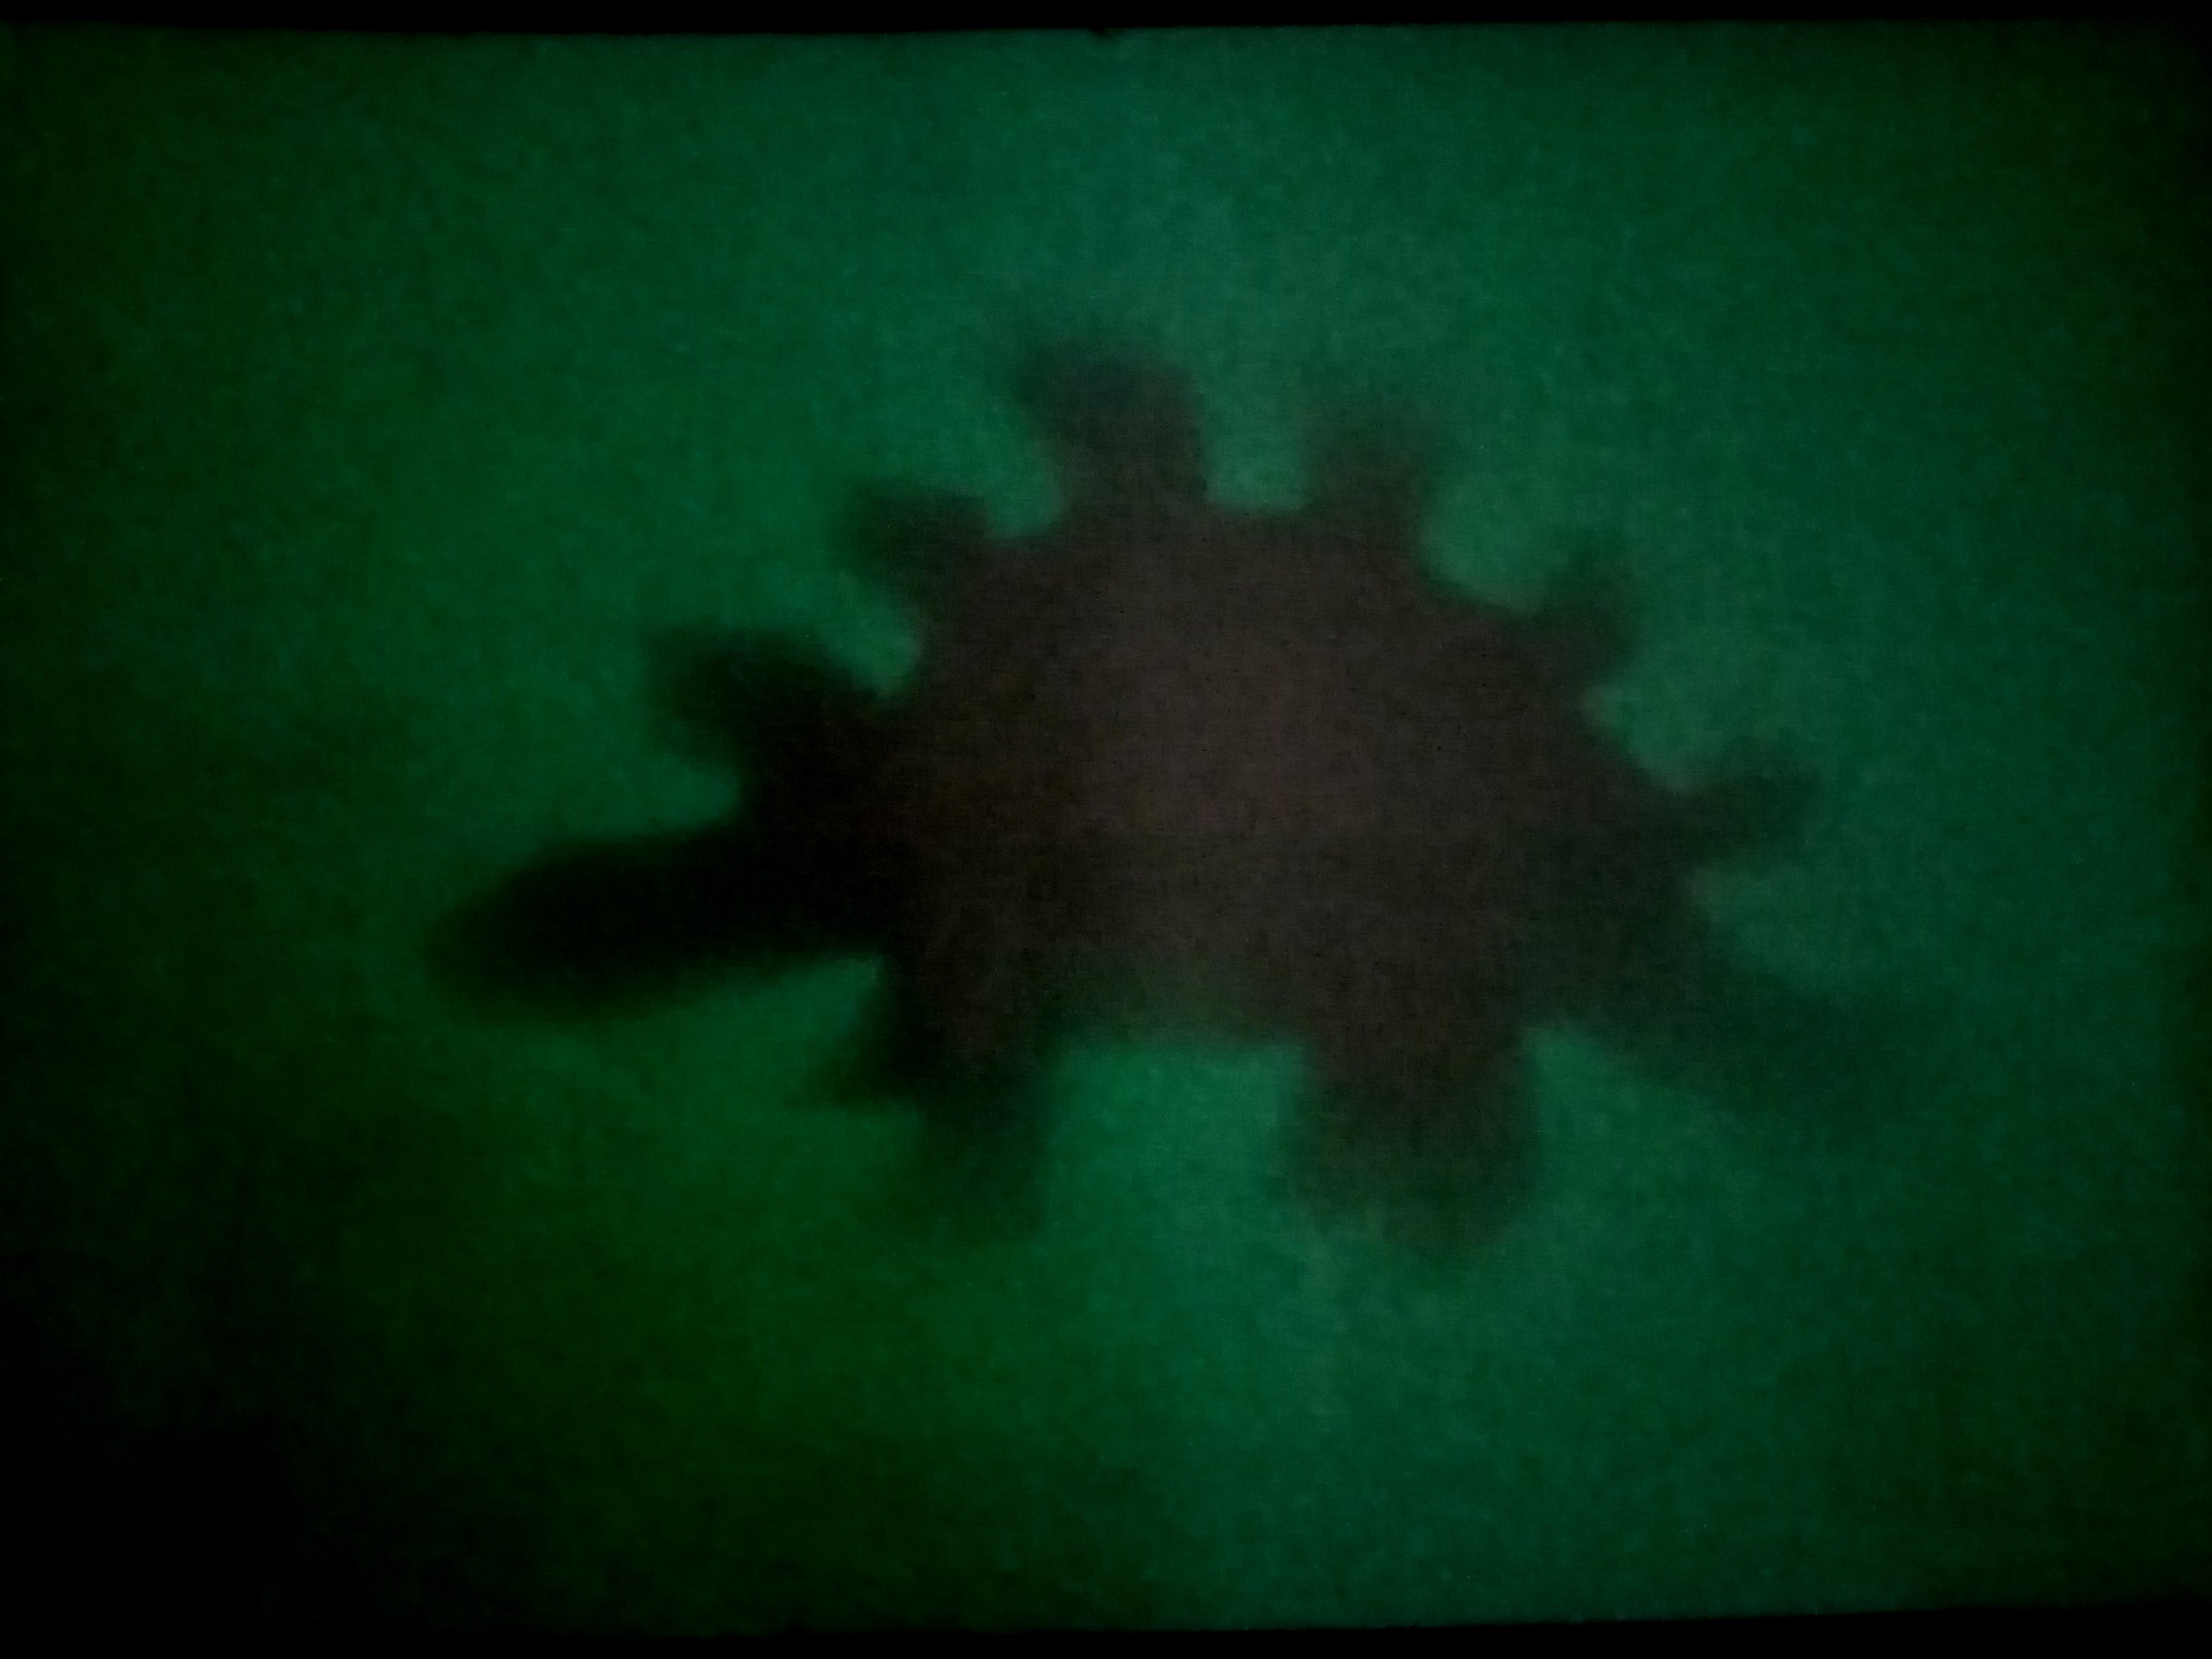
We loved the ‘magic paper’ that allowed us to explore the skeletal system and make our own x-ray of a broken bone. We started with a clear sheet of plastic that we blu-tak’d to the poster and then carefully applied bones to create the hand and forearm (ulna and radius). We put the sheet of plastic on top of the ‘magic paper’ and placed it in bright sunlight; later (in a dark room), we removed the plastic and admired our x-ray of a break in the radius. Note: There are a range of bones that you can choose from and they can be removed easily so that you can try more projects.
Tip: You can also use the magic paper to create your own experiments! We used black paper to create a Stegosaurus silhouette and thus created our very own dinosaur magic trick!
Make your own stethoscope
Provided in the kit were the materials to make our own stethoscope – it really works for listening to a heartbeat! It also comes with a fun double-sided wipe-clean examination sheet so that kids can play doctor.
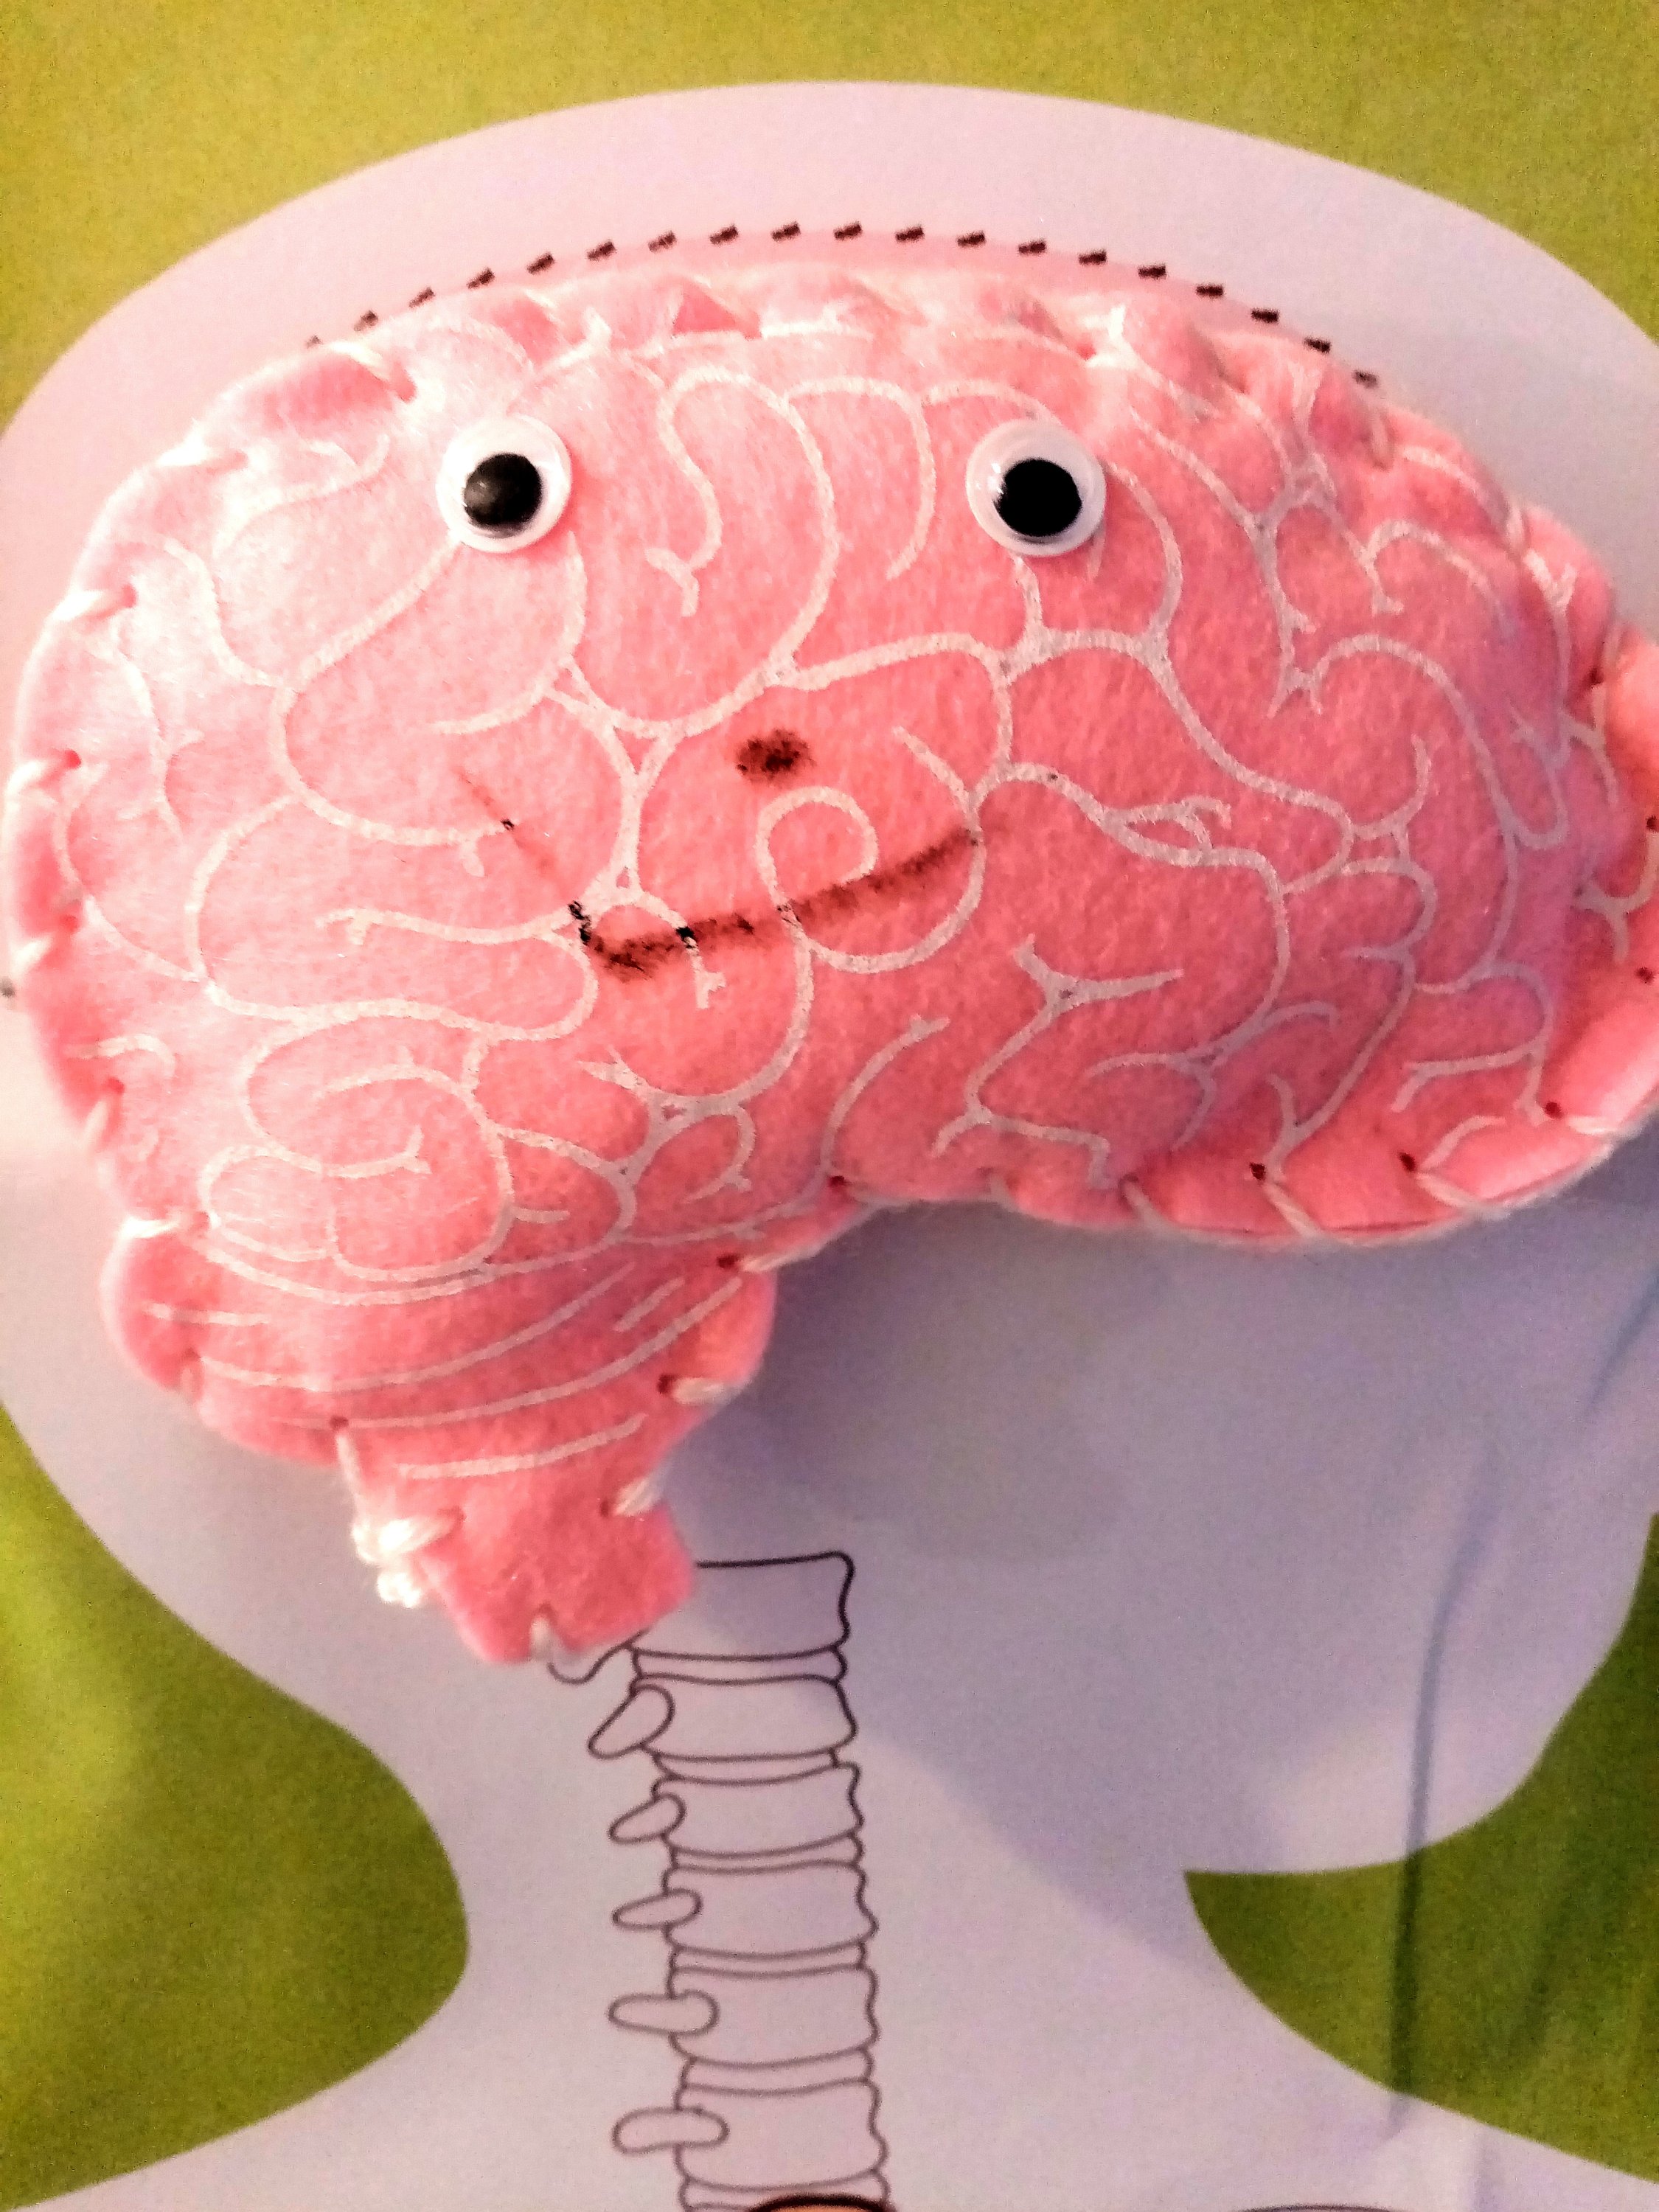
Make your own plush organs
The art project for the box means you can make your own super cute plush organs (brain, heart, and stomach). The felt comes with pre-pierced holes which makes threading easier for children.
Want more ideas for learning about the human body?
This is not a paid review. I spent a lot of time searching the internet to find out more information about the Kiwi Crate and Atlas Crate boxes before deciding to try them and found the blog posts / photos that people shared were really useful!
If you would like to try Kiwi Crate (or one of their other lines), you can receive 50% off your first box by clicking here.
What I like about the Kiwi Crate kits is that they use a combination of Science, Technology, Engineering, Arts, and Mathematics to explore a concept or idea. There’s no obligation to sign-up in an on-going capacity so it’s easy to tie them in with birthdays / Christmas; the boxes are quite compact so they also store easily in a cupboard for bringing them out on a rainy day. Mind you, this only works if you spot the package on the door-step first – children become quite adept at recognising the green Kiwi Crate box and screaming with delight at it’s arrival!
The boxes are sent randomly so there’s no way to know what will come in the future; however, you can log-in to your account at the start of each month to see what box has been selected. Your box history is kept which means that even if you cancel and then pick-up again the following year they can make sure that you aren’t sent repeats of boxes.
WHAT IS IN A KIWI CRATE?
The Kiwi Crate is aimed at ages 5-8 years. It comes with a copy of the Explore magazine which opens with a fun comic about Steve the Kiwi and his friends. [As a side note, these are made by an American company despite the use of our New Zealand native bird]. These comics are really approachable for younger kids and a great way of exploring the concepts being introduced in a relateable manner.
The Explore magazine provides a range of information on the topic, it might include some simple games or tricks to try at home, and provide ideas for additional crafts / activities using simple materials. It also has a sticker [unique to each box theme] to put on your Kiwi Crate chart.
The box also includes an instruction manual and the materials that you need to build the main craft. Generally, there are two activities to do – one that is more art related, and one that is more mechanical engineering. What makes the kits special, is how well crafted the engineering components are. They really are designed for the intended age group so that they can either build themselves or help assist an adult. There are handy visual images and checkpoints to make sure that things are aligned correctly. There is no super-bonding-fingers-together wood glue to use with these projects (which makes them great for highly sensory children); instead parts come with double sided tape finely engineered on so that you just need to remove the backing strip of paper.