Discover Kenya – How to make vibibi (gluten free pancakes)

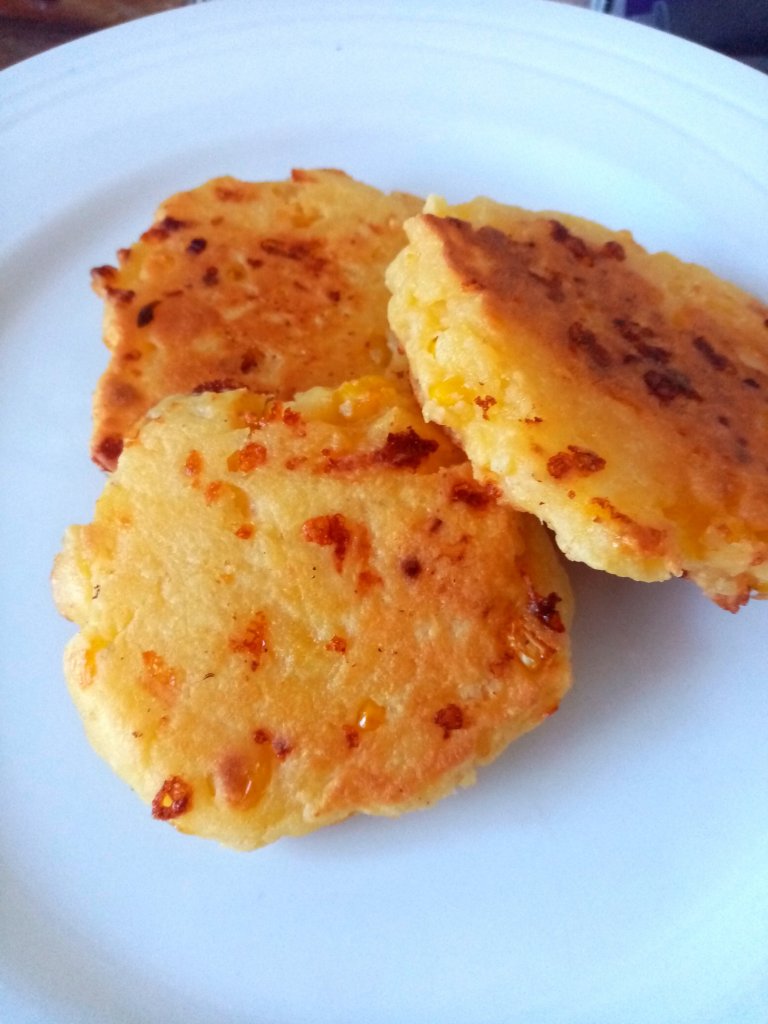
Vibibi are a popular gluten free pancake in East Africa made using rice and coconut milk. Typically, these are made by soaking rice overnight and then blending to a smooth paste with the coconut milk but they can also be made with rice flour (as per this recipe). They are often served sweet but the sugar in the recipe can be reduced in favour of serving with fresh fruit like mango instead.

Ingredients

  • 1 tsp active yeast
  • 1/4 cup lukewarm water
  • 1 tsp sugar
  • 1/2 cup sugar
  • 1 1/2 cups rice flour
  • 1/4 tsp ground cardamom
  • 200 – 250 ml coconut milk
  • Optional: Nutmeg or vanilla can be added for a different flavour.

Allergies: free from gluten, dairy, soy, egg, nuts.

Note: You can choose to add an egg to the recipe (it is optional).

Directions

  1. In a mixing bowl, place the yeast, water, and 1 tsp sugar. Wait 5-10 minutes until it begins to foam and release a yeasty scent. Tip: In cooler weather, this will take longer. You may need to place the bowl in a hot water cupboard, or sit the mixing bowl in a little warm water.
  2. Mix in the rest of the sugar, the rice flour, and cardamom.
  3. Mix in the coconut milk until you have a smooth batter.
  4. Cover the mixing bowl and place in a warm spot. Allow to ferment for 2-3 hours.
  5. Cooking: Heat a frying pan with a little oil. Ladle batter into the pan. As it cooks, tiny bubbles will appear in the pancake. After about a minute (once golden brown on the bottom), flip, and cook for about 30 seconds on the other side. Repeat for each pancake (adding a little oil to the pan for each one).
  6. Serve with fresh fruit, or yoghurt, or a cup of coffee.
Advertisement

How to make butter at home!

This is fun activity to do with the kids that requires no electricity or fancy gadgets – just a little patience!

Ingredients

  • Cream
  • Glass jar with lid

In New Zealand, you just need standard supermarket cream; in countries where cream is differentiated by milkfat, you want heavy cream.

Optional: You can add extras to your butter once it is made. Consider: salt; honey; a garlic herb mix; brown sugar and cinnamon; finely chopped lavender petals and honey.

Directions

  1. Half full your glass jar with cream and put on the lid (tightly).
  2. Start shaking!
  3. Phase 1 – you’ll hear a sloshing sound as the cream moves around. Phase 2 – silence…you have whipped cream thickly coating the glass. Phase 3 – the glass begins to clear and the sloshing sound begins to return. Phase 4 – you clearly have a ball of butter in the middle sitting in thin white liquid (buttermilk).
    • Note: the timing for this is impacted by the weather! This activity is made more difficult by very hot and by very cold weather.
  4. Pop the jar in the fridge for an hour or so to set.
  5. Drain the buttermilk (you can drink or use it for cooking).
  6. Pour cool water in the jar and give it a shake. You will need to wash the butter several times until the water remains clear. This helps to remove the buttermilk and casein traces that will otherwise go rancid.
  7. Tip the butter onto a dish (or bowl) and press with the back of a wooden spoon (or even a metal fork). This will help to bring out the water which needs to be drained off.
  8. Now your butter is ready to have any desired salt or flavours added.
  9. Butter will keep best in the fridge (wrapped or sealed).

Discover Greece: How to make Tzatziki (Keto + Gluten Free)

This popular Greek dish is traditionally served with pita bread; for a gluten free / keto option, consider serving with linseed focaccia bread or a mezze platter. Shown with: carrots, cherry tomatoes, green beans, cheese, and beef meatballs w. sliced almonds.

Ingredients

  • 100g peeled lebanese cucumber
  • 250g yoghurt (traditionally thick creamy Greek yoghurt)
  • 1/2 – 1 clove of garlic
  • Juice 1/2 lemon
  • Herbs: 1/2 – 1 Tbsp dill or mint.
  • Salt and pepper to taste

Directions

  1. Decide on what kind of texture you want for your tzatziki; then select and prepare your ingredients.
    • Greek yoghurt is traditional, you can use a thinner natural yoghurt.
    • Cucumber can be either grated or finely diced. Wrap it in muslin cloth and allow to rest so that any excess water is absorbed.
    • Choose your herb: dill, mint, or a combination? Dice the herb finely. Some like to also add a little cumin, parsely, or sumac.
    • Garlic can be crushed or finely diced.
  2. Combine the cucumber, yoghurt, garlic, lemon juice, herb, and salt (to taste).
  3. Rest in fridge for an hour to allow flavours to blend.
  4. Serve with accompaniments.

NUTRITIONAL INFORMATION

Based on 2 servings and using De Winkl natural yoghurt.

Average Quantity
per Serving
Energy257.6 kJ (62 kcal)
Protein7.4 g
Fat, total1.9 g
– saturated1 g
Carbohydrate3 g
Dietary Fibre0.4g

Tasty Chicken and Haloumi Fritters (Keto + Gluten Free)

High in protein and only 2.3g of carbs per serve!

Ingredients

  • 500g chicken mince
  • 200g halloumi
  • 1 medium egg
  • 200g grated zucchini
  • 30g almond flour
  • dash of salt
  • Optional: add a little grated lemon zest.

Directions

  1. Grate the zucchini. Press (or hand wring) to squeeze most of the water out.
  2. Grate or finely cut the haloumi.
  3. Combine all ingredients.
  4. Shape into about 20 meatballs.
  5. I like to cook in the airfryer @ 180’C / 356’F for 13-15 minutes but you could also oven bake.
  6. Serve with above ground green vegetables, such as a leafy salad.

NUTRITIONAL INFORMATION

Based on 4 servings per recipe; nutritional breakdown is approx:

Serving Size: 1 Serving

Average Quantity
per Serving
Energy1466.5kJ (350 kcal)
Protein41.2 g
Fat, total19.6 g
– saturated8.7 g
Carbohydrate2.3 g
Dietary Fibre1.3 g
Sodium257 mg

Easy Cheesy Taco Mince (Keto + Gluten Free!)

Served with konjac fettucine and broccoli; yum!

Makes two servings @ 10.2 carbs each; if cooking for the family simply scale up the recipe. For keto eaters, this is great served with konjac noodles and green above ground veggies; for gluten free families consider serving with brown basmati rice or wholegrain gf corn chips.

Note: Those on keto can reduce carbs further by making their own spice mix; calculations for this recipe are based on Farrahs Taco Spice Mix.

Ingredients

Directions

  1. Lightly brown mince in a frying pan/skillet.
  2. Add tomato paste, spices, salt, dried onion and cook for a few more minutes.
  3. Turn off heat (leave on hot element) and stir in cream cheese + colby cheese.
  4. If using konjac noodles: rinse them, stir in, and return pan to low heat for a few minutes until noodles are cooked.

NUTRITIONAL INFORMATION

Based on 2 servings per recipe; nutritional breakdown is approx:

Average Quantity
per Serving
Energy2337.2 kJ (558 kcal)
Protein41.8 g
Fat, total38.9 g
– saturated21.1 g
Carbohydrate10.2 g
– sugars5.4 g
Dietary Fibre1.8 g
Sodium822.2 mg
Calcium206 mg

Discover Colombia – how to make corn arepas

Arepa are one of the most popular foods in Colombia. They are often eaten every day and so versatile that they can be served as breakfast, lunch, or dinner. They might be served with rich Colombian hot chocolate; with soft fresh cheese; with guacamole or fresh tomato salsa; with prawns; the possibilities are endless!

There are many recipes for arepas and this is one variant 🙂

Ingredients

  • 1 cup milk
  • 2 Tablespoons butter
  • 1 cup fine cornmeal flour
  • 1/2 cup Colombian queso campesino, or queso doble crema, or shredded mozzarella.
  • 1/2 teaspoon salt
  • 1/2 cup frozen corn
  • Butter / rice bran oil for pan

All about corn flours

An important note for this recipe is that in Colombia they use a special arepa flour (masarepa) which is a precooked fine cornmeal. It can be sourced in New Zealand but it is a speciality item.

If you don’t have access to masarepa, you can use a gluten free substitute; you will need a larger quantity as it will not absorb the liquid in the same way. For instance, 1.5 cups Cornmeal Flour (not to be confused with NZ cornflour) and 1/2 cup gluten free baking flour.

Directions

  1. Warm the milk and butter (either in a pot or in a microwave).
  2. In a large mixing bowl, combine the warm milk (with dissolved butter) + cornmeal flour + salt + frozen corn + mozzarella. Mix until you have a dough-like batter.
  3. Let the batter rest for 30 minutes.
  4. Divide the dough into balls and then flatten.
  5. You can choose to: deep fry or lightly fry on a skillet / frying pan; give them a very light coating of oil and cook them in the air fryer (which I did); or even cook them in a panini press. The aim is to be golden crisp on the outside and cooked through. They are best served warm and are delicious eaten straight away.

Discover Colombia – How to make decadent hot chocolate

Chocolate sin queso es como amor sin beso, chocolate without cheese is like love without a kiss.”

It was fascinating researching this as part of our world studies unit on Colombia and delicious to try. This drink is an essential part of Colombian culture and often served for breakfast with arepa. It is an incredibly rich drink and worth noting that the cheese they use is Colombian queso campesino or queso doble crema; note these fresh cheeses are very different to something like our Kiwi block of yellow Colby featured in our quintessential mince and cheese pie.

Colombian Hot Chocolate

Ingredients

  • Stick(s) of dark chocolate
  • Full cream milk
  • White cheese

Those are essentially the ingredients; you can flavour with cinnamon and cloves if desired. Amounts will vary depending on how much you are making; I used about 1 sante bar, 1 cup full cream milk, and about 1/4c mozzarella. While delicious, I’m aware that it’s not quite the same cultural experience as I’m using my local ingredients.

Directions

  1. Warm the milk almost to a boil; watch closely and whisk.
  2. Remove from heat and stir in the chocolate until fully melted.
  3. Drop some mozzarella cheese into your cup and pour hot chocolate over the top.
  4. Let the cheese melt a little and enjoy!

Tip: In Colombia, they use a chocolatera and a molinillo for warming the milk and frothing the chocolate. Lacking these, I used a small pot and a whisk.

Madagascar chicken

While studying Madagascar, I was fascinated by their terraced rice fields (unusual for an African nation). The Malagasy people use rice as a part of all three meals and also draw on many cultural influences in their cooking.

One dish that particularly drew my attention was this idea for a simple marinade that would allow me to make good use of our bountiful lemon tree.

Ingredients

  • Fresh lemon zest
  • Ginger
  • Garlic
  • Salt
  • Coconut oil / Coconut cream
  • Chicken
  • Rice

Directions

Unlike most recipes, I’m keeping this simple since the focus is really on the combination of flavours used.

In a deep dish, place your chicken. You want something that will stay tender like chicken thighs or whole legs.

Onto the chicken, rub fresh lemon zest (the finely grated skin of the lemon), fresh grated ginger (or ground ginger), some crushed garlic, and coconut oil. Alternatively, use rice bran oil and add a little coconut cream to your finished dish.

Marinate the chicken overnight to absorb the flavours. Cook until tender using your choice of BBQ, skillet, or air fyer.

Serve with rice.

Consider adding a popular Malagasy side dish, such as Lasary Voatabia or Mofo Sakay.

Apple Cake

Apple Cake

Apple Cake

Miss 4 and I have been reading a series of picture books, the latest of which is “The Wolf who visited the land of Fairy Tales.” The wolf goes on a quest to collect a recipe and ingredients to make apple cake. The book has a recipe at the back which inspired me to invent our own version; it has more protein and added micro-nutrients than a traditional recipe. This is a light thin apple cake that reminds me a little of  Tarte Tatin.

If you have young children, this is great for school lunches. Alternatively, read the book during the school holidays (or anything that features baking, ‘Little Red Riding Hood’ would work just as well) and then tie in the real world application with the story. Add in some dress-ups for acting out the story and that’s your morning filled!

Apple Cake

Ingredients

  • 1/2 cup Nuttelex (or dairy-free spread, or butter)
  • 1/2 cup sugar
  • 3 fresh eggs, lightly beaten
  • 1 tsp baking powder
  • 1 cup flour, sifted
  • 1/4 cup wheat germ
  • 1 Tbsp ground linseed
  • 1/4 tsp ground cinnamon
  • 1 tsp finely diced fresh ginger
  • 1/4 cup rice milk (or alternative)
  • 3 large apples, peeled and diced into small pieces.


Directions

  1. Preheat the oven to 180’C / 350’F. Grease the sides and bottom of a round cake tin.
  2. Cream the Nuttelex (or butter) and sugar. Add the beaten eggs and mix.
  3. Gently fold in the baking powder, flour, wheat germ, ground linseed, and ground cinnamon.
  4. Gently stir in the apple pieces and fresh ginger.
  5. Stir in a little rice milk until the batter is smooth.
  6. Pour the batter into the cake pan and bake for 40 mins.


Alternatives

You can change the flavour profile in a variety of ways:

  • Add a splash of freshly squeezed lemon or orange juice.
  • Switch fresh ginger for ground ginger for a milder ginger flavour.
  • Increase the cinnamon to 1 tsp and add 1/4 tsp all spice + pinch nutmeg.

If your child is adverse to the apple being in chunks, consider experimenting with stewed apple or apple sauce. Keep an eye on your dry/wet ratios as this will have an impact.

Mushroom melt burgers

Mushroom melt burgers

Mushroom melt burgers

Grilled mushrooms with melted cheese make a quick and easy vegetarian meal.

Ingredients

  • Portobello mushrooms (or similar big fleshy mushrooms)
  • Piquant easy-melt cheese (like goat cheese or blue cheese)
  • Fresh salad ingredients (like sliced tomato, grated carrot, baby spinach, lettuce, sliced beetroot, watercress, mungbeans, sliced cucumber).
  • Hamburger bun, brioche bun, gluten-free wrap or bun.

Cheese

If goat cheese seems too…well, goaty, consider a goat-buffalo cheese blend. Similarly, if blue cheese seems too strong consider a creamy mild blue cheese. Alternatively, use a strong tasty or colby cheese + grated parmesan and mozzarella!

For dairy free / soy free / vegan cheese consider: Daiya or Angel Food

Burger buns

If allergies aren’t an issue, there a range of burger buns to choose from, or go up-scale and use a brioche bun. For gluten-free (or soy free) then you may want to use a gluten free bun or wrap. You can also skip the bun (and substitute rice or beans) and tell your child (or yourself) that you’re simply having a super fancy ‘deconstructed’ burger.

Allergies: gluten free*, dairy free*, soy free, egg free, nut free.

Directions

  1. Prepare your salad ingredients.
  2. Grill the mushrooms and cheese.
  3. Assemble your burger. Add dressings (like sauces and mustard) if desired.