Discover Colombia – A KiwiCo Review: Atlas Crate for 6-11 Year Olds (Deluxe Box)

What is in the Colombia crate?

You begin by opening your travel mail from Milo and Anya to find out about their latest travel adventures! Miss 6 enjoys seeing all the photos in Colombia.

There is a passport sticker to add to our Adventure Passport and various cards about Colombia to add to it as well. These range from a country map and cultural information, to activity cards with things to do. The game in the box is inspired by Tejo – we agreed that playing tejo in Colombia looks like a lot of fun! We learned about the Wayúu weavers and were able to hand paint our own mochila bag. Check out our adventures at home: we were inspired to cook corn arepas, make decadent cheesy hot chocolate, and make a maraca. We really enjoyed going online to learn more about the mud baths of El Totumo, the beautiful colours of Caño Cristales, and watching great green macaw be born and learn to take flight.

Our Deluxe Box Book was the graphic novel ‘Juana & Lucas’ by Juana Medina which we very much enjoyed. We liked getting a glimpse into her life in Colombia and had fun learning a few words in Spanish.

HOW DO I ORDER ATLAS CRATE?

This is not a paid review. I spent a lot of time searching the internet to find out more information about the Kiwi Crate and Atlas Crate boxes before deciding to try them and found the blog posts / photos that people shared were really useful!

If you would like to try Atlas Crate (or one of their other lines), you can receive 50% off your first box by clicking here.

What I like about the Atlas Crate kits is that they provide a colourful and imaginative way of exploring the world through hands-on activities. I like that they use a mix of STEM and art to explore different concepts and ideas. Their products are also very well made, with clear instructions, and kids feel a real sense of pride in what they accomplish with each box.

There’s no obligation to sign-up in an on-going capacity so it’s easy to tie them in with birthdays / Christmas; the boxes are quite compact so they also store easily in a cupboard for bringing them out on a rainy day. Other families will choose to sign up for a longer period (like a 3, 6, or 12 month cycle).

WHAT IS IN AN ATLAS CRATE?

Each Atlas Crate comes with a special airmail envelope from Anya the Cricket and Milo the Sandpiper revealing where they’ve been on their latest adventure. There is a special passport sticker for your child’s Atlas Adventure Book plus seven new pages to add about a new country (highlighting geography, customs, landmarks, history, and foods).

There are supplies for two activities (which might be a mix of art, STEM, and games) as well as suggestions for more DIY activities to try at home – from things to make, to things to bake!

If you choose the Deluxe option, then you will also receive a book that helps you explore that month’s destination. This upgrade is an additional USD$9.95 (approx. $15 NZD) and can impact shipping costs as well. Since we’re homeschooling, I decided that we’d try the Deluxe option for 6 months to see how useful we find it.

Interested in more homeschool box reviews?

Discover the World with ATLAS Crate

#1 Introducing the World

#2 Discover Japan

#3 Discover France

#4 Discover Madagascar

Explore STEM with Kiwi Crate

#1 Arcade Box (and the Claw!)

#2 The Amazing Animation Box (make your own 19th century movie with a Zoetrope!)

#3 The Mechanical Sweeper Box (make your own baleen whale!)

#4 The Disc Launchers Box (play games with physics!)

#5 Kaleidoscope Puzzles (explore symmetry and mirrors!)

#6 The Human Body

ExperisenseNZ

Exploring Maths through Art

Exploring Space through Art

Exploring the Human Body

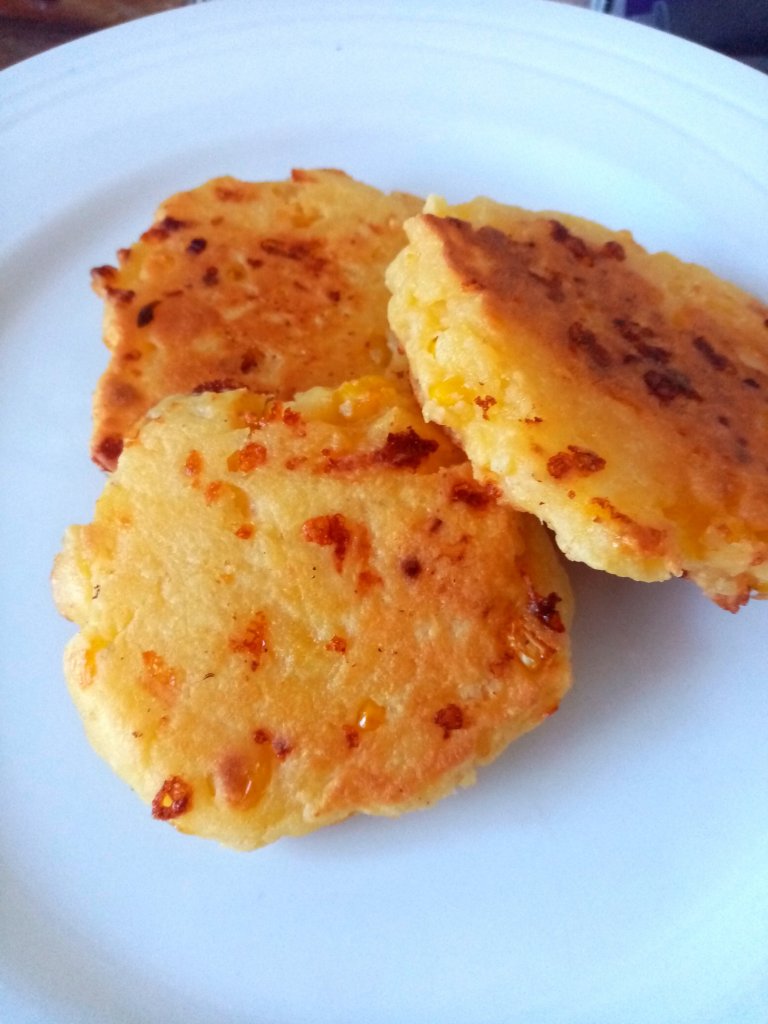
Discover Colombia – how to make corn arepas

Arepa are one of the most popular foods in Colombia. They are often eaten every day and so versatile that they can be served as breakfast, lunch, or dinner. They might be served with rich Colombian hot chocolate; with soft fresh cheese; with guacamole or fresh tomato salsa; with prawns; the possibilities are endless!

There are many recipes for arepas and this is one variant 🙂

Ingredients

  • 1 cup milk
  • 2 Tablespoons butter
  • 1 cup fine cornmeal flour
  • 1/2 cup Colombian queso campesino, or queso doble crema, or shredded mozzarella.
  • 1/2 teaspoon salt
  • 1/2 cup frozen corn
  • Butter / rice bran oil for pan

All about corn flours

An important note for this recipe is that in Colombia they use a special arepa flour (masarepa) which is a precooked fine cornmeal. It can be sourced in New Zealand but it is a speciality item.

If you don’t have access to masarepa, you can use a gluten free substitute; you will need a larger quantity as it will not absorb the liquid in the same way. For instance, 1.5 cups Cornmeal Flour (not to be confused with NZ cornflour) and 1/2 cup gluten free baking flour.

Directions

  1. Warm the milk and butter (either in a pot or in a microwave).
  2. In a large mixing bowl, combine the warm milk (with dissolved butter) + cornmeal flour + salt + frozen corn + mozzarella. Mix until you have a dough-like batter.
  3. Let the batter rest for 30 minutes.
  4. Divide the dough into balls and then flatten.
  5. You can choose to: deep fry or lightly fry on a skillet / frying pan; give them a very light coating of oil and cook them in the air fryer (which I did); or even cook them in a panini press. The aim is to be golden crisp on the outside and cooked through. They are best served warm and are delicious eaten straight away.

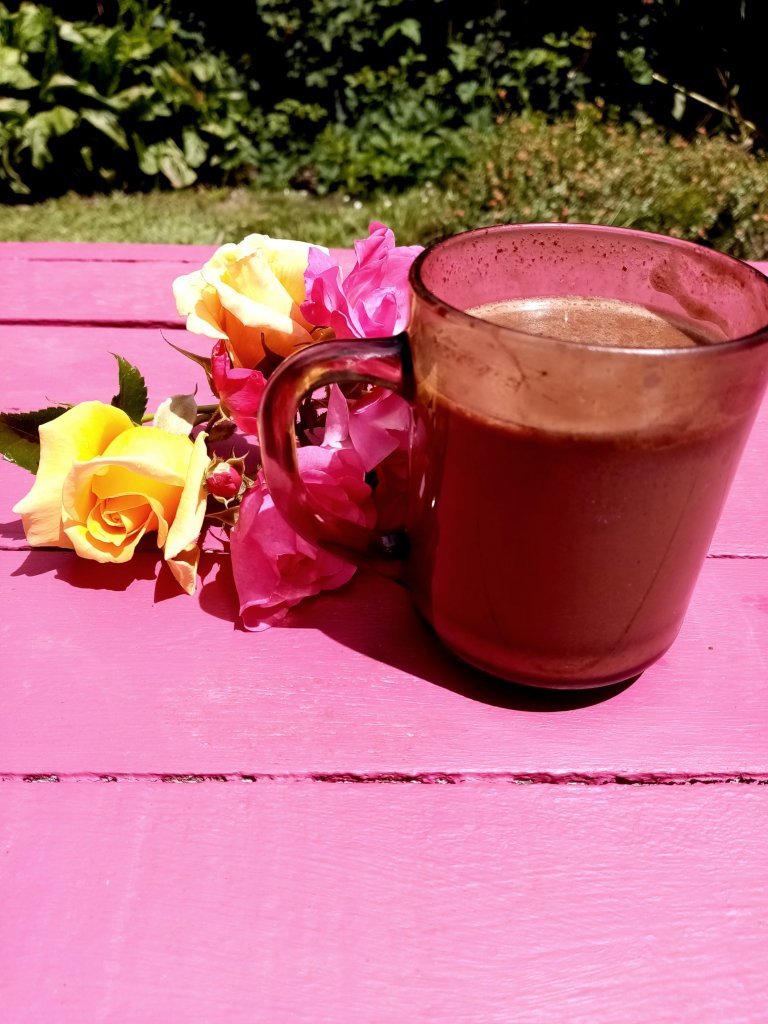
Discover Colombia – How to make decadent hot chocolate

Chocolate sin queso es como amor sin beso, chocolate without cheese is like love without a kiss.”

It was fascinating researching this as part of our world studies unit on Colombia and delicious to try. This drink is an essential part of Colombian culture and often served for breakfast with arepa. It is an incredibly rich drink and worth noting that the cheese they use is Colombian queso campesino or queso doble crema; note these fresh cheeses are very different to something like our Kiwi block of yellow Colby featured in our quintessential mince and cheese pie.

Colombian Hot Chocolate

Ingredients

  • Stick(s) of dark chocolate
  • Full cream milk
  • White cheese

Those are essentially the ingredients; you can flavour with cinnamon and cloves if desired. Amounts will vary depending on how much you are making; I used about 1 sante bar, 1 cup full cream milk, and about 1/4c mozzarella. While delicious, I’m aware that it’s not quite the same cultural experience as I’m using my local ingredients.

Directions

  1. Warm the milk almost to a boil; watch closely and whisk.
  2. Remove from heat and stir in the chocolate until fully melted.
  3. Drop some mozzarella cheese into your cup and pour hot chocolate over the top.
  4. Let the cheese melt a little and enjoy!

Tip: In Colombia, they use a chocolatera and a molinillo for warming the milk and frothing the chocolate. Lacking these, I used a small pot and a whisk.

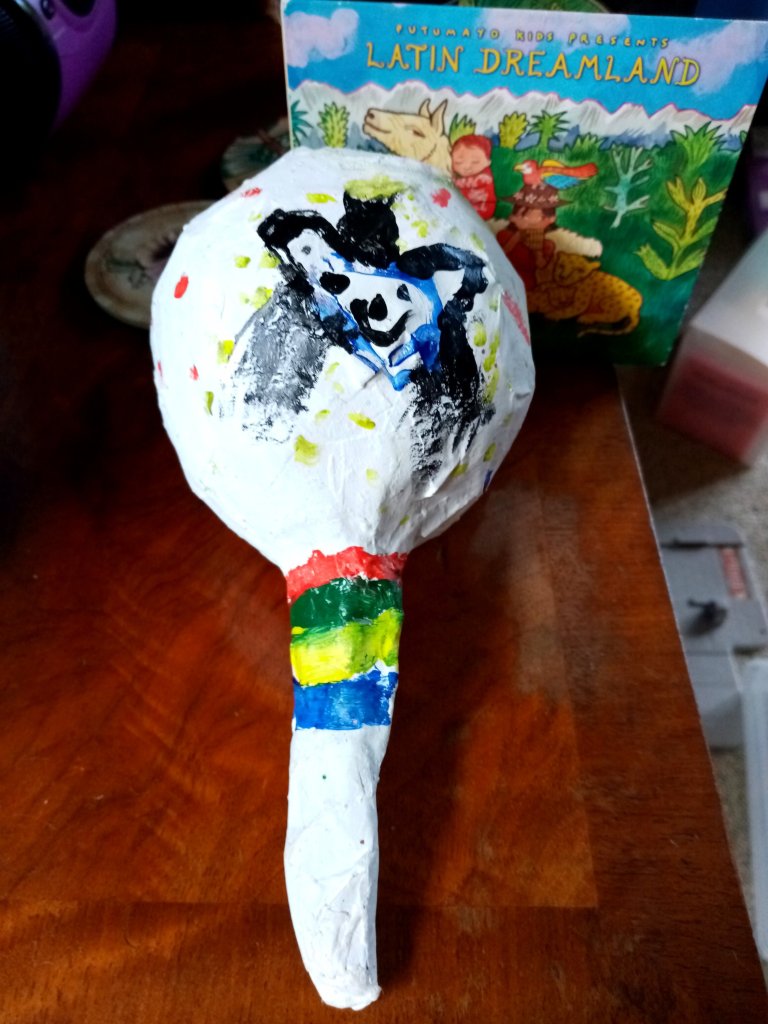
Discover Colombia: How to make a maraca

In studying Colombia, we were fascinated to learn about traditional maracas made from natural materials. These beautiful instruments are often large hollowed-out gourds with a wooden handle and might contain pebbles, or in the Andes mountain, smaller maraca called gapachos use seeds from the gapacho plant. It’s interesting to see how they contrast with the brightly painted wooden maracas that we are familiar with.

We decided to have a go making our own maraca using a few simple materials from around the house. We did a few different engineering builds and this was what we found worked best for us.

Materials you will need

Making your maraca

Start with a balloon

You’ll want to start by snuggling the empty end of a balloon onto the narrow end of a funnel. Pour in some dry rice or beans (give it a little shake to help them go in). Remove the funnel and blow air into the balloon. Kids are fascinated to watch what appears to be a solid shape still expand as the air pushes the sides out.

Tip: Blow up the balloon to the size of a really big coffee mug; the kind you reach for when the kids have been up till super late and then are awake before dawn the next day. We’ve found that you get better stability of the handle if you don’t make the balloon too big.

Attach a handle

Once you’ve tied off the balloon, take two popsicle sticks and tape these together to make a handle. I found it easiest to stick the balloon upside down and stretch the knot vertical along the base of the popsicle sticks to begin taping it. You’ll then want to use long pieces of tape (like compass points) to attach the handle to the balloon; add some horizontal lines of tape as well for extra support. When you’ve finished, the handle should be capable of standing tall in the air (though probably not strong enough to flip the maraca and give it a shake).

Make paper mache paste

I like to use a large plastic tray and my fingers. You’ll want to mix together equal parts flour : water; I also add salt as a preservative. I like to make mine fresh each day so I use 1/2 cup of flour plus about 1/2 cup water to begin with. You want to stir well so that you have a thick paste (you may need to add a little more water).

The great thing about adding your own paste is that you can be creative! We like to add different colours of glitter to each layer.

Start adding layers

Rip your paper into strips. It’s a good idea to have a mix of medium and short strips (with some variety of width). A small balloon is not the easiest surface to work on for this first layer so kids may need some adult assistance.

Tip: Do you need to use newspaper when doing paper mache? The answer is no. It’s a nice form of recycling but really you just need a porous paper that isn’t glossy. You know what else is brilliant for paper mache? Piles of old paintings and drawings (when you reach the point that there are too many to adorn the walls); these make for a fun and super colourful way of doing the layers!

Aim to paste on one layer of paper at a time. Remember to run strips from the handle down to the balloon, around the base of the handle, and along / around the handle itself.

Tip: I like to lay my strips on the paste (in the tray) and then pull it up, run my fingers along both sides to remove excess paste, and then place it on.

After each layer, leave your balloon for 24-48 hours to dry; placing it in the Hot Water Cupboard can help the drying process. It’s important that it has this time to air to avoid creating a habitat for mould. Paper mache projects teach patience.

You’ll only need 4-5 layers for the project. The top layer will ultimately be what is decorated.

Decorating your maraca

Kids can have so much fun with this! Here are just a few ideas:

Tip: If using paint, make sure that you leave plenty of time to dry between layers. Poster paint can be great for foundation layers but the water content means it has a longer drying time. We did several layers of white poster paint and then used acrylics for the detailing.

Engaging kids

This is a very sensory (and time consuming) activity and not all aspects will appeal to all kids. This is a great opportunity to brainstorm all the different roles that would be involved in bringing this to market in the real world. If your child would prefer an adult to do the goopy paper mache part, help your child play to their strengths and interests by finding a project role that interests them.

Do they like planning? Every project needs a project manager to identify steps, keep the team on task, and create a report.

Do they like numbers? Consider allocating a budget for materials (especially decorations). Consider what kinds of costs you might have for a larger run (i.e. 10 or 100 maraca); what price point would you set your maraca at? How might price impact sales and profits?

Do they like art and design? They might enjoy being the hands-on graphic designer and/or art director. This could involve getting creative with the paste as it is mixed and decorating the finished maraca once it is dry. They might want to draw inspiration from Colombia’s beautiful birds; the stunning natural wonder of Caño Cristales (the rainbow waterfall); or the brightly coloured town of Guatapé.

Do they like big ideas? Would they like to be marketing director? This means working alongside the graphic designer to consider what style of art and use of colour would be a good idea. What will make this maraca unique?

Do they like building and creating things? As engineer, they might want to test different strategies for connecting the balloon and popsicle sticks to create a single stable unit capable of being shaken vigorously.

Gluten Free Lemon Cake

This delicious gluten free lemon cake was inspired by both our study of Colombia, where corn flour is a key ingredient in many traditional foods, and our sun drenched lemon tree.

Ingredients

  • 1 cup GF cornmeal flour
  • 1 cup sugar
  • 2 cups gluten free plain flour
  • 1 1/2 tsp Baking Powder
  • pinch salt
  • 2 eggs
  • 120g Nuttelex (or margarine, or butter)
  • Zest of 1 lemon
  • Juice of 2 lemons
  • approx. 3/4 cup water (or rice milk, or milk, or greek yoghurt).

Allergies: gluten free, dairy free*, soy free, nut free.

Directions

  1. Line or grease a large spring-form cake tin. Preheat the oven to 180’C / 350’F.
  2. I like to keep things simple. Put everything in a big bowl in the order listed EXCEPT the water. Tip: a flour sieve is great for keeping out the lemon pips!
  3. Add 1/4 cup liquid and mix with an electric beater. Slowly keep adding water and mixing until you have a good cake batter consistency.
  4. Pour the cake batter into the cake tin, smooth, and bake for 30-35 mins (or until a toothpick / sharp knife comes out clean).
  5. Sprinkle with a little icing sugar, or whip up a lemon icing for a more lemony flavour.

Tip: I like to eat it warm from the oven and then freeze the rest to pull out as needed.

Tip: For a more lemony flavour, pierce many times with a toothpick when the cake is half cooked. Cover the top of the cake in a thin layer of sugar and squeeze a fresh lemon over the top; then place back in the oven. The lemon syrup will soak into the cake while it continues baking.

World Studies: How to make your name using a secret Inca code!

How to make your name in a secret Inca code!

Ways of recording information

The Inca civilisation had a complex administration system keeping detailed records of supplies, people, tributes, and stored goods. They also maintained over 40,000km (25,000 miles) of paved roadways with an State chaski messenger relay system.

As well as a rich oral culture, detailed records and messages were kept using quipus (kee-pooz). Instead of a system of written symbols (such as hieroglyphics or an alphabet), the Inca had a woven system of multi-coloured knots suspended from a central string. Different kinds of knots, their colour, and their position had different meanings that translated into a numerical system.

Creating a simple number cipher

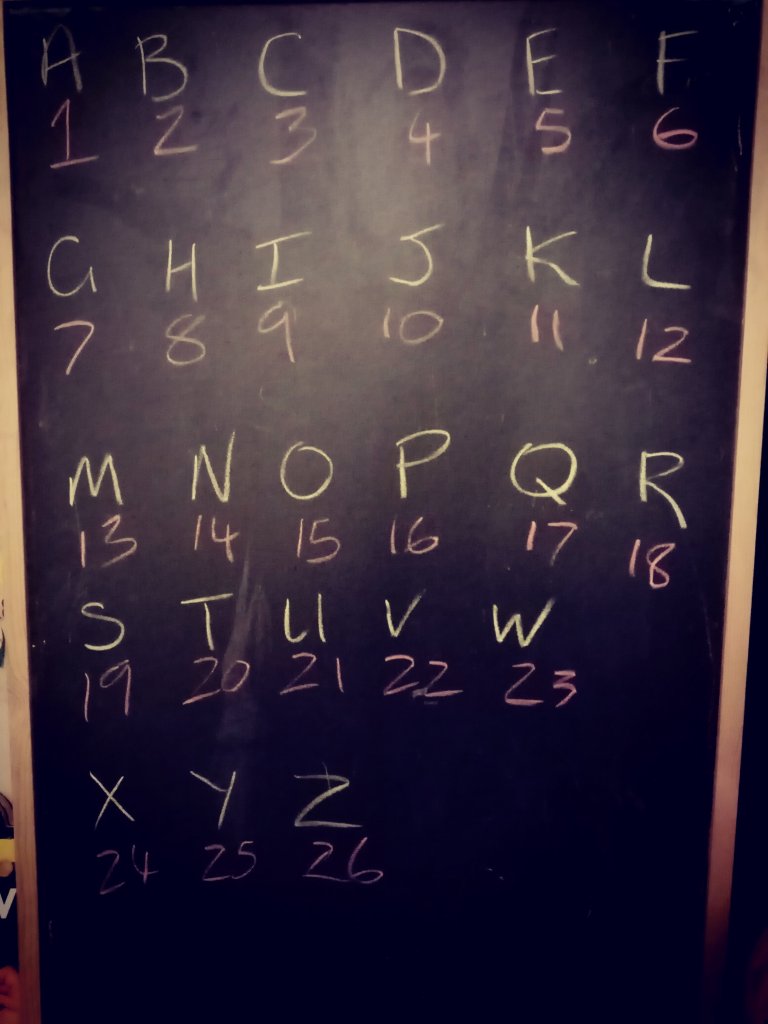
To explore the concept of recording information without using a written language, we will begin by creating a simple number substitution cipher where A=1, B=2, C=3, etc. This will then get translated into a series of knotted beads.

Simple number substitution cipher

Weaving words

Materials

  • Coloured yarn
  • Beads
  • Scissors

Directions

  1. Start by choosing a word that you want to record (such as a name); as in English, you will read this from left to right (with each letter being read from top to bottom).
  2. Weave a simple plait to act as your top anchor; it’s a good idea to have a loop at the left end so that it’s clear where to start reading from.
  3. Knot a piece of yarn to the top anchor (you can slip it through the plait before tying it to help make sure it doesn’t move). Attach the relevant number of beads to correspond with the letter you are recording and knot beneath them so that they don’t slide off.
    • Letters A – I (numbers 1-9) will be represented by a corresponding number of beads close to the top anchor (i.e. A =1 bead).
    • Letter J (10) will be be represented as a single bead further down the strand.
    • Letters K-S (11-19) will be represented by a single bead further down the strand (representing one 10) with a knot to hold it in place, an approx. 5 cm gap, and then a group of beads to represent the ‘ones’ (i.e. S/19 will be one bead = 10, and then a group of nine beads = 9), and a knot to hold in place.
    • Letters T – Z will be represented by two beads further down the strand (representing two 10) with a knot to hold in place, an approx. 5 cm gap, and then a group of beads to represent the ‘ones’ (i.e. Z/26 will be two beads = 20, and then a group of six beads = 6), and a knot to hold in place.
  4. Keep following Step 3, with a separate piece of yarn for each letter.

Example:

Lily (12/9/12/25) = One top anchor with four strands hanging from it. Reading from left to right, these will hold the following beads: low 1 (10) + 2 (2); high 9 (9); low 1 (10) + 2 (2); low 2 (20) + 5 (5).

Sam (19/1/13) = One top anchor with three strands hanging from it. Reading from left to right, these will hold: low 1 (10) + 9 (9); high 1 (1); low 1 (10) + 3 (3).

Tip: Older kids may want to create their own variation of this code by creating meaning based on the colour, size, or type of beads being used.

Want to find out more about the Inca?

One of my favourite books is proving to be Inca Discover the culture and geography of a lost civilisation. It’s well laid out, has plenty of pictures and infographics, and (very importantly) it has lots of ideas for easy to complete projects to help develop learning. This craft is inspired by one of their projects.

A wonderful animated short video for children is The Rise and Fall of the Inca Empire.

Want another project? Why not try making your own Inca Rope Suspension Bridge. This particular project references the Inca using rope bridges made of woven grass to cross narrow river canyons (such as the Keshwa Chaca – Quecha Bridge).

Want to learn more about Quipus? Try this short National Geographic video: Threads that Speak – How the Incas used strings to communicate.