Mushroom melt burgers

Mushroom melt burgers

Mushroom melt burgers

Grilled mushrooms with melted cheese make a quick and easy vegetarian meal.

Ingredients

  • Portobello mushrooms (or similar big fleshy mushrooms)
  • Piquant easy-melt cheese (like goat cheese or blue cheese)
  • Fresh salad ingredients (like sliced tomato, grated carrot, baby spinach, lettuce, sliced beetroot, watercress, mungbeans, sliced cucumber).
  • Hamburger bun, brioche bun, gluten-free wrap or bun.

Cheese

If goat cheese seems too…well, goaty, consider a goat-buffalo cheese blend. Similarly, if blue cheese seems too strong consider a creamy mild blue cheese. Alternatively, use a strong tasty or colby cheese + grated parmesan and mozzarella!

For dairy free / soy free / vegan cheese consider: Daiya or Angel Food

Burger buns

If allergies aren’t an issue, there a range of burger buns to choose from, or go up-scale and use a brioche bun. For gluten-free (or soy free) then you may want to use a gluten free bun or wrap. You can also skip the bun (and substitute rice or beans) and tell your child (or yourself) that you’re simply having a super fancy ‘deconstructed’ burger.

Allergies: gluten free*, dairy free*, soy free, egg free, nut free.

Directions

  1. Prepare your salad ingredients.
  2. Grill the mushrooms and cheese.
  3. Assemble your burger. Add dressings (like sauces and mustard) if desired.
Advertisement

Baked Chicken & Peaches

Baked Chicken and Peaches.jpg

Baked Chicken and Peaches

This is a great dish to make in summer when fresh peaches are cheap; I made it recently on a dark Autumn day with the skies full of rain – tinned peaches work just as well and bring a bright note to the day!

It takes very little time too mix up and put in the oven; combine it with some vegetables and instant mashed potatoes for a quick meal that is also toddler / child friendly!

(FYI I buy plain potato flakes from a bulk buy store rather than buying boxed instant mashed potato from the supermarket.)

Ingredients

  • 2 chicken breasts (boned & skinned)
  • 1/3c brown sugar
  • 1 peach / 1/3 of a 400g tin of peaches
  • 2 pinches of ground ginger
  • 1 pinch allspice or ground cloves
  • 1/2T lemon juice

Optional

  • Superfine white rice flour or cornflour (corn starch) to make gravy.
  • Potato flakes + boiling water + rice bran oil + salt + almond milk to make mashed potatoes.
  • Broccoli.

Allergies: gluten free, dairy free, soy free, egg free, nut free.

Note: The recipe will also work well for larger amounts just double or triple the ingredients based on the number of chicken breasts you are cooking.

Directions

  1. Take a pyrex baking dish and put in the brown sugar.
  2. Put in the chicken breasts (turning them to coat them in sugar).
  3. Lay slices of peaches over the chicken breasts.
  4. Sprinkle the ground ginger, allspice, and lemon juice over the chicken and peaches.
  5. Bake in a preheated oven at 180’C for approx. 30 minutes. Baste regularly with the chicken juices. Cover in tinfoil if needed.
  6. Optional: After removing the chicken and peaches, whisk in some superfine white rice flour (or cornflour) to make a sweet gravy.
  7. Optional: Serve with steamed broccoli, mashed potatoes, and gravy.

Butter bean dip

butter bean dip

Butter bean dip

This is a great way to use up leftover Butter Beans with Butter & Garlic. Serve it with freshly made bread, rice crackers, pita chips etc.

Ingredients

  • Sauteed butter beans with butter (or rice bran oil) & garlic
  • Natural greek yoghurt
  • Lemon juice (or a pinch or citric acid)
  • Optional: fresh herbs like parsley, chives, coriander.
  • Optional: for a Moroccan style dip: add 1 tsp ground cumin, 1 tsp paprika, and garnish with dukkah.

Note: Most of the ingredients for the dip have already been included when you cooked the beans; the flavour of the dip will be impacted by which optional extras you cooked with the beans (i.e. leek, shallots etc.)

Allergies: gluten free, soy free, egg free, nut free, dairy free*.

Directions

  1. In a bowl, mix natural greek yoghurt with a teaspoon of lemon juice (or a pinch of citric acid).
  2. Mash the beans.
  3. Mix the bean mash into the yoghurt mix.
  4. The dip is tangy with smokey notes. You can adjust the flavour, if desired, by slowly adding any of the following: lemon juice, olive oil, salt, maple syrup, chilli.
    • Just remember that it’s easy to add more of something but much harder to balance if you put too much of something in!
  5. Garnish with fresh herbs and serve with freshly made bread, rice crackers, pita chips etc.

Tip: You can fork mash these for a rustic blend or pop everything in a food processor to get it smooth.

Butter Bean Dip

Butter Bean Dip (rustic blend)

Butter beans (a baked beans alternative)

Butter beans with butter, leek, and garlic

Butter beans with butter, leek, and garlic. Grated parmesan. Choko noodles.

Don’t get me wrong, I loved baked beans as much as the next kiwi kid, but  the reality is that processed foods these days are often packed full of unnecessary sugar and salt. Hopefully Watties have changed their recipe since this damning article in 2009: “Wattie’s baked beans 420g: Although beans are good for you and packed with fibre, a can of baked beans has almost 30g of sugar. This is a low fat product and high in fibre, but does it require 1890mg of salt and 29g of sugar to make it taste good?”

Processed foods can also be a minefield for allergy families! Additionally, the reason for choosing vegetables like garlic, choko (chayote), leeks, and shallots for this recipe is because they’re low in naturally occuring food chemicals like salicylates, amines, and glutamates which is helpful for sensitive systems.

Don’t worry if you don’t have allergies – I’ve seen people post similar recipes simply because they don’t like baked beans or because butter + garlic can make anything awesome!

Tip: This recipe is also the basis of the easy to make Butter bean dip!

Ingredients

  • 400g tin of butter beans (rinse thoroughly)
    • You can substitute different beans according to taste. Like broad beans, these are quite large and hold up well in a wok without a sauce to simmer in.
  • Butter (or neutral oil, like Rice Bran Oil)
  • Garlic (crushed)
    • You can use garlic granules if you don’t have fresh.
  • Optional: leek (thinly sliced) or shallots (finely diced)
  • Optional: parmesan or grated cheese
  • Optional: cooked bacon (finely chopped)
  • Optional: choko (cheyote) as vegetable noodles.

Allergies: gluten free, dairy free*, soy free, egg free, noodle free.

Directions

  1.  Heat a frying pan (or wok) and melt butter. Lightly saute the garlic and any optional extras like leek or shallots.
    • Be careful not to over cook the garlic or you’ll get a distinctly smokey taste! (she says from experience…)
  2. Add the butter beans and cook until soft. You may need to add some extra butter while they are cooking.
  3. Serve topped with parmesan or tasty cheese if desired.


Choko noodles

  1. Use a vegetable peeler to remove the skin.
  2. Peel wide strips of the actual vegetable (the length of the choko).
  3. Add some more butter to the pan (after you’ve removed the butter beans) and fry the choko noodles until softened (they should still be slightly firm to the bite; not raw and not falling apart!). They will pick up the remaining garlic from the pan.


Flavourful Black Beans

Flavoursome Black Beans.jpg

Flavoursome Black Beans on Rice

This is such a wonderful recipe free of all the top 8 allergens that is cheap, quick, and easy to make. It’s fantastic to have as a base recipe that can then be served with rice, tortillas, wraps, empanadas, quesadillas, or to make lunchbox pies.

Ingredients

  • 400g tin of black beans (rinsed)
  • Ham or bacon or pancetta (finely chopped)
    • Check ingredients carefully if you have food allergies, such as soy.
  • 1 diced brown onion
  • 2 tsp crushed garlic
  • 1T balsamic vinegar
  • 1T coconut amino acids (or soy sauce).

This is the base recipe; it’s delicious as is or you can vary it as desired by adding mince, diced chicken, chilli, peas & corn, celery, etc.

Allergies: soy free, dairy free, egg free, gluten free, peanut free, tree nut free.

Directions

  1. Brown the onion and garlic in a frying pan.
  2. Add ham, balsamic vinegar, and coconut amino acids.
  3. Add black beans.
  4. Cook until hot. Can be served immediately.
    • If you have the time, lower the heat to minimum and slow cook for 20 minutes. This allows the flavours to simmer and the onion to caramelize.

This slideshow requires JavaScript.

Egg in a hole

dsc_0339

Eggs in a hole. Such an easy recipe but one I’ve only discovered recently.

Ingredients

  • Egg (can be gluten free bread)
  • Butter (or dairy-free spread)
  • Bread
  • Optional: Salt & Pepper to taste. Chopped chives. Grated cheese.

Allergies: soy free, dairy free*, peanut free, tree nut free.

Directions

  1. Butter the bread and cut a rectangular window out of the middle.
  2. Heat frying pan (or skillet) and pop both pieces of bread in butter side down. Add a little butter into the ‘window’ and wait for it melt.
  3. Crack an egg into the ‘window’.
  4. Let it cook until the egg white has firmed up and then flip. Also flip your little cut out bread.
  5. Cook for a bit longer so the egg white is firm (you may want the yolk runny).
  6. Serve with any seasonings that you want. The cut out bit of bread is delicious and crunchy and can also be dipped into runny egg yolk.


Prawn Fried Rice


Ingredients

  • 2c cooked rice (refrigerated from previous day)
  • 1 1/2c frozen vegetables
  • 1 1/2c prawns
  • Dried ginger
  • Sliced green onion
  • Sugar
  • Salt
  • Fish sauce
  • Oil (I like rice bran oil)
  • optional: coriander, chilli, lime slices.

This is the kind of recipe that you may want to make on the spur of the moment because you have leftover rice, or it may be something that you prep the night before so that you can whip up lunch or dinner the next day quickly.

In terms of prep time, the rice needs to have been cooked and cooled long enough. This changes it to resistant starch which will help it to stir fry. My personal preference is basmati rice (both for taste and that it holds together well in a wok); I made this with long grain white rice and it worked well enough but some of the cooked grains for break apart.

My prawns were frozen so I had both those and the veggies covered on the bench for the afternoon to defrost. They were cool when they went in the wok but not frozen so this leads to a quick cooking time.

Tip: I find that sliced green onion freezes well. I portion it out in little bags and then pull it out as needed for stir fries and pizza.

Allergies: soy free, dairy free, egg free, peanut free, treenut free, gluten free. May not be suitable for people with fish or shellfish allergies.

Directions

  1. Cook your rice the day before. Personally, I like to use the rice cooker with water, salt, and rice bran oil.  As your rice cools give it a bit of a fluff (easier if you’ve used some oil in the cooking) and put it in the fridge to cool overnight.
  2. Prepare your vegetables. If you’re using frozen veggies then it’s a good idea to put them in the fridge at the same time as the rice so that it can defrost overnight. Alternatively, you might want to use something like grated carrot.
  3. Prepare your prawns. If frozen, make sure that they’ve defrosted slowly. Give them a rinse and pat dry.
  4. When you’re ready to cook, heat your wok nice and hot with some oil.
  5. Add the prawns and a pinch or two of ginger.
  6. Prawns aren’t as temperamental as squid but they don’t need a long cook time. About 5 minutes for prawns (and less if using shrimp instead).
  7. Add your vegetables.
  8. Add the rice. Keep moving it around to separate and coat the grains.
  9. Add a dash of fish sauce. Add sugar and salt to taste.
  10. Keep moving everything around so that it doesn’t stick; add more oil if needed.  Serve when hot through.
  11. Serve with condiments if desired (like chopped fresh coriander, fresh chillies, lime slices etc.).

Welsh Rarebit


This is such a wonderful comfort food. It’s tasty, quick and easy to make (even with a grumpy toddler), and a cheap meal to make if these are the kind of staples you have at home. You’re also likely to end up with leftover cheese sauce that you can use the next day (make mince & cheese pie, lasagne, nachos, or just serve with baked beans or broccoli!).

I also have to confess that I normally mispronounce this and tell my toddler that we’re eating Welsh Rabbit.

Ingredients

  • 4 slices thick bread (can use gluten free bread)
  • 250g strong cheddar cheese
    • (I have had this turn out fine with a mild colby so don’t stress if you don’t have something stronger).
  • 100ml milk
    • (apparently you can replace this with light ale but I haven’t tried)
  • 25g butter
  • 1 beaten egg
  • 1T plain flour (or superfine white rice flour)
  • 1T mustard
    • (I like Dijonnaise)
  • Paprika
  • Worcestershire sauce (optional)
  • Dried onion (optional)

Allergies: soy free, gluten free*, nut free.

Directions

  1. Lightly toast bread.
    • (If soft it will go soggy).
  2. In pot on a low heat, melt cheese + milk + butter.
  3. Turn heat to medium and stir in egg.
  4. Add flour and stir swiftly until fully mixed.
  5. Take off heat. Add mustard; dash in Worcestershire sauce (if desired); add a dash of paprika (or you can sprinkle on top once spread); mix in dried onion (if desired).
  6. Butter toast and lay on baking tray.
  7. Spoon cheese sauce onto toast. Sprinkle on paprika (if not already mixed in).
  8. Grill until cheese goes golden and starts to bubble.


Optional:  You can add ham, cooked bacon, anchovies, or warm baked beans to the bread before spreading the cheese sauce. Remember that everything needs to be warm and cooked before it goes under the grill!

Allergy: peanut free; soy free*.

Note: This can be made soy free as long as you’re careful to select soy free ingredients.


Egg Fried Rice without Soy Sauce


Ingredients

  • 2c cooked rice (refrigerated from previous day)
  • 1c frozen peas & corn (refrigerated from previous day)
  • 2 eggs
  • Sliced green onion
  • Sugar
  • Salt
  • Chicken stock powder
  • Oil (I like rice bran oil)
  • optional: fish sauce, chilli, lime slices.

Note: Instead of sugar and salt, you can use 1/2 – 1T of coconut amino acids to achieve a similar umami flavour to soy sauce.

You can play with ingredients, i.e. consider chopped ham or bacon, bbq pork, char siu pork, shrimps etc. You want everything to be cut small and to be pre-cooked; you are essentially heating everything through. It’s important that the rice needs to have been cooked earlier, cooled and been fluffed, and then completely chilled in the fridge (cooling for 12 hours changes the type of starches the rice contains).

This is the kind of recipe that you may want to make on the spur of the moment because you have leftover rice, or it may be something that you prep the night before so that you can whip up lunch or dinner the next day quickly.

Allergies: soy free, dairy free, gluten free, peanut free.

Directions

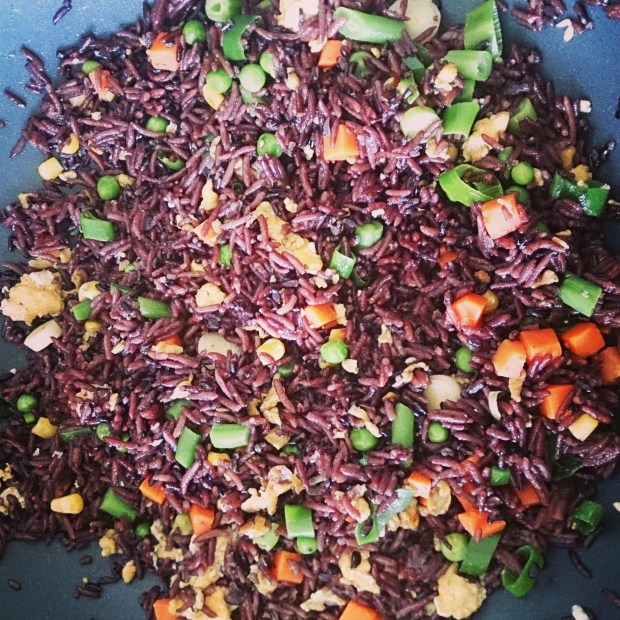
  1. Cook your rice the day before. Personally, I like to use basmati rice in the rice cooker with water, salt, and rice bran oil. Today I used 80% basmati and 20% black rice; this has the fun visual side-effect of dying the basmati a dark purple colour! As your rice cools give it a bit of a fluff (easier if you’ve used some oil in the cooking) and put it in the fridge to cool overnight.
  2. Prepare your vegetables. If you’re using frozen veggies (I used a mix of peas, corn, cubed carrots, and small cut beans) then it’s a good idea to put them in the fridge at the same time as the rice so that it can defrost overnight. Alternatively, you might want to use something like grated carrot.
  3. When you’re ready to cook, heat your wok nice and hot with some oil.
  4. Crack two eggs and scramble them. You can choose either to: (A) cook them as an omelette, take it out and cut into strips, and re-add once the rice is in, or (B) add the rice when the eggs are almost cooked and break the eggs into small pieces while moving the rice grains around.
  5. Add the rice. Keep moving it around to separate the grains and break the egg up.
  6. Add stock powder, sugar, and salt to taste. (You may also want to add a dash of fish sauce).
  7. Add your vegetables (and any pre-cooked meat).
  8. Keep moving everything around so that it doesn’t stick; add more oil if needed.  Serve when hot through.
  9. Serve with condiments if desired (like dried shallots, dried or fresh chillies, lime slices etc.)


Why not use soy?

You may not like the taste of soy, or may dislike the sodium content; for us, it’s because of a soy allergy. Salt and sugar (I prefer brown) can be found in a variety of soy free fried recipes as way of substituting for the salty flavour of the soy sauce and also providing a dash of sweetness.