Making natural icings for kids

All natural colourful icing for kids with no artificial colours or additives

Tropical jungle mango & pear icing | Princess pink beetroot icing

Chocolate Buttercream Frosting

Chocolate Buttercream Frosting. I use Nuttelex + coconut milk to make a vegan, allergy free frosting that tastes amazing!

Making all natural icings is easy and is a great way to avoid issues with allergies, chemical sensitivities, or the fact that countries like New Zealand and Australia still allow artificial food dyes that are banned in Europe due to health concerns. My daughters 3rd birthday party used three all natural icings that were vegan, free of all the top allergens, and contained no artificial additives.

Allergies: gluten free, soy free, dairy free, egg free, nut free, additive free.

Advertisement

How to wash net curtains (cheaply, easily, and with natural products)

Getting great results from washing net curtains with natural products!

Getting great results from washing net curtains with natural products!

My city is humid all year round (often hovering at 95% and still not raining); combine that with winter and aluminium frames and it means sweating windows which need to be wiped down daily. It also means net curtains need to be periodically washed to keep them free of grime and mold.

For a family with sensitive skin, I prefer to use more natural options for cleaning (than commercial chemicals). I wanted to see if I could find any advice on washing net curtains and found these great step by step instructions.

To summarise:

  1. Put warm water and 1 cup of white vinegar in a bathtub (or large bucket). Swirl around (agitate) and make sure the curtains are covered.  Leave to soak for an hour.
  2. Drain the water. Refill with a fresh batch of warm water and 1 cup of baking soda (bicarbonate soda). Swirl around and make sure the curtains are covered. Leave to soak for an hour.
  3. Treat any stains remaining on the curtains. Create a paste using four tablespoons of baking soda and ¼ cup of water. Apply this paste to your curtain and rub it into the stains. After working the baking soda thoroughly into the stains, apply a little undiluted vinegar.
  4. Wash normally in the washing machine (on a gentle / delicate cycle).
  5. Line dry in the sun.

Tip: The reason for needing separate soaking times is because baking soda (base) + white vinegar (acid) will largely cancel each other out and reduce effectiveness if you use them at the same time.

Tip: Don’t put the net curtains in the dryer (not even on Low). They shrink – I speak from experience!

Gingerbread / Spice Cookies (Allergy Free)

Gingerbread cookies

Gingerbread cookies

Ingredients

  • 2 cups plain flour (I have also used Healtheries GF Bread Mix)
  • 1 tsp Baking Soda
  • 1 tsp Baking Powder
  • 2 tsp ginger
  • 1 tsp cinnamon
  • 1/2 tsp allspice
  • 150g butter or allergy free spread (I use Nuttelex)
  • 3/4 cup brown sugar
  • 2 – 3 Tbsp Maple Syrup or Golden Syrup
  • Drop vanilla
  • Pinch salt

Note: These make a light more-ish spices gingerbread cookie (as opposed to one denser and chewier). Maple syrup will provide a more delicate flavour, golden syrup a more traditional one. The flavour notes are easy to experiment with, you can add more ginger and a pinch of nutmeg. I’ve made these a lot as my daughter loves them and this is her favourite combination.

Allergies: dairy free*, gluten free*, soy free, egg free, nut free.

Directions

  1. Cream ‘butter’, sugar, maple (or golden) syrup, and vanilla.
  2. Add flour, baking soda, baking powder, salt, and spices.
  3. Knead everything together. It will gradually turn from breadcrumbs to a soft cookie dough. Add a little water if you need to but just a tablespoon at a time.
  4. Refrigerate for 30 – 60 mins. You can leave it in a ball or roll it out. It’s tempting to try cutting it but (and I speak from experience) it doesn’t work very well at room temperature.
  5. Preheat oven to 180’C while rolling out the cookies.
  6. Place cookies on a baking sheet / lightly oiled baking tray.
  7. Bake for 12-15 mins.
  8. Take out from oven and allow to cool briefly before placing on cooling rack to continue cooling.

Tip: If you want a fancy (and easy) dessert reserve some of the cookie dough. Serve balls of French vanilla ice cream with little balls of cookie dough and a warm gingerbread cookie.

Note: These cookies are soft coming straight out of the oven and will harden overnight. They are delicious either way. They also freeze well.

Gingerbread cookies with chocolate icing

Gingerbread cookies with chocolate icing

Winter Crafts: Painting Leaves

A wonderful winter activity can be going for a walk through the woods or local park and talking about how the trees change with the seasons (and how some don’t!).

Collect some leaves and pine cones on your walk and take them home to dry.

Tip: Putting then on newspaper or a towel in the hot water cupboard works well.

Once the leaves are dry they make a wonderful canvas for painting. Again, they dry well in the hot water cupboard and can be hung up for a few days as decorations.

Tip: You could try spraying them with varnish to help them last longer.

Butter bean dip

butter bean dip

Butter bean dip

This is a great way to use up leftover Butter Beans with Butter & Garlic. Serve it with freshly made bread, rice crackers, pita chips etc.

Ingredients

  • Sauteed butter beans with butter (or rice bran oil) & garlic
  • Natural greek yoghurt
  • Lemon juice (or a pinch or citric acid)
  • Optional: fresh herbs like parsley, chives, coriander.
  • Optional: for a Moroccan style dip: add 1 tsp ground cumin, 1 tsp paprika, and garnish with dukkah.

Note: Most of the ingredients for the dip have already been included when you cooked the beans; the flavour of the dip will be impacted by which optional extras you cooked with the beans (i.e. leek, shallots etc.)

Allergies: gluten free, soy free, egg free, nut free, dairy free*.

Directions

  1. In a bowl, mix natural greek yoghurt with a teaspoon of lemon juice (or a pinch of citric acid).
  2. Mash the beans.
  3. Mix the bean mash into the yoghurt mix.
  4. The dip is tangy with smokey notes. You can adjust the flavour, if desired, by slowly adding any of the following: lemon juice, olive oil, salt, maple syrup, chilli.
    • Just remember that it’s easy to add more of something but much harder to balance if you put too much of something in!
  5. Garnish with fresh herbs and serve with freshly made bread, rice crackers, pita chips etc.

Tip: You can fork mash these for a rustic blend or pop everything in a food processor to get it smooth.

Butter Bean Dip

Butter Bean Dip (rustic blend)

Butter beans (a baked beans alternative)

Butter beans with butter, leek, and garlic

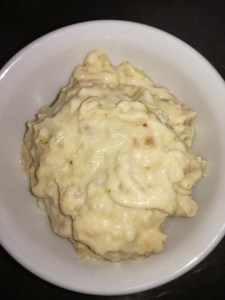
Butter beans with butter, leek, and garlic. Grated parmesan. Choko noodles.

Don’t get me wrong, I loved baked beans as much as the next kiwi kid, but  the reality is that processed foods these days are often packed full of unnecessary sugar and salt. Hopefully Watties have changed their recipe since this damning article in 2009: “Wattie’s baked beans 420g: Although beans are good for you and packed with fibre, a can of baked beans has almost 30g of sugar. This is a low fat product and high in fibre, but does it require 1890mg of salt and 29g of sugar to make it taste good?”

Processed foods can also be a minefield for allergy families! Additionally, the reason for choosing vegetables like garlic, choko (chayote), leeks, and shallots for this recipe is because they’re low in naturally occuring food chemicals like salicylates, amines, and glutamates which is helpful for sensitive systems.

Don’t worry if you don’t have allergies – I’ve seen people post similar recipes simply because they don’t like baked beans or because butter + garlic can make anything awesome!

Tip: This recipe is also the basis of the easy to make Butter bean dip!

Ingredients

  • 400g tin of butter beans (rinse thoroughly)
    • You can substitute different beans according to taste. Like broad beans, these are quite large and hold up well in a wok without a sauce to simmer in.
  • Butter (or neutral oil, like Rice Bran Oil)
  • Garlic (crushed)
    • You can use garlic granules if you don’t have fresh.
  • Optional: leek (thinly sliced) or shallots (finely diced)
  • Optional: parmesan or grated cheese
  • Optional: cooked bacon (finely chopped)
  • Optional: choko (cheyote) as vegetable noodles.

Allergies: gluten free, dairy free*, soy free, egg free, noodle free.

Directions

  1.  Heat a frying pan (or wok) and melt butter. Lightly saute the garlic and any optional extras like leek or shallots.
    • Be careful not to over cook the garlic or you’ll get a distinctly smokey taste! (she says from experience…)
  2. Add the butter beans and cook until soft. You may need to add some extra butter while they are cooking.
  3. Serve topped with parmesan or tasty cheese if desired.


Choko noodles

  1. Use a vegetable peeler to remove the skin.
  2. Peel wide strips of the actual vegetable (the length of the choko).
  3. Add some more butter to the pan (after you’ve removed the butter beans) and fry the choko noodles until softened (they should still be slightly firm to the bite; not raw and not falling apart!). They will pick up the remaining garlic from the pan.


Superfood Coconut Cacao Smoothie

I used the Healtheries Ground Chia Superfood Blend Cacao & Coconut in the Gluten Free Wild Berry Chocolate Cake and wanted to see what it would be like in a smoothie. The result is creamy, delicious, chocolatey, and with the added nutritional benefits of chia seeds!

Ingredients

Allergies: gluten free, dairy free*, soy free, nut free*, egg free.

Directions

  1. Place everything in a high-powered blender and blend until smooth and creamy.
  2. Pour into a serving glass. Consider topping with a little coconut cream or greek yoghurt and sprinkle some cacao on top.

Making playdough insects (portable playgroup fun!)

Playdough and straw caterpillar

Making playdough insects

Why not spend a rainy afternoon making homemade playdough and designing your own insects (or animals, or monsters!). It’s a cheap activity that’s also easily transportable to playgroup. Younger toddlers will have fun pushing the legs in and pulling them out again; preschoolers will have fun making their designs happen. Think about putting out some library picture books to help give them ideas!

What you 

  • Playdough (try making your own!)
  • Straws
  • Scissors
  • Knife (bamboo or wooden ones are great!)
  • Optional: Googly eyes (from craft stores)

Wild berry chocolate cake (Gluten Free)

Wild berry chocolate cake (Gluten Free)

Wild berry chocolate cake (Gluten Free)

I love chocolate. I’ve posted a few chocolate recipes like the Crazy One Dish Chocolate Cake and the Chocolate Irish Potato Cake, and I’ve posted some make-from-scratch gluten free recipes like the Vanilla Cupcakes and the all natural pink berry flavoured icing. I wanted to play around in the kitchen with some different gluten free ingredients and make a wonderfully chocolatey and moist cake that also wouldn’t be packed with sugar – I prefer to balance my cakes so there’s more chocolate flavour in the cake and then extra sweetness in the (optional) icing. I liked my recipe for the gluten free Chocolate Cupcakes and used it as the basis for this cake!

Ingredients

Group 1

Group 2

  • 3/4 cup sugar
  • 3/4 cup Dutch cocoa powder
  • 1/2 cup superfine white rice flour
  • 1/2 cup garbanzo flour (also called chickpea flour)
  • 1T sweet (glutinous) rice flour
  • 1/4 cup cornstarch (cornflour)
  • 1/2 tsp guar gum
  • 1/4 tsp Baking Soda
  • 1/2 Tbsp Baking Powder
  • 1/2 tsp salt
  • 1/2 cup fresh or frozen mixed berries (i.e, raspberries, blueberries, blackberries, strawberries).
    • I like this paired with raspberries best!

Allergies: dairy free, soy free, gluten free, nut free.

Directions

  1. Preheat the oven to 180’C.
  2. Whisk together the ingredients in Group 1. This helps to aerate the mix. You can use a stick blender or I used the food processor (with a plastic mixing attachment, not a metal cutting blade!).
  3. Sift together the ingredients in Group 2.
  4. Mix the combined dry ingredients into the whisked liquid.
  5. Divide the mix between two cake tins (or similar). Bake at 180’c for approx. 25-30 mins or until cooked.
  6. Allow to cool before icing. Place one cake layer on serving dish. Cover with jam (i.e. you could have raspberries in the cake mix and then use raspberry jam), place the second cake layer on top, dust with icing sugar. Serve with cream or coconut ice-cream.

Tips

As an alternative you might want to bake this as a bundt cake and use a chocolate buttercream frosting.

How to make easy bracelets and crowns for kids

How to make easy bracelets and crowns for kids

How to make easy bracelets and crowns for kids

Kids are so wonderfully creative! There are lots of kit-sets for crafts at toy stores but it’s often much cheaper to visit a craft store or emporium.

All you need to make a crown, necklace, or bracelet is some pretty pipe cleaners, beads, and imagination! They’re a great activity for birthday parties, playgroups, and rainy days.

Fun things to do with beads!

Fun things to do with beads!

Make sure that you choose beads (or bells) with large enough holes for the pipe cleaners to feed through. Younger kids will need active supervision and assistance but by 4 years they’ll be shaking you off 🙂 You’ll also find they start coming up with their own ideas like making swords or funny glasses or monster crowns!

Warning: This isn’t suitable for babies and young toddlers due to small parts and choking hazards. Make sure young children are old enough to follow instructions and will not put beads in their mouths.