Everything you wanted to know about baking bread & rolls!

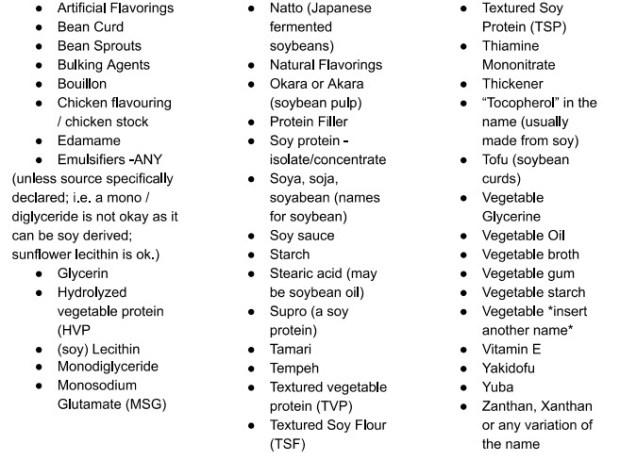
I stumbled upon a fabulous repository of information at the Robin Hood Baking Centre; apart from a wee bit of product placement all of their information is well presented with helpful photos. I’ve altered the order of information so that there’s a more logical grouping and flow to it 🙂

ADDING FLOUR

Adding Flour

People often add too much flour to dough, and this makes the finished product heavy and dense. Hold back about 1 cup (250 mL) of flour, then add it gradually until you get the desired texture. Add as little flour as possible to the kneading surface. Use a pastry scraper as you knead the dough to pick up any bits that stick to the surface. The dough should still be slightly sticky when fully kneaded— it may be a little harder to work but will give you the desired results.

CHOOSING FLOUR

Choosing Flour

It’s best to use flour specially formulated for baking bread, like Robin Hood® Best for Bread flours. It will help you make delicious breads that are high in volume with a light, even texture.
At the minimum, you want High Grade Flour (not plain flour). You may also find flours that are called ‘Strong Flour’ or which say that they have extra gluten added for breadmaking.

ADDING SALT

Adding Salt

Salt enhances taste, and helps bring out the flavours and aromas of the ingredients in your baked goods. Salt will help with tightening the gluten structure, which strengthens the bread dough, and helps with the volume of the bread in the end.

ADDING SUGAR

Adding Sugar

Yeast feeds on sugar, which causes it to activate and produce carbon dioxide gas. Be sure to follow the recipe, as adding too much sugar can slow down your yeast or keep it from activating.

BAKING WITH YEAST

Baking with Yeast

When using active dry yeast, it’s important to make sure it’s still viable. Always follow the recipe directions, which will include dissolving a specified amount of sugar into lukewarm water (110ºF-115ºF/45ºC-56ºC). Then add the yeast and allow it to stand for 10 minutes. If the yeast bubbles up, it’s still active. If not, your bread or rolls will not rise.

Be sure the water is lukewarm. If the water exceeds 138°F (59°C), the yeast will become inactive.

KNEADING BREAD DOUGH

Kneading Bread Dough

Kneading helps to develop gluten in the bread. Knead dough on a lightly floured work surface, adding more flour if dough is too sticky.

You’ll know kneading is complete when the bread is smooth and elastic. To test it, lightly slap the dough. If your hand comes away clean, it’s ready to rise.

RISING

First Rising
When you let the dough rise, the ingredients activate and carbon dioxide develops causing the gluten to stretch. It will rise best in a warm place (75°F-85°F / 24°C-29°C) that is free from drafts. Make sure you place it in a greased bowl that’s large enough to allow the dough to double in size. Cover the bowl with a tea towel.Once it’s doubled in size and no longer springs back when pressed, lightly punch down the dough and let it rest for 10 minutes to relax the gluten.

Second Rising
Once your dough is placed in or on its pan, it’s ready to rise again in a warm place (75°F-85°F / 24°C-29°C). Let your dough rise until it is again double in size.

If dough overrises, it may collapse in the oven during baking.

If you don’t have a place in your home that’s warm enough, try leaving it in the oven with the oven light turned on. If you like, you can also add a pot of hot water on another rack.

Letting the dough rise twice helps improve the flavour and texture even more.

RISING BREAD DOUGH IN THE REFRIGERATOR

Rising Bread Dough in the Refrigerator

Just finished making your bread dough but need to step away? Place your dough in the refrigerator for the first rising. This slows down the rising as yeast doesn’t like the cold. You can let the dough sit in the refrigerator overnight.

When you’re ready to make the bread, take the dough out of the refrigerator, punch it down, shape the dough and let it rise a second time. Since the dough is cold, it will take longer than normal to rise.
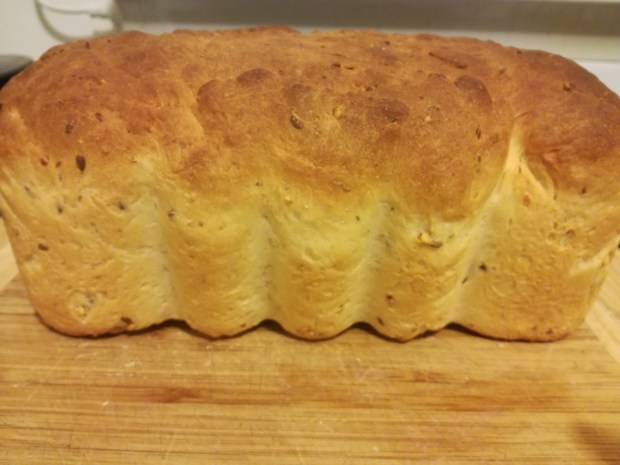
SHAPING A LOAF

Shaping a Loaf

To eliminate large air bubbles, roll out your dough into a large rectangle (approx. 9” x 12” / 23cm x 30cm). From the shorter end, roll it up jelly-roll style, sealing the dough in the middle with the heel of your hand after each turn.

For a different look, bake your loaves free-form on a baking sheet that’s greased or sprinkled with cornmeal. Cornmeal will prevent bread from sticking and provide an interesting texture to the bread.

DIVIDING DOUGH

Dividing dough

Use a sharp knife or kitchen shears when a recipe calls for dividing the dough in half or making into rolls. If you tear the dough it may compromise the gluten, which will affect the rising and shape of the end product.

FREEZING BREAD DOUGH

Freezing Bread Dough

Love homemade bread but don’t want to have to make the dough all the time? Plan ahead and freeze some dough. Use your favourite bread dough recipe but double the amount of yeast called for. Follow the recipe for the mixing, kneading and the first rising. Punch down the dough, shape into loaves that are 2” (5 cm) thick (this allows for quicker thawing). Place in air tight freezer bag and freeze for up to four weeks.

When you’re ready to bake, remove the dough from freezer bag, place it in a greased loaf pan, and cover with greased plastic wrap. The dough will rise as it defrosts. Once thawed, follow your recipe’s baking directions.

GLAZING BREADS

Glazing Breads

Glazes may be used to provide different results in the bread crust. For a crisp crust, brush the dough with a mixture of one egg white and ½ tsp (2 mL) water. For a shiny, golden crust, use a whole egg beaten with 1 tsp (5 mL) water. If you’d like a deep brown crust, use egg yolks instead of egg whites. If you brush the dough with melted butter or oil, it will produce a soft velvety crust.

If you want to top your bread with nuts, seeds or grains, make sure to brush the dough with the glaze first, so it acts like a glue.

CRUSTS – FROM SOFT TO CRISP

Crusts – From Soft to Crisp

Dough that is made with water will typically have a crispier crust, while dough made with milk will be softer.

To soften a crisp crust, brush it with melted butter as soon as it comes out of the oven.

For a darker, richer colour, brush the finished loaves lightly with butter and return them to the oven for 5 to 10 minutes.

HOW DO I GET A CRISP BAGUETTE TYPE CRUST

How Do I Get a Crisp Baguette Type Crust

To get a crisp baguette type crust, you have to create a steam environment in your oven. Using a spray bottle, spray water on the sides of the oven every 10 minutes while the bread is baking. You can also put a pan of boiling water on the bottom rack of the oven under the bread.

VERSATILITY OF BREAD DOUGH

Versatility of Bread Dough

Take your favourite bread dough and change it up by adding nuts, cheese, dried fruit or chopped chocolate. To make a savory dinner bread, you can also add chopped garlic and herbs.

PREPARING YOUR PAN

Preparing Your Pan

Use shortening or oil, like Crisco®, butter, or non-stick spray to grease the pan.

BAKING WITH PROPER HEAT DISTRIBUTION

Baking with Proper Heat Distribution

Unless the recipe says otherwise, always bake your bread on a lower rack.

If you’re baking more than one pan, be sure they are not touching one another or any sides of the oven. You want the air to circulate between them so they cook evenly.

If your crust is becoming too brown too quickly, cover it loosely with aluminum foil.

HOW DO I KNOW WHEN MY BREAD IS BAKED?

How Do I Know When My Bread Is Baked?

Similar to checking the doneness of other baked goods, you can insert a skewer or cake tester into middle of bread. If it comes out clean, it is ready. An instant read thermometer is a very reliable way to check as well. Insert the thermometer in the center of the loaf – if the temperature has reached 190°F/88°C, it is ready.

COOLING BAKED BREAD

Cooling Baked Bread

Remove the baked bread from the pan immediately and place on a wire cooling rack to cool. This allows the air to circulate and prevents the crust from becoming soggy.

WHY IS MY BREAD TOO SMALL?

Why is My Bread Too Small?

Make sure your oven is at the right temperature. If it’s too hot, the bread may bake too quickly, causing a crust to form before the bread is finished rising in the oven.

Also make sure that your bread dough isn’t too cold. Make sure your bread dough has risen in a warm place (between 75°to 85°F/24° to 29°C).

When baking, leave a space between your pans so they are not touching in the oven, allowing for proper air circulation.

WHY IS MY BREAD COARSE AND CRUMBLY?

Why is My Bread Coarse and Crumbly?

If your bread is coarse and crumbly, you may have let your dough over rise or you may have over kneaded the dough. Make sure you follow the recipe directions and allow the dough to rise just until it is double in size – this should take about 1 hour. Knead your dough for the specified time only.

STORING BREAD

Storing Bread

To keep your crust crisp, store your bread in a paper bag at room temperature. It should be good for up to two days. If storing bread at room temperature, avoid storing it in plastic wrap unless you want an especially soft crust.

Bread is best stored at room temperature or frozen. Refrigeration tends to dry out bread.

FREEZING BREAD

Freezing Bread

Bread freezes really well. To freeze, allow your loaf to cool completely, wrap well with plastic wrap, then place in a freezer bag. Be sure to remove all the air or ice crystals will form while freezing.

Thaw at room temperature in the freezer bag to allow the bread to re-absorb the moisture lost during the freezing process.

To freshen your loaf, place it in a 350°F (180°C) oven for 10-15 minutes.

What foods contain soy?

Soy beans (edamame)

Soy beans (edamame) are an obvious form of soy; you will be surprised how many of the foods you eat are hiding soy!

Is soy really hiding in everything I eat?

You may be surprised how many of the foods you eat each day contain hidden soy. I’ve written previously about  soybean oil (normally called vegetable oil) and soy lecithin. These are incredibly widely used in the international food industry because they are cheap, grown year round, and are not FDA regulated (i.e. these do not have to be declared as an allergen on packaging). These are often hidden in compound ingredients, as are other products that may be soy derived. I have to check ingredients every single time I buy something (even if I’ve bought it before). I don’t buy anything containing oil or emulsifiers unless those are 100% declared and identifiable (i.e. canola oil and sunflower lecithin). 

I also have to be careful about bathroom products because glyercin can be soy derived. I’ve changed our bathroom to natural products like shampoo bars and chemical free soap products.

What foods contain soy?

I’ve tried to keep the table below to ingredients. The reality is that these ingredients can be in anything other than raw fruit, most raw vegetables, and most unprocessed raw meats. Soy can be present in anything else including bread, biscuits, crackers, dried fruit (i.e. sultanas have oil added), deli meats, bacon, sausages, peanut butter, spreadable butter, margarine, spice mixes; I’ve even looked at tins of ‘beans in springwater’ which have had soy!

I’ve inserted the table it as a photo so that it’s possible to save the image to your phone or print it for your wallet.

Ingredients that may contain SOY

Ingredients that may contain SOY

Note: Also miso (as a soup or paste)!

Making natural icings for kids

All natural colourful icing for kids with no artificial colours or additives

Tropical jungle mango & pear icing | Princess pink beetroot icing

Chocolate Buttercream Frosting

Chocolate Buttercream Frosting. I use Nuttelex + coconut milk to make a vegan, allergy free frosting that tastes amazing!

Making all natural icings is easy and is a great way to avoid issues with allergies, chemical sensitivities, or the fact that countries like New Zealand and Australia still allow artificial food dyes that are banned in Europe due to health concerns. My daughters 3rd birthday party used three all natural icings that were vegan, free of all the top allergens, and contained no artificial additives.

Allergies: gluten free, soy free, dairy free, egg free, nut free, additive free.

Gingerbread / Spice Cookies (Allergy Free)

Gingerbread cookies

Gingerbread cookies

Ingredients

  • 2 cups plain flour (I have also used Healtheries GF Bread Mix)
  • 1 tsp Baking Soda
  • 1 tsp Baking Powder
  • 2 tsp ginger
  • 1 tsp cinnamon
  • 1/2 tsp allspice
  • 150g butter or allergy free spread (I use Nuttelex)
  • 3/4 cup brown sugar
  • 2 – 3 Tbsp Maple Syrup or Golden Syrup
  • Drop vanilla
  • Pinch salt

Note: These make a light more-ish spices gingerbread cookie (as opposed to one denser and chewier). Maple syrup will provide a more delicate flavour, golden syrup a more traditional one. The flavour notes are easy to experiment with, you can add more ginger and a pinch of nutmeg. I’ve made these a lot as my daughter loves them and this is her favourite combination.

Allergies: dairy free*, gluten free*, soy free, egg free, nut free.

Directions

  1. Cream ‘butter’, sugar, maple (or golden) syrup, and vanilla.
  2. Add flour, baking soda, baking powder, salt, and spices.
  3. Knead everything together. It will gradually turn from breadcrumbs to a soft cookie dough. Add a little water if you need to but just a tablespoon at a time.
  4. Refrigerate for 30 – 60 mins. You can leave it in a ball or roll it out. It’s tempting to try cutting it but (and I speak from experience) it doesn’t work very well at room temperature.
  5. Preheat oven to 180’C while rolling out the cookies.
  6. Place cookies on a baking sheet / lightly oiled baking tray.
  7. Bake for 12-15 mins.
  8. Take out from oven and allow to cool briefly before placing on cooling rack to continue cooling.

Tip: If you want a fancy (and easy) dessert reserve some of the cookie dough. Serve balls of French vanilla ice cream with little balls of cookie dough and a warm gingerbread cookie.

Note: These cookies are soft coming straight out of the oven and will harden overnight. They are delicious either way. They also freeze well.

Gingerbread cookies with chocolate icing

Gingerbread cookies with chocolate icing

Butter bean dip

butter bean dip

Butter bean dip

This is a great way to use up leftover Butter Beans with Butter & Garlic. Serve it with freshly made bread, rice crackers, pita chips etc.

Ingredients

  • Sauteed butter beans with butter (or rice bran oil) & garlic
  • Natural greek yoghurt
  • Lemon juice (or a pinch or citric acid)
  • Optional: fresh herbs like parsley, chives, coriander.
  • Optional: for a Moroccan style dip: add 1 tsp ground cumin, 1 tsp paprika, and garnish with dukkah.

Note: Most of the ingredients for the dip have already been included when you cooked the beans; the flavour of the dip will be impacted by which optional extras you cooked with the beans (i.e. leek, shallots etc.)

Allergies: gluten free, soy free, egg free, nut free, dairy free*.

Directions

  1. In a bowl, mix natural greek yoghurt with a teaspoon of lemon juice (or a pinch of citric acid).
  2. Mash the beans.
  3. Mix the bean mash into the yoghurt mix.
  4. The dip is tangy with smokey notes. You can adjust the flavour, if desired, by slowly adding any of the following: lemon juice, olive oil, salt, maple syrup, chilli.
    • Just remember that it’s easy to add more of something but much harder to balance if you put too much of something in!
  5. Garnish with fresh herbs and serve with freshly made bread, rice crackers, pita chips etc.

Tip: You can fork mash these for a rustic blend or pop everything in a food processor to get it smooth.

Butter Bean Dip

Butter Bean Dip (rustic blend)

Butter beans (a baked beans alternative)

Butter beans with butter, leek, and garlic

Butter beans with butter, leek, and garlic. Grated parmesan. Choko noodles.

Don’t get me wrong, I loved baked beans as much as the next kiwi kid, but  the reality is that processed foods these days are often packed full of unnecessary sugar and salt. Hopefully Watties have changed their recipe since this damning article in 2009: “Wattie’s baked beans 420g: Although beans are good for you and packed with fibre, a can of baked beans has almost 30g of sugar. This is a low fat product and high in fibre, but does it require 1890mg of salt and 29g of sugar to make it taste good?”

Processed foods can also be a minefield for allergy families! Additionally, the reason for choosing vegetables like garlic, choko (chayote), leeks, and shallots for this recipe is because they’re low in naturally occuring food chemicals like salicylates, amines, and glutamates which is helpful for sensitive systems.

Don’t worry if you don’t have allergies – I’ve seen people post similar recipes simply because they don’t like baked beans or because butter + garlic can make anything awesome!

Tip: This recipe is also the basis of the easy to make Butter bean dip!

Ingredients

  • 400g tin of butter beans (rinse thoroughly)
    • You can substitute different beans according to taste. Like broad beans, these are quite large and hold up well in a wok without a sauce to simmer in.
  • Butter (or neutral oil, like Rice Bran Oil)
  • Garlic (crushed)
    • You can use garlic granules if you don’t have fresh.
  • Optional: leek (thinly sliced) or shallots (finely diced)
  • Optional: parmesan or grated cheese
  • Optional: cooked bacon (finely chopped)
  • Optional: choko (cheyote) as vegetable noodles.

Allergies: gluten free, dairy free*, soy free, egg free, noodle free.

Directions

  1.  Heat a frying pan (or wok) and melt butter. Lightly saute the garlic and any optional extras like leek or shallots.
    • Be careful not to over cook the garlic or you’ll get a distinctly smokey taste! (she says from experience…)
  2. Add the butter beans and cook until soft. You may need to add some extra butter while they are cooking.
  3. Serve topped with parmesan or tasty cheese if desired.


Choko noodles

  1. Use a vegetable peeler to remove the skin.
  2. Peel wide strips of the actual vegetable (the length of the choko).
  3. Add some more butter to the pan (after you’ve removed the butter beans) and fry the choko noodles until softened (they should still be slightly firm to the bite; not raw and not falling apart!). They will pick up the remaining garlic from the pan.


Superfood Coconut Cacao Smoothie

I used the Healtheries Ground Chia Superfood Blend Cacao & Coconut in the Gluten Free Wild Berry Chocolate Cake and wanted to see what it would be like in a smoothie. The result is creamy, delicious, chocolatey, and with the added nutritional benefits of chia seeds!

Ingredients

Allergies: gluten free, dairy free*, soy free, nut free*, egg free.

Directions

  1. Place everything in a high-powered blender and blend until smooth and creamy.
  2. Pour into a serving glass. Consider topping with a little coconut cream or greek yoghurt and sprinkle some cacao on top.

Wild berry chocolate cake (Gluten Free)

Wild berry chocolate cake (Gluten Free)

Wild berry chocolate cake (Gluten Free)

I love chocolate. I’ve posted a few chocolate recipes like the Crazy One Dish Chocolate Cake and the Chocolate Irish Potato Cake, and I’ve posted some make-from-scratch gluten free recipes like the Vanilla Cupcakes and the all natural pink berry flavoured icing. I wanted to play around in the kitchen with some different gluten free ingredients and make a wonderfully chocolatey and moist cake that also wouldn’t be packed with sugar – I prefer to balance my cakes so there’s more chocolate flavour in the cake and then extra sweetness in the (optional) icing. I liked my recipe for the gluten free Chocolate Cupcakes and used it as the basis for this cake!

Ingredients

Group 1

Group 2

  • 3/4 cup sugar
  • 3/4 cup Dutch cocoa powder
  • 1/2 cup superfine white rice flour
  • 1/2 cup garbanzo flour (also called chickpea flour)
  • 1T sweet (glutinous) rice flour
  • 1/4 cup cornstarch (cornflour)
  • 1/2 tsp guar gum
  • 1/4 tsp Baking Soda
  • 1/2 Tbsp Baking Powder
  • 1/2 tsp salt
  • 1/2 cup fresh or frozen mixed berries (i.e, raspberries, blueberries, blackberries, strawberries).
    • I like this paired with raspberries best!

Allergies: dairy free, soy free, gluten free, nut free.

Directions

  1. Preheat the oven to 180’C.
  2. Whisk together the ingredients in Group 1. This helps to aerate the mix. You can use a stick blender or I used the food processor (with a plastic mixing attachment, not a metal cutting blade!).
  3. Sift together the ingredients in Group 2.
  4. Mix the combined dry ingredients into the whisked liquid.
  5. Divide the mix between two cake tins (or similar). Bake at 180’c for approx. 25-30 mins or until cooked.
  6. Allow to cool before icing. Place one cake layer on serving dish. Cover with jam (i.e. you could have raspberries in the cake mix and then use raspberry jam), place the second cake layer on top, dust with icing sugar. Serve with cream or coconut ice-cream.

Tips

As an alternative you might want to bake this as a bundt cake and use a chocolate buttercream frosting.

Tamale Pie

Tamale Pie.jpg

Tamale Pie (gluten free!)

Tamale Pie is delicious! I’d never heard of it until I discovered it in Elizabeth Gordon’s The Complete Allergy-Free Comfort Foods Cookbook. Apparently it’s a Depression-era dish that’s considered a comfort food in the Southwestern United States. It’s warm, filling, serves a bunch of hungry people (or can be used over several nights), and is conveniently gluten-free. It’s also an awesome and economical dish for those that do eat gluten and just want to try something different from a traditional Shepherd’s Pie.

Ingredients

  • 4 1/2c water
  • 1 tsp salt
  • 1 1/2c quick-cooking polenta (fine cornmeal)
  • 350-450g beef mince (ground beef)
    • Or: turkey,  chicken.
  • 1/2 tsp cumin
  • 1/4 tsp chipotle powder
  • 400g tin of black beans (rinsed and drained)
  • 350-450g jar mild salsa
  • 1c grated cheese
    • Use Daiya vegan cheese if you need to be soy & dairy free.
  • Optional: 2nd jar of: salsa, or tomato passata, or basic tomato pasta sauce.
  • Optional: grated carrot, grated zucchini, finely sliced celery.
  • Optional: finely chopped ham or bacon.

Allergies: soy free, gluten free, dairy free*, egg free, nut free.

Note: You’ll see that there are a number of optional ingredients. Personally, I like to add in the extra vegetables so that I have a one dish meal. I also like to add in the extra tomato for flavour (you’ll need to spend more time simmering the mince in order to reduce the extra liquid). The cheese on top helps to flavour the polenta (and is just plain yum); Daiya is apparently affordable in the USA as an allergy-free vegan cheese but it very expensive in New Zealand. If you can’t use cheese, consider adding some light spices to the polenta that is going on top.

Directions

  1. Preheat the oven to 180’C.
  2. Bring the water and salt to the boil in a large pot. When the water is boiling, slowly stir the polenta in and keep stirring to prevent clumping. Stir until smooth and then turn heat to low; cook for 5 minutes.
  3. Remove the polenta from pot and spread half over the bottom of your pie plate or casserole dish.
  4. Heat up your frying pan (or electric wok in my case) and brown your mince; break it up as it cooks. Stir in the cumin, chipotle, and a pinch of salt.
  5. Add the beans + salsa. Also add any additional salsa/pasta sauce and vegetables that you are choosing to use.
  6. Continue cooking over a medium heat.If you are using a minimum of ingredients, you only need to cook until the edges start to bubble.
    • If you have added extra liquid and vegetables then, once the mix has started to bubble, reduce to a low-medium heat until the liquid has reduced and vegetables have started to soften.
  7. Pour the meat mixture on top of the polenta.
  8. Spread the remaining polenta on top. Sprinkle with cheese (if using).
  9. Cook for 20-25 mins at 180’C.
  10. Remove the pie from oven and let it cool for 10-15 mins before serving.
  11. Store lefovers, covered and refridgerated, for up to 3 days.

This slideshow requires JavaScript.

Baked Meatballs (easy to make)

Baked Meatballs

Baked Meatballs & Onion Rings

I haven’t made meatballs in the past; for some reason I thought they would be really tricky to make. I found these to be super easy and have now made them both in passata and oven baked. The two cooking styles create different textures – if you cook in oven they will be drier and denser (good to dip in an accompanying sauce) whereas meatballs cooked in passata they will have a softer, moister mouthfeel. Both ways are great!

This recipe will make a big batch of meatballs so feel free to halve it if desired (or to cook half in oven and half in passata to enjoy both styles!)

Tip: Baked meatballs are really just little round sausages (a great way to market them to toddlers) so they are easy to play around with flavours. Why not try Lamb & Cumin, Chicken & Cranberry, or Pork & Apple instead of the traditional Beef & Onion!

Ingredients

Meatballs

  • 150g breadcrumbs / gluten-free breadcrumbs / cooked quinoa
  • 3/4c milk / almond or rice milk
  • 600g beef mince (ground beef)
  • 1 small finely chopped onion
  • Optional: 1/2c parmesan cheese (powder or finely grated)
  • 1T ground chia seeds
  • Salt & pepper
  • Parsley (dried or finely chopped fresh)
  • Chives (dried or finely chopped fresh)
  • Garlic (dried granules or crushed fresh garlic)

Allergies: gluten free*, dairy free*, egg free, soy free, nut free.

Directions

  1. Preheat oven to 180’C.
  2. Soak the breadcrumbs in the milk until the liquid has been absorbed.
    • If you’re using cooked quinoa instead: put the quinoa in the mixing bowl for the next step and add the milk after the other ingredients are roughly combined (you may not need to add all the milk).
  3. In a large mixing bowl, add all of the meatball ingredients (including the soaked breadcrumbs). Mix until combined. The mixture will be a little sticky but should be thick and not overly wet.
  4. Lightly oil your hands and roll meatballs; I like to do lots of small ones (approx. 2T of meat mix). Sit the rolled meatballs on a sheet of baking paper (on an oven tray).
  5. Bake for 18-25 minutes (or until no longer pink in the middle).
  6. Serve as a snack with a dipping sauce, or serve with pasta sauce and spaghetti, gluten-free pasta, or rice noodles.