Butter bean dip

butter bean dip

Butter bean dip

This is a great way to use up leftover Butter Beans with Butter & Garlic. Serve it with freshly made bread, rice crackers, pita chips etc.

Ingredients

  • Sauteed butter beans with butter (or rice bran oil) & garlic
  • Natural greek yoghurt
  • Lemon juice (or a pinch or citric acid)
  • Optional: fresh herbs like parsley, chives, coriander.
  • Optional: for a Moroccan style dip: add 1 tsp ground cumin, 1 tsp paprika, and garnish with dukkah.

Note: Most of the ingredients for the dip have already been included when you cooked the beans; the flavour of the dip will be impacted by which optional extras you cooked with the beans (i.e. leek, shallots etc.)

Allergies: gluten free, soy free, egg free, nut free, dairy free*.

Directions

  1. In a bowl, mix natural greek yoghurt with a teaspoon of lemon juice (or a pinch of citric acid).
  2. Mash the beans.
  3. Mix the bean mash into the yoghurt mix.
  4. The dip is tangy with smokey notes. You can adjust the flavour, if desired, by slowly adding any of the following: lemon juice, olive oil, salt, maple syrup, chilli.
    • Just remember that it’s easy to add more of something but much harder to balance if you put too much of something in!
  5. Garnish with fresh herbs and serve with freshly made bread, rice crackers, pita chips etc.

Tip: You can fork mash these for a rustic blend or pop everything in a food processor to get it smooth.

Butter Bean Dip

Butter Bean Dip (rustic blend)

Butter beans (a baked beans alternative)

Butter beans with butter, leek, and garlic

Butter beans with butter, leek, and garlic. Grated parmesan. Choko noodles.

Don’t get me wrong, I loved baked beans as much as the next kiwi kid, but  the reality is that processed foods these days are often packed full of unnecessary sugar and salt. Hopefully Watties have changed their recipe since this damning article in 2009: “Wattie’s baked beans 420g: Although beans are good for you and packed with fibre, a can of baked beans has almost 30g of sugar. This is a low fat product and high in fibre, but does it require 1890mg of salt and 29g of sugar to make it taste good?”

Processed foods can also be a minefield for allergy families! Additionally, the reason for choosing vegetables like garlic, choko (chayote), leeks, and shallots for this recipe is because they’re low in naturally occuring food chemicals like salicylates, amines, and glutamates which is helpful for sensitive systems.

Don’t worry if you don’t have allergies – I’ve seen people post similar recipes simply because they don’t like baked beans or because butter + garlic can make anything awesome!

Tip: This recipe is also the basis of the easy to make Butter bean dip!

Ingredients

  • 400g tin of butter beans (rinse thoroughly)
    • You can substitute different beans according to taste. Like broad beans, these are quite large and hold up well in a wok without a sauce to simmer in.
  • Butter (or neutral oil, like Rice Bran Oil)
  • Garlic (crushed)
    • You can use garlic granules if you don’t have fresh.
  • Optional: leek (thinly sliced) or shallots (finely diced)
  • Optional: parmesan or grated cheese
  • Optional: cooked bacon (finely chopped)
  • Optional: choko (cheyote) as vegetable noodles.

Allergies: gluten free, dairy free*, soy free, egg free, noodle free.

Directions

  1.  Heat a frying pan (or wok) and melt butter. Lightly saute the garlic and any optional extras like leek or shallots.
    • Be careful not to over cook the garlic or you’ll get a distinctly smokey taste! (she says from experience…)
  2. Add the butter beans and cook until soft. You may need to add some extra butter while they are cooking.
  3. Serve topped with parmesan or tasty cheese if desired.


Choko noodles

  1. Use a vegetable peeler to remove the skin.
  2. Peel wide strips of the actual vegetable (the length of the choko).
  3. Add some more butter to the pan (after you’ve removed the butter beans) and fry the choko noodles until softened (they should still be slightly firm to the bite; not raw and not falling apart!). They will pick up the remaining garlic from the pan.


Superfood Coconut Cacao Smoothie

I used the Healtheries Ground Chia Superfood Blend Cacao & Coconut in the Gluten Free Wild Berry Chocolate Cake and wanted to see what it would be like in a smoothie. The result is creamy, delicious, chocolatey, and with the added nutritional benefits of chia seeds!

Ingredients

Allergies: gluten free, dairy free*, soy free, nut free*, egg free.

Directions

  1. Place everything in a high-powered blender and blend until smooth and creamy.
  2. Pour into a serving glass. Consider topping with a little coconut cream or greek yoghurt and sprinkle some cacao on top.

Making playdough insects (portable playgroup fun!)

Playdough and straw caterpillar

Making playdough insects

Why not spend a rainy afternoon making homemade playdough and designing your own insects (or animals, or monsters!). It’s a cheap activity that’s also easily transportable to playgroup. Younger toddlers will have fun pushing the legs in and pulling them out again; preschoolers will have fun making their designs happen. Think about putting out some library picture books to help give them ideas!

What you 

  • Playdough (try making your own!)
  • Straws
  • Scissors
  • Knife (bamboo or wooden ones are great!)
  • Optional: Googly eyes (from craft stores)

Wild berry chocolate cake (Gluten Free)

Wild berry chocolate cake (Gluten Free)

Wild berry chocolate cake (Gluten Free)

I love chocolate. I’ve posted a few chocolate recipes like the Crazy One Dish Chocolate Cake and the Chocolate Irish Potato Cake, and I’ve posted some make-from-scratch gluten free recipes like the Vanilla Cupcakes and the all natural pink berry flavoured icing. I wanted to play around in the kitchen with some different gluten free ingredients and make a wonderfully chocolatey and moist cake that also wouldn’t be packed with sugar – I prefer to balance my cakes so there’s more chocolate flavour in the cake and then extra sweetness in the (optional) icing. I liked my recipe for the gluten free Chocolate Cupcakes and used it as the basis for this cake!

Ingredients

Group 1

Group 2

  • 3/4 cup sugar
  • 3/4 cup Dutch cocoa powder
  • 1/2 cup superfine white rice flour
  • 1/2 cup garbanzo flour (also called chickpea flour)
  • 1T sweet (glutinous) rice flour
  • 1/4 cup cornstarch (cornflour)
  • 1/2 tsp guar gum
  • 1/4 tsp Baking Soda
  • 1/2 Tbsp Baking Powder
  • 1/2 tsp salt
  • 1/2 cup fresh or frozen mixed berries (i.e, raspberries, blueberries, blackberries, strawberries).
    • I like this paired with raspberries best!

Allergies: dairy free, soy free, gluten free, nut free.

Directions

  1. Preheat the oven to 180’C.
  2. Whisk together the ingredients in Group 1. This helps to aerate the mix. You can use a stick blender or I used the food processor (with a plastic mixing attachment, not a metal cutting blade!).
  3. Sift together the ingredients in Group 2.
  4. Mix the combined dry ingredients into the whisked liquid.
  5. Divide the mix between two cake tins (or similar). Bake at 180’c for approx. 25-30 mins or until cooked.
  6. Allow to cool before icing. Place one cake layer on serving dish. Cover with jam (i.e. you could have raspberries in the cake mix and then use raspberry jam), place the second cake layer on top, dust with icing sugar. Serve with cream or coconut ice-cream.

Tips

As an alternative you might want to bake this as a bundt cake and use a chocolate buttercream frosting.

How to make easy bracelets and crowns for kids

How to make easy bracelets and crowns for kids

How to make easy bracelets and crowns for kids

Kids are so wonderfully creative! There are lots of kit-sets for crafts at toy stores but it’s often much cheaper to visit a craft store or emporium.

All you need to make a crown, necklace, or bracelet is some pretty pipe cleaners, beads, and imagination! They’re a great activity for birthday parties, playgroups, and rainy days.

Fun things to do with beads!

Fun things to do with beads!

Make sure that you choose beads (or bells) with large enough holes for the pipe cleaners to feed through. Younger kids will need active supervision and assistance but by 4 years they’ll be shaking you off 🙂 You’ll also find they start coming up with their own ideas like making swords or funny glasses or monster crowns!

Warning: This isn’t suitable for babies and young toddlers due to small parts and choking hazards. Make sure young children are old enough to follow instructions and will not put beads in their mouths.

Tamale Pie

Tamale Pie.jpg

Tamale Pie (gluten free!)

Tamale Pie is delicious! I’d never heard of it until I discovered it in Elizabeth Gordon’s The Complete Allergy-Free Comfort Foods Cookbook. Apparently it’s a Depression-era dish that’s considered a comfort food in the Southwestern United States. It’s warm, filling, serves a bunch of hungry people (or can be used over several nights), and is conveniently gluten-free. It’s also an awesome and economical dish for those that do eat gluten and just want to try something different from a traditional Shepherd’s Pie.

Ingredients

  • 4 1/2c water
  • 1 tsp salt
  • 1 1/2c quick-cooking polenta (fine cornmeal)
  • 350-450g beef mince (ground beef)
    • Or: turkey,  chicken.
  • 1/2 tsp cumin
  • 1/4 tsp chipotle powder
  • 400g tin of black beans (rinsed and drained)
  • 350-450g jar mild salsa
  • 1c grated cheese
    • Use Daiya vegan cheese if you need to be soy & dairy free.
  • Optional: 2nd jar of: salsa, or tomato passata, or basic tomato pasta sauce.
  • Optional: grated carrot, grated zucchini, finely sliced celery.
  • Optional: finely chopped ham or bacon.

Allergies: soy free, gluten free, dairy free*, egg free, nut free.

Note: You’ll see that there are a number of optional ingredients. Personally, I like to add in the extra vegetables so that I have a one dish meal. I also like to add in the extra tomato for flavour (you’ll need to spend more time simmering the mince in order to reduce the extra liquid). The cheese on top helps to flavour the polenta (and is just plain yum); Daiya is apparently affordable in the USA as an allergy-free vegan cheese but it very expensive in New Zealand. If you can’t use cheese, consider adding some light spices to the polenta that is going on top.

Directions

  1. Preheat the oven to 180’C.
  2. Bring the water and salt to the boil in a large pot. When the water is boiling, slowly stir the polenta in and keep stirring to prevent clumping. Stir until smooth and then turn heat to low; cook for 5 minutes.
  3. Remove the polenta from pot and spread half over the bottom of your pie plate or casserole dish.
  4. Heat up your frying pan (or electric wok in my case) and brown your mince; break it up as it cooks. Stir in the cumin, chipotle, and a pinch of salt.
  5. Add the beans + salsa. Also add any additional salsa/pasta sauce and vegetables that you are choosing to use.
  6. Continue cooking over a medium heat.If you are using a minimum of ingredients, you only need to cook until the edges start to bubble.
    • If you have added extra liquid and vegetables then, once the mix has started to bubble, reduce to a low-medium heat until the liquid has reduced and vegetables have started to soften.
  7. Pour the meat mixture on top of the polenta.
  8. Spread the remaining polenta on top. Sprinkle with cheese (if using).
  9. Cook for 20-25 mins at 180’C.
  10. Remove the pie from oven and let it cool for 10-15 mins before serving.
  11. Store lefovers, covered and refridgerated, for up to 3 days.

This slideshow requires JavaScript.

Bedazzling bags (rainy day crafts)

Bedazzling bags (rainy day crafts)

Bedazzling bags (rainy day crafts)

This is a great way to pass a rainy day – especially since a trip to the craft store will take up time as well! It’s also a fun activity for playgroups!

What do I need?

This is really up to your imagination!

  • Coloured paper bags
  • Glue (You may need a mix of paste, PVA, and a glue gun depending on what you’re using)
  • Wooden clips
  • Scissors
  • Buttons, sequins, stickers, fabric, wooden beads etc!

Directions

Play around with your materials to find a look that you like and start gluing!

These have wooden ladybugs hot-glued to the wooden clips. The flower is layered; there are plastic petals glued to the bag and then a fabric flower glued on top of that.

Ancient Grains Bread (soft & fluffy!)

Ancient Grains Bread

Ancient Grains Bread

To make a 750g loaf. This was delicious with home made peanut butter.

Ingredients

  • 290ml water
  • 2T oil (I use rice bran oil)
  • 1 1/2 tsp salt
  • 2T sugar
  • 3c bread flour
  • 2 T mix of:
    • Linseed
    • Pumpkin Seeds
    • Sunflower Seeds
    • Buckwheat
    • Puffed Quinoa
    • Coconut Thread
    • *You can mix this yourself or Hubbards conveniently sell a Seeds & Ancient Grains Mix
  • 2T milk powder
    • Baby formula also works and has the benefit of fortifying it with added vitamins & minerals!
    • Can replace with Almond Milk powder or Coconut Milk powder.
  • 3 tsp bread improver yeast

Allergies: soy free, egg free, dairy free* nut free.

Directions

  1. Put everything into the breadmaker in order listed. Select Dough only.
  2. When it finishes, select Dough only again so that it goes through another knockdown/rising cycle.
  3. Take out dough, knead for a couple of minutes, and place in bread tin. Let it rise while oven heats.
  4. Heat oven to 220’C.
  5. Bake at 220’C for 10 minutes, then at 180’C for 30 minutes; you may want to lower the oven tray when you turn the temperature down. I also recommend removing the loaf from the bread tin for the last 5-10 mins of cooking to allow even browning along the base.
  6. Bread should sound ‘hollow’ if you take it out of the tin and knock on the bottom.

Note: This will not turn out the same if you simply cook it in the breadmaker (it will be okay but not amazing) because the bread is contained by the size of the breadmaker and you can’t vary temperature and distance from heat.

Tip: A longer rising time will result in fluffier bread. I have sometimes done 4 knockdowns (two lengthy and two short) and 4 rising times meaning that the bread with 4-8 hours of ‘proofing’ before baking. Gluten based bread loves getting knocked around; all that kneading and rising helps to elasticate the dough and allows the gluten + yeast to work together to create tiny air bubbles.

If you’re interested in the chemistry of breadmaking check out this great post from Serious Eats.

Did you know? A commercial bakery will go from start to bag in 3 hours or less when making bread; traditional methods (and sourdoughs) take 18-25 hours. One theory behind rising numbers of gluten sensitivity and celiac disease is our move away to industrialized baking; a longer rising time results in decreased gluten proteins as they break down and change. It’s something to think about if you’re considering decreasing gluten in your diet.

Ancient Grains Bread

Ancient Grains Bread

What are turbinates and why do they need surgery to reduce them? (Are you sleeping badly? This may be why!)

What do swollen turbinates look like

What do swollen turbinates look like

If you’ve never heard of turbinates before then you’re not the only one! As long as they’re working well then the subject is unlikely to ever come up; they are also not something that your regular doctor (GP) is able to review – finding out there’s a problem first requires a referral to an Ears Nose Throat (ENT) specialist because of the symptoms you are experiencing.

Your turbinates can have a surprisingly large impact on your quality of sleep; this is especially true in young children and the problems are even more exacerbated if they also have troubles with their ears, adenoids, and tonsils.

What are turbinates?

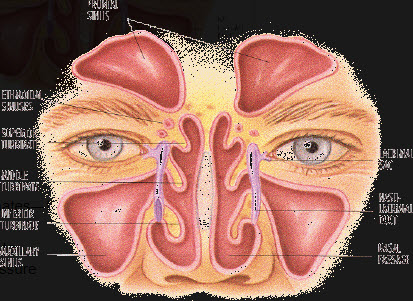
Turbinates are bony structures (covered in moist tissue called the nasal mucous membrane). Inside your nose there are three sets of turbinates: upper (superior), the middle, and the lower (inferior).

Lateral nasal airway

Lateral Nasal Airway: Turbinates, Adenoids, Eustachian Tube Opening

Why do we need turbinates? What do turbinates do?

The turbinates have several important functions:

  • Help warm and moisturize air as it flows through the nose.
  • Protect the openings into your paranasal sinuses.
  • Help create airflow through your nose (important for your sense of smell!).
  • Trap micro-organisms (like viruses) and pollutants (like pollen).
  • Help the voice to resonate (i.e. they affect how we sound).
  • Produce mucous to help clean out the nose and assist the cilia in their work.
  • Help to regulate pressure in the sinuses.
  • Help the nose and sinus cavities to drain.
  • The turbinates play an important mechanical function when we sleep.  When you sleep on the right side, with the right turbinate down, over time the right turbinate fills up with fluid and expands so that it pushes against the septum; this makes you turn on the left side until that side fills up and turns you again. If the turbinates are not functioning correctly then you may wake up feeling cramped and sore with achey muscles.
Turbinates and sinus cavities

Feeling the pressure? Healthy turbinates help regulate pressure and drainage of the sinus cavities.

What causes turbinates to swell?

One of the most common causes of swollen turbinates (turbinate hypertrophy) are airborne allergies (allergic rhinitis) such as grass or weed pollen, birch tree pollen, or dust mites.

Other causes can include repeat upper respiratory infections, hormones, drugs, medication (i.e. as a complication from long-term nasal spray use).

Healthy inferior turbinate

Healthy inferior turbinate – you can see quite clearly that there is a tunnel for air to flow freely past the turbinates.

Swollen turbinates

Swollen turbinates – you can see how they have swollen and are bulging out across the airway to the nasal septum.

What are the possible side effects of swollen turbinates?

  • Stuffy nose
  • Headache
  • Facial Pain
  • Pressure (often in forehead). In young children this may result in behavioural issues, trouble concentrating, or head banging.
  • Nasal drip
  • Loss of Sense of Taste and/or Smell
  • Mouth breathing, noisy breathing, and/or snoring. This is especially problematic if adenoids and/or tonsils are also swollen and obstructive sleep apnea develops.
  • Fatigue. Children might seem like they’re getting enough hours of sleep but in reality the quality of sleep is poor because their body is struggling to get enough oxygen through the night. It’s a bit like starting each day on a half tank of gas.
  • Sore, cramped, achey muscles in the morning. Healthy turbinates play an important mechanical function when we sleep; they are key to helping us unconsciously change which side we are sleeping on through the night.
  • Developmental delays. Sleep is critical for young children. During those early years, they are rapidly growing and learning. They need sleep to focus during the day; to have time for their brain to make connections between all the things they have learned or experienced; and their brain releases a growth hormone while they sleep. Poor sleep, fatigue and pain/discomfort, trouble hearing: these can make it harder for them to stay on track.
  • Behavioural difficulties. Poor sleep, fatigue and pain/discomfort, trouble hearing: these can result in daily misery that children don’t know how to express.

Why do turbinates need surgery?

An Ears Nose Throat (ENT) specialist will be able to examine the interior of the nose quickly and painlessly during outpatient appointments; they may also opt for imaging scans such as x-ray or CT.

It is likely that they will suggest trying non-invasive means initially to see if this reduces the swelling, This is likely to involve a steroidal nasal spray and anti-histamine medication (in the case of allergic rhinitis). They may also recommend additional saline spray / drops to help keep the nose irrigated, or using a humidifier.

If these options do not work an symptoms have not been alleviated then they are likely to recommend surgery. Note: it is important that turbinates are reduced (not removed) and they will slowly regrow; in order for them not to become swollen again, any other underlying issues must still be addressed.

What does turbinate reduction surgery (turbinoplasty) involve?

Turbinates perform highly important functions and removing them entirely can cause a raft of new issues; surgeons will normally opt to reduce the turbinates. There are different methods that can be used; some remove tissue and others aim to shrink them through other means.

A procedure called submucosal resection is a common technique used to treat enlarged turbinates. With this procedure, the lining of the turbinate is left intact, but the “stuffing” from the inside of the turbinate is removed. As the turbinate heals, it will be much smaller than before surgery. Sometimes, this resection can be performed with a device called a microdebrider. This device allows the surgeon to remove the “stuffing” through a small opening in the turbinate. In some instances, more of the turbinate is removed.

Some of these methods shrink the turbinates without removing the turbinate bone or tissue. These methods include cauterization, coblation, and radiofrequency reduction. In each of these methods, a portion of the turbinate is heated up with a special device. Over time, scar tissue forms in the heated portion of turbinate, causing the turbinate to shrink in size.

Turbinoplasty is generally an outpatient procedure performed under general anaesthetic and patients can go home the same day.

Want to find out more about surgery or risks? The American Rhinologic Society has useful information.

What happens after surgery?

You can expect to have pain, fatigue, nasal stuffiness, and a clear fluid nasal discharge for several days after surgery. If this was the only surgery being performed then pain is generally mild  and typically well controlled with pain medications. A saline spray and/or steroidal nasal spray are likely to be recommended to use for several weeks after the surgery.

Swelling as a result of the procedure means that there may still be snoring for a week or two after the surgery, as well as a general feeling of stuffiness. The fluid discharge will generally begin to improve and crust after the first week.

Patients may be off school or work for a week and are recommended to avoid strenuous activity for two to three weeks afterwards.