Writing with phonics: Short vowel ‘a’.

SAT (short vowel ‘a’)

Today’s word is brought to you by Miss 5 and the colour pink!

Learning to read and spell with phonics

Classrooms around the world take all kinds of different approaches to learning to read, write, and spell. In New Zealand, research studies (McNeill & Kirk, 2014) found that most teachers did not teach their students phonemes, how to spell phonologically, sound-letter relationships, or spelling patterns. Understanding how to decode language is especially important for children with special learning needs, such as dyslexia and auditory processing disorder, as they require an explicit understanding of these topics (exposure to print media and general literacy is not enough to create an implicit understanding or ‘osmosis’ effect).

It is important to teach a phonological awareness of each alphabet sound (what ‘sound’ does the letter make). A good place to start can be putting a light coating of shaving foam in a flat tray and tracing the upper case letter with your finger while making the accompanying sound. After modelling, encourage the student to make 3-5 attempts. Speculate together what words might start with that sound. Tip: If dyslexia is indicated or they are struggling to distinguish letters, focus on capital letters as these are easier to differentiate visually.

When moving onto words, a good place to start is with short vowel ‘a’ as several phonics words families can be taught together. It’s common to start with CVC words [consonant-vowel-consonant].

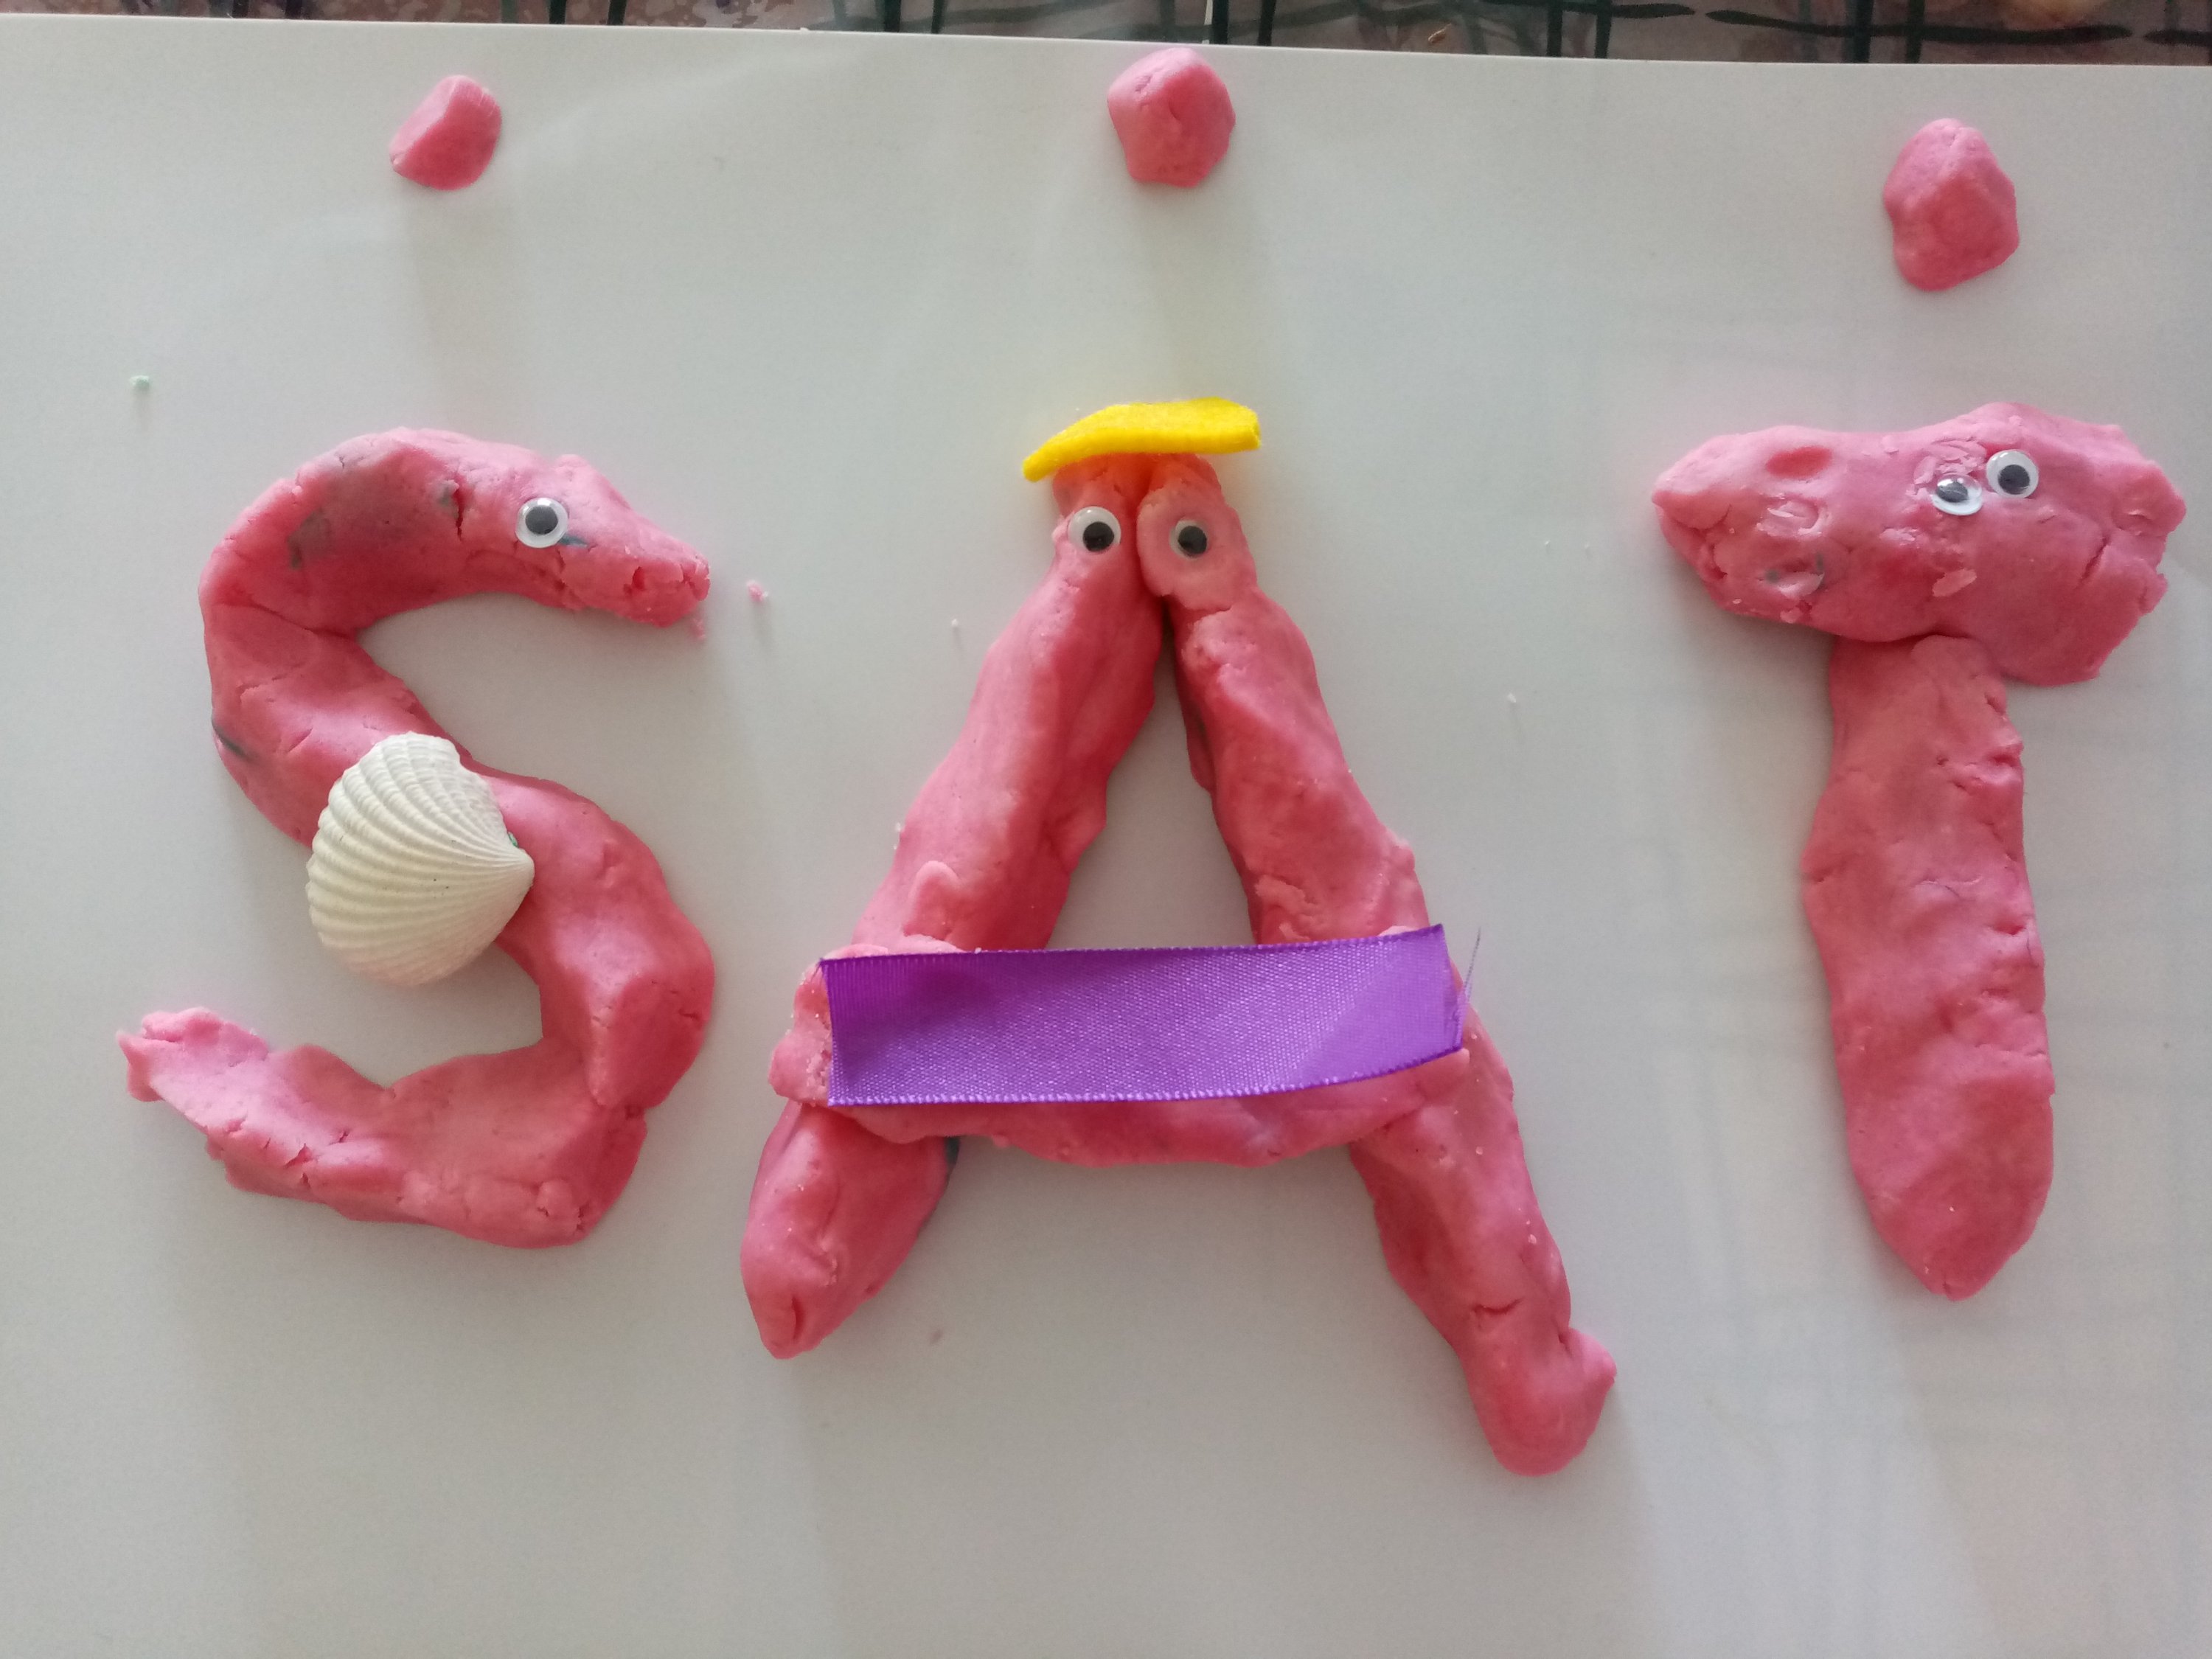
When teaching an explicit awareness of phonemic awareness, ‘SAT’ is composed of: 3 letters, 1 syllable, and 3 phonemes. Within the -at phonically decodable word family are multiple words that have the same onset-rime.

Syllable: A unit of sequential speech sounds containing a vowel and any consonants preceding or following that vowel. (Henry, 2010. p.314)

Phoneme: The smallest unit of sound that conveys a distinction in meaning. (Henry, 2010, p.312).

Onset-rime: The onset is the initial consonant or consonants within a syllable. The rime is the vowel and any consonant that follows, within the syllable. (Nicholson & Dymock, 2015.p.87)

-at words

  • cat
  • fat
  • sat
  • hat
  • mat
  • rat
  • bat

-an words

  • can
  • fan
  • man
  • ran
  • van
  • tan
  • pan

-ap words

  • tap
  • cap
  • gap
  • lap
  • nap
  • map
  • zap

-am words

  • jam
  • ham
  • Sam

High frequency words

  • a
  • can
  • and
  • I
  • see

Activities to try

Playdough letters

Make or buy laminated upper case letter mats. Ask the student to help you make each of the letters needed to make one of the CVC words above. While making the letter, explain that there is a sound that matches the letter and model making it,

When the word is complete, show how to sound out the letters to make the word.

Silly Spelling

Using toys, containers, or pictures drawn on paper, create a ‘treasure chest’ for real words and a ‘rubbish bin’ for fake words.

Use 3D letters to make one of the words above; let’s use CAT as an example. Demonstrate how to sound out the letters. Ask the student if they think it is a real word or fake word. Write CAT on a strip of paper and place it in the treasure chest.

Ask the student to remove the first sound [C] and swap it for a different one. Let’s say they add ‘L’. Ask the student if they think LAT is a real word or fake word. Write LAT on a strip of paper and place it in the rubbish bin.

Explicitly discuss how the end sound (-at) is staying the same and ask if they can think of any words that rhyme with CAT. Demonstrate with another word such as HAT.

Jumbled Words

For some learners, it can be difficult to focus on ‘flat’ worksheets and working with kinaesthetic 3D letters can be more helpful. If the entire alphabet is placed in front of them and they are asked to spell RAT this may be visually overwhelming. Try scaffolding the activity:

Level 1: Have the word (and a picture) on a card in front of you. Model spelling the word with the 3D letters and sounding out each letter. Point out that you are matching the letters with the order on the card.

Level 2: Place on the letters that are needed in front of you. Explain to the student that you were trying to write [MAT] but the letters got muddled. Sound out the letters in the word and ask the student if they can put the letters in the right order to match the sounds.

Level 3: Place five letters in front of you. Advise the student that you feel they know the word [MAT] so you have a game that is a little harder. Explain that three of the letters are needed to spell the word and two of the letters are tricks. Sound out the letters in the word and ask the student if they can put the letters in the right order to match the sounds.

You might find that they identify the correct letters but place them in the wrong order. Praise them for finding the right letters and help place them in the correct order. Teach them that there is a pattern that they can learn for this phonic word family. Show them how the -at words they have been learning all have -at at the end and only change the beginning letter.

Phonics Strips

Create your own sliding phonics strips. These are a great visual activity for showing how changing a phoneme can alter the word.

Phoneme Boxes

Show students how to chunk words into their individual phonemes by using phoneme boxes. Explicitly discuss the difference between the number of letters that a word has and the number of sounds that a word has.

Students are likely to begin with CVC words where there are three letters and three sounds. The English language is full of all kinds of oddities (with its blend of Anglo-Saxon, Romance languages, and Greek roots). They will go on to encounter words like M|OO|N which has 4 letters / 3 phonemes; or CL|O|CK which has 5 letters / 3 phonemes.

It can be helpful to pick up a visual phoneme chart that shows all 44 sounds of spoken English and gives examples of their use.

Easy Christmas Gifts for Kids to make

Upcycled tin cans can make all kinds of things!

Upcycling tin cans is a great way to get kids involved in Christmas gift giving (and it’s cheap!). They can be filled with craft projects, candy canes, coins, colouring pencils or pens, or seeds for the spring!

Whether you’re homeschooling, or just enjoy learning with the kids, it’s easy to integrate S.T.E.A.M. into this project. Skip to the end for ideas!

Materials

  • 420g tin can (15oz), empty, washed, and dried.
  • Scrapbooking paper
  • Measuring tape (dressmakers)
    • OR string.
  • Pencil
  • Ruler
  • PVA glue (white glue)
  • Scissors

Directions

  1. Prepare your tin can. Tip: Choose one where your can opener left smooth edges! Remove the old label (warm water can help).
  2. Select your scrapbooking paper.
  3. Use a flexible dressmakers tape to measure the circumference and height of your can (or a piece of string which you can lie against a ruler).
  4. Once you have your measurements, mark out a rectangle on your paper. I like to add several centimetres (an inch) to the length and height of what I’m going to cut out as this allows a margin of error and means you can do a pretty fold at the top.
  5. Wrap the paper around the tin can and make sure the pattern will align correctly with how you plan to orient the tin. When you’re ready do a vertical line of PVA glue (the residue of the old glue will give you an idea of how wide you want to spread your glue). Wrap the paper around and smooth it down. Add more glue where the end of the paper meets and overlaps the start of the paper.
  6. If you’ve allowed an overlap at the top, cut a vertical slit (to the metal edging) at the four compass points. Apply glue to the inside of the paper and then fold down smoothly into the can.
  7. Once the glue is dry, you can fill it with all kinds of things!

Learning through play

Maths

  • 3D Shapes: Cylinders can both stack and roll. Compare this with other 3D shapes like a sphere (ball) or a cube (dice).
  • Measurement: Curved surfaces can be more challenging to measure – we can use a flexible piece of string to wrap around the cylinder and then lie it flat against a ruler or piece of paper. The curved face of the cylinder will transform into a rectangle when it’s drawn.

Fine Motor Skills

School skills are being practised with cutting and gluing. A fun way to practice fine motor skills is to fill the finished can with pom-poms and then fish them out with mini-tongs.

Creativity

As well as choosing pretty scrapbooking paper, you could use a hot glue gun to add ribbons, lace, colourful buttons, and all kinds of things to your creation! Googly eyes and a marker pen make an easy face and then stand pipe cleaners / chenille sticks in the tin as hair.

Home Science: Make a colour changing magic potion!

These colour changing molecules can be changed from indigo to brilliant blue or bright pink with a few simple experiments!

Pigments are molecules that contain colour and the ones in red cabbage juice ( anthocyanin ) are pretty special. By adding a base or acid, we can both change their shape and their colour! The pigments are easy to collect and the basis for two easy home experiments: Colour Changing Magic Potions and Making Litmus Paper.

First, you will need to collect some magic molecules from a red cabbage: click here to find out how.

Materials

Change your purple cabbage juice to blue by adding a base and to red/pink by adding an acid.

Directions

  1. Pour your prepared red cabbage juice into two clear glasses or small bowls.
  2. Into one glass, stir 1 tsp of baking soda. Watch the solution turn blue – indicating that the pH has turned basic.
  3. Into the second glass, stir 3 Tbsp of white vinegar. Watch the solution turn red/pink – indicating that the pH has turned acidic.
  4. For fun, pour the glass containing vinegar into the glass containing baking soda and watch them foam! Tip: for less mess, pour both solutions into a big bowl!
Foaming magic potion fun!

Home Science: Making Litmus Paper

Make your litmus paper to test acids and bases – it’s easy!

You don’t need expensive chemistry kits containing dangerous chemicals to have fun doing science at home. This simple (and colourful) experiment will help you make you own litmus paper so that you can test acids and bases using simple household ingredients. You can also test these by making a colour changing magic potion!

First, you will need to collect some magic molecules from a red cabbage: click here to find out how.

Materials

  • Red cabbage juice
  • Paper towels
  • Water
  • Dishwashing Liquid
  • Lemon juice
  • Baking Soda
  • Baking Powder
  • Vinegar
Making home made litmus paper
Home-made Litmus Paper

Directions – Part 1

  1. You will need your red cabbage juice (cooled and strained) and some paper towels. I folded mine twice to make thick squares.
  2. Quickly dip / submerge the paper towels into the red cabbage juice. Don’t hold them under for too long as you want them to collect the colour pigments but not get so soggy that they fall apart. It’s a little like candle dipping – you may need to do a couple of dips to get a good colour.
  3. Place the purple paper towels on a clean tray (that won’t stain) and put them somewhere warm (like the hot water cupboard) to dry until the next day.
  4. You now have litmus paper! Cut them into strips for easy dipping.
Testing Acids and Bases

Directions – Part 2

  1. Using glasses or small bowls prepare the solutions that you want to test. Your litmus paper will stay purple in ph neutral solutions, turn red-pink in acidic solutions, and turn blue in basic solutions.
  2. Dip away!

We used:

Bases: soapy water, baking soda, baking powder.

Acids: vinegar, lemon juice.

Don’t worry if your experiment doesn’t go perfectly (ours didn’t!); simply use it as a talking point to discuss why things didn’t turn out as expected. In our case, the detergent and baking powder didn’t dissolve properly which meant that out litmus paper stayed purple (recognising the ph neutral water). For more ideas on common acids and bases: click here.

Home Science: Making Magic Molecules

These colour changing molecules can be changed from indigo to brilliant blue or bright pink with a few simple experiments!

Pigments are molecules that contain colour and the ones in red cabbage juice ( anthocyanin ) are pretty special. By adding a base or acid, we can both change their shape and their colour! The pigments are easy to collect and the basis for two easy home experiments: Colour Changing Magic Potions and Making Litmus Paper.

Materials

  • 1/2 red cabbage
  • Hot water
  • A food processor (or a big pot)
  • Bowl
  • Fine colander or flour sieve
Simply blending the red cabbage in boiling water produces amazing bubbles!

Directions

  1. Shred or coarsely chop the red cabbage.
  2. You can then choose whether to boil or blend. I chose blending and it’s meant to result in slightly better colour.
    • Boil: Pop in a pot with enough water to cover the cabbage and boil for 15 minutes.
    • Blend: Pop in a food processor with about 3 cups of boiling / hot water. Blend until the cabbage is finely processed and then leave to soak for 15 minutes.
  3. Allow the cabbage mixture to cool and then strain the juice into a bowl. Tip: The juice will stain so glass is great if you have it. I used a flour sieve to strain mine into a glass pyrex jug.

You now have the cabbage juice you need for your two science experiments!

Added Extras

You can also freeze leftover juice in ice cube trays to make all natural coloured icing for birthday cakes or cupcakes!

Cheesy Oat Muffins

Cheesy Oat Muffins

These delicious muffins have protein, calcium, fibre and are delicious served warm with butter or dipped into winter soup.

Ingredients

Allergies: soy free, egg free*, nut free.

Directions

  1. Start the oven pre-heating to 180’C / 350’F and grease the muffin pans.
  2. Whisk the eggs, milk, and oil.
  3. Add the salt, sugar, and oats.
    • Tip: If you prefer a fine texture to your baking, use an electric hand beater to combine. This will help to break the oats into a finer texture (without demolishing them into oat flour).
  4. Add the wheat bran, wheat germ and cheese. Sift in the flour and baking powder. Mix well to combine.
  5. Spoon the muffin mix into the greased muffin trays and pop into the pre-heated oven.
  6. Bake for 25-35 mins until the muffins are cooked through (test with a knife or skewer to see that it comes out clean).
  7. Allow muffins to cool on a wire rack.

These are brilliant served warm with butter and are still lovely for breakfast in the morning. Consider freezing leftovers to heat up as needed.

Caramel Crunch Cookies

Caramel Crunch Cookies

These delicious crunchy cookies are also a great opportunity to discuss science in the kitchen! STEM discussion points follow after the recipe 🙂

Ingredients

  • 125 butter
  • 1/2 brown sugar
  • 1 Tbsp maple syrup or golden syrup
  • 1 Tbsp milk
  • 1 1/2 cups plain flour
  • 1 tsp baking soda

Allergies: soy free, egg free, nut free.

Directions

  1. Start the oven preheating to 180’C / 350’F.
  2. Have a grown up mix the butter, sugar, maple syrup, and milk in a pot. Heat until the butter is melted and the mixture is almost boiling – you’ll be able to see the surface tension change as it begins to think about bubbling. Make sure that you stir constantly so that it doesn’t stick or burn.
  3. Remove from heat and allow the caramel to cool to lukewarm.
  4. Sift the flour and baking soda into the pot and mix into the caramel.
  5. Stir well and it will turn into a caramel coloured cookie dough.
  6. Roll the cookie dough into balls and flatten on a baking tray (either greased or lined with baking paper).
  7. Bake for 10-15 mins or until golden brown.

Science in the Kitchen (STEM)

  1. Gravity & Weight: When you’re using kitchen scales to measure out the butter, take a few moments to talk about why things have weight and why we weigh them. That butter would weigh about 20g on the Moon and about 315g on Jupiter.
  2. Solids, Liquids, Gas: It’s a good idea to have a grown up do the stirring with the caramel mixture as it gets very hot; keep young helpers interested by helping them to safely view the way the ingredients change. Ask them if the butter and sugar going into the pot are liquids or solids (the latter); then show them what happens when heat is applied (becomes liquid); as the mixture cools and is combined with the flour it’s state changes again (solid).
  3. Gassy Bubbles: Ask young helpers what’s different about the ingredients in this recipe. The answer is that it uses baking soda rather than baking soda. The baking soda causes small carbon dioxide gas bubbles in the cookie mix causing it to rise when it goes into the hot oven. Tip: Get the cookies in the oven quickly as the longer the mix is left at room temperature, the less the cookies will rise.
  4. Sweet Surprise: A great way to see baking soda in action is to make a candy version of these cookies. Have a go at making Hokey Pokey!

How to make kefir ice cream

Probiotic + prebiotic kefir ice-cream. Tasty, low in lactose, high in calcium.

Ingredients

  • 1 large frozen banana
  • 150g kefir
    • I used The Collective Blueberry Hemp Kefir. The hulled hemp seeds + chicory root help to add some prebiotic fibre to go with the probiotic kefir. Tip: Another option is to mix in 1Tbsp of ground linseed.

Allergies: soy free, gluten free, egg free, nut free.

Directions

  1. Slice up the banana and freeze the slices.
  2. Blend the frozen banana and kefir until smooth.
  3. Serve and eat immediately. The consistency is like soft-serve ice-cream.

Chocolate Peanut Butter Cookies

Chocolate Peanut Butter breakfast cookies


These are more of a crisp or crunchy cookie that can be eaten on the run or dipped in yoghurt as a breakfast cookie; or topped with a thin layer of Nutella for the lunchbox. They are comparatively low in sugar with good amounts of fat, fibre, and protein. For a soft and chewy version, try these vegan Peanut Butter Cookies.


I note that the peanut butter used contains only two ingredients: peanuts + salt. It’s also easy to make peanut butter at home as an alternative to commercial brands containing sugar, molasses, and hydrogenated oils.

Ingredients

  • 2c flour
  • 1/4 cup almond meal
  • 1/4 cup fine oats (i.e. Milk Oaties or Instant Porridge)
  • 1/2 cup crumbled Weetbix
  • 3 Tbsp Dutch Cocoa
  • 1/2 tsp salt
  • 1 tsp Baking Powder
  • 1 tsp Baking Soda
  • 1 Tbsp apple cider vinegar
  • 2 eggs
  • 1 tsp vanilla essence
  • 1/2 cup coconut oil
  • 3/4 cup brown sugar
  • 3/4 cup smooth peanut butter
  • 1/4 cup milk (or rice milk)

Allergies: soy free, dairy free*.

Directions

  1. Preheat oven to 180’C / 360’F.
  2. In a large mixing bowl, combine all ingredients. I prefer to add all the dry ingredients, and then in mix in the wet ingredients.
  3. Knead everything together. It will gradually turn to a soft cookie dough. 
  4. Roll the dough into small balls and lightly flatten (with a fork or fingers).
  5. Place cookies on a baking sheet / lightly oiled baking tray.
  6. Bake for 15-18 minutes or until cookies begin to brown.

Peanut Butter Cookies (Vegan)

Peanut Butter Cookies (Vegan)

Peanut Butter Cookies (Vegan). Free from dairy, egg, and soy.

These are a soft chewy peanut butter cookie with a hint of chocolate that went down very well with an audience of young taste testers. They are comparatively low in sugar with good amounts of fat, fibre, and protein. For a crunchier cookie try these Chocolate Peanut Butter breakfast cookies.

I note that the peanut butter used contains only two ingredients: peanuts + salt. It’s also easy to make peanut butter at home as an alternative to commercial brands containing sugar, molasses, and hydrogenated oils.

Ingredients

  • 2c flour
  • 1/4 cup almond meal
  • 1/4 cup fine oats (i.e. Milk Oaties or Instant Porridge)
  • 2 Tbsp Dutch Cocoa
  • 1/2 tsp salt
  • 1 tsp Baking Powder
  • 1 tsp Baking Soda
  • 1 Tbsp apple cider vinegar
  • 2 Tbsp Orgran egg replacer + 4 Tbsp water
    • OR: 2 flax eggs
    • OR: 2 eggs
  • 1 tsp vanilla essence
  • 1/2 cup coconut oil
  • 3/4 cup brown sugar
  • 3/4 cup smooth peanut butter
  • approx. 100g apple puree
    • TIP: baby food pouches or tins are an easy way of adding fruit puree to baking recipes.

Allergies: soy free, dairy free, egg free.

Directions

  1. Preheat oven to 180’C / 360’F.
  2. In a large mixing bowl, combine all ingredients. I prefer to add all the dry ingredients, and then in mix in the wet ingredients.
  3. Knead everything together. It will gradually turn to a soft cookie dough. 
  4. Roll the dough into small balls and lightly flatten (with a fork or fingers).
  5. Place cookies on a baking sheet / lightly oiled baking tray.
  6. Bake for 12-15 minutes or until cookies begin to brown.